
Platform reference: this article follows the Rockchip RKNN2 SDK V2.5.0 Development Guide, including only the SoCs, Linux/Android Runtime and Toolkit combinations stated by the source. Features apply under the chip, SDK, driver and kernel conditions in each section, not automatically to every ArmSoM board. Check the actual ArmSoM BSP, NPU driver, Runtime and model versions before deployment. No ArmSoM hardware validation was performed; logs, performance figures and examples belong to the source.
Sources and proofreading: Chinese follows Chinese V2.5.0 (182 pages); English, Russian and German follow English V2.5.0 (208 pages). Source-specific technical information is retained; older-version content is not presented as new-version fact. Chinese figures come from the Chinese PDF; EN/RU/DE figures come from the English PDF, including separately extracted vector flowcharts. Original section and equation numbers remain. Some source cross-references still use old chapter numbers; dynamic-shape capacity examples contain “1224+140=264”, TP_NORM support statements conflict, and names such as init()/rknn.val_perf() differ from later API descriptions. These source issues are retained and require checking against actual V2.5.0 SDK headers/API references before execution. Code and parameters remain; PDF wrapping and table continuations are repaired.
RKNN2 SDK V2.5.0 · 19/22
1. Software stack and core concepts
2. Environment, versions and board connection
3. Development workflow and interface selection
4. Model conversion and ONNX editing
5. Quantization, hybrid quantization and QAT
6. Inference, accuracy, performance and memory evaluation
7. Runtime lifecycle, layouts and memory
8. Zero-copy interfaces and I/O constraints
9. C API deployment and code generation
10. Toolkit Lite2 Python deployment
11. Matmul API and matrix layouts
12. NPU multicore configuration and performance
13. Dynamic-shape models and deployment
16. Cache coherency and sparse inference
17. Custom operators: Python and C API
18. Encrypted model deployment
Accuracy troubleshooting
20. Performance analysis and network optimization
21. Memory analysis, sharing and reuse
22. FAQ, error handling and references
5. Troubleshooting and Optimization
5.1 Accuracy Troubleshooting
Model accuracy issue troubleshooting is generally carried out from two aspects: simulator accuracy troubleshooting and board-side runtime accuracy troubleshooting. Correct simulator inference results are the prerequisite for correct board-side runtime inference. Therefore, it is essential to first ensure that the simulator inference results are correct, and then troubleshoot board-side runtime accuracy issues. Overall, follow the progressive troubleshooting flow of “simulator FP16 accuracy → simulator quantization accuracy → board-connected accuracy → runtime accuracy”, where the correctness of each preceding stage is the prerequisite for the correctness of the next stage.
Therefore, this chapter provides troubleshooting suggestions and solutions for the two aspects of simulator accuracy troubleshooting and runtime accuracy troubleshooting. The following figure shows the specific troubleshooting steps:
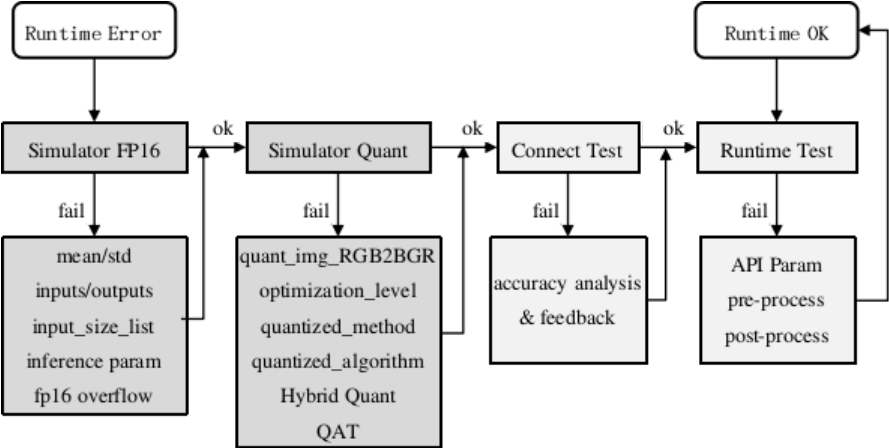
Figure 5-1 The step of accuracy analysis
Simulator accuracy troubleshooting is mainly divided into two sub-steps: simulator FP16 accuracy troubleshooting and simulator quantization accuracy troubleshooting (the dark-colored boxes in the above figure).
Runtime accuracy troubleshooting is mainly divided into two sub-steps: board-connected accuracy troubleshooting and runtime accuracy troubleshooting (the light-colored boxes in the above figure).
Cosine distance can be used as the basic criterion for judging accuracy, but the final impact of quantization on accuracy still needs to be validated on the dataset.
5.1.1 Simulator Accuracy Troubleshooting
Correct simulator inference results are the prerequisite for correct board-side runtime inference, so priority must be given to ensuring that the simulator inference results are correct.
Simulator inference on RKNN-Toolkit2 is divided into FP16 inference and quantization inference, depending on whether the model is quantized. Correct FP16 inference results are the prerequisite for correct quantization inference results. Therefore, when there are accuracy issues with quantization inference, first verify the correctness of FP16 inference, and then troubleshoot the accuracy issues of quantization inference.
5.1.1.1 SIMULATOR FP16 ACCURACY
RKNPU currently does not support FP32 calculations, so the simulator defaults to FP16 computation when quantization is not enabled. To convert the original model to an FP16 RKNN model, use the rknn.build() interface with the do_quantization parameter set False. Then, call rknn.init_runtime(target=None) and rknn.inference()interfaces for FP16 simulation inference and to obtain the output results.
If the FP16 inference output is incorrect, users can perform the following troubleshooting:
Configuration Error
The configuration information of the model is mainly concentrated in the rknn.config() interface. At the same time, there is also a small amount of configuration information in other APIs that may affect the accuracy of FP16. The main parameters are as follows:
mean_values / std_values: Normalization parameters of the model. Generally, the input normalization operation of the original model is implemented in the model’s input preprocessing. However, for RKNN models during inference, this normalization operation can be included (when quantization is enabled, the quantization correction dataset will undergo normalization first). Therefore, when the original model has a normalization step, ensure that these parameters are consistent with the normalization parameters used in the original model.
input_size_list: If the input node shape information of the rknn.load_tensorflow(), rknn.load_pytorch() and rknn.load_onnx() interfaces is configured incorrectly, it will lead to incorrect inference results.
inputs / outputs: If the input and output node names of the rknn.load_tensorflow() and rknn.load_onnx() interfaces are configured incorrectly, it will lead to incorrect inference results.
inference interface parameters: The input parameters for the rknn.inference() interface mainly include inputs and data_format.
Generally in the Python environment, image data is read using cv2.imread(). In this case, it is important to note that the image format read by cv2.imread() is BGR. If the original model’s input is BGR (such as in most caffe models), there is no need to adjust the RGB order. However, if the original model’s input is RGB, users need to use cv2.cvtColor(img, cv2.COLOR_BGR2RGB) to convert the image data to RGB. Additionally, the shape dimensions of the image read by cv2.imread() are 3 dimensions, but the input shape of most models is 4 dimensions. Therefore, users need to use np.expand_dims(img, 0) to expand the input shape to 4 dimensions before passing it to the rknn.inference() interface. The layout of the image read by cv2.imread() is NHWC, and the default value of data_format is also NHWC, so there is no need to set the data_format parameter.
If the model’s input data is not read by cv2.imread(), it is necessary to know the layout of the input data and set the data_format parameter correctly. Also, ensure that the shape of the input data is consistent with the original model. If the input data is image data, ensure that its RGB order is consistent with the original model.
Checking parameter configurations is a crucial step and is the main reason many users encounter incorrect FP16 inference results. The specific troubleshooting steps are as follows:
a. Perform inference using the original model in the original inference framework and save the inference results.
b. Use the RKNN-Toolkit2 to convert and infer the original model. Use the same input data as in the previous step and set the FP16 inference mode (set do_quantization to False in rknn.build()). Also, the target parameter of rknn.init_runtime() is set to None to call the RKNN-Toolkit2 simulator for inference, and save the inference results.
c. Compare the results of the two inferences. If the results are relatively consistent (cosine distance can be used to judge consistency), it indicates that the above configurations are correct.
d. If the results are inconsistent, check whether the above parameters are correct.
If it is confirmed that the above parameter configurations are correct and the results are still inconsistent, it may be due to tensors in the model exceeding the FP16 expression range.
Exceeding the FP16 Expression Range
When converted from FP32 to FP16, the intermediate tensors of the model may encounter overflow issues. Since the typical data type for model inference is FP32, if tensors in the model during inference have values exceeding the FP16 expression range (-65504〜65504), the tensor will overflow, resulting in abnormal model inference results.
For overflow issues, users can use the rknn.accuracy_analysis(…, target=None) interface (refer to Model Accuracy Analysis) for simulator FP16 accuracy analysis. If the entire column or single column of simulator_error in the analysis results has an abnormal value (If words such as ‘inf’ appear), an FP16 overflow may occur. In this case, users can try modifying the model structure to ensure that all tensors in the model do not overflow in FP16 (such as adding some BN layers, etc.).
If it is confirmed that the above parameter configurations are correct and there is no FP16 overflow, but the results are still inconsistent, it may be an issue with the internal implementation of the simulator. Please provide the reproduction file of the model to Rockchip NPU team for analysis and resolution.
5.1.1.2 SIMULATOR QUANTIZATION ACCURACY
After ruling out FP16 accuracy issues, the model can be quantized (when using the rknn.build() interface, set the do_quantization parameter to True), and then call the rknn.accuracy_analysis(…, target=None) interface (refer to Model Accuracy Analysis) to conduct simulator quantization accuracy analysis.
If in the analysis results, users find that the accuracy of the entire column of simulator_error has dropped significantly, and no layer shows a particularly large accuracy decrease in the single column of simulator_error, investigate mainly in the following areas:
Configuration errors
Similar to configuration issues with FP16 inference, incorrect configurations can also lead to quantization inference accuracy problems. Therefore, on the basis of ensuring the correct configuration for FP16 inference, the following quantization configuration parameters still need to be checked.
quant_img_RGB2BGR: Indicates whether to perform the RGB2BGR operation when loading quantization images, typically used for caffe models. For more detailed information, refer to the description of the quant_img_RGB2BGR parameter. This parameter must be consistent with the channel order of the images used during training; an incorrect configuration can also cause a considerable decrease in quantization accuracy.
optimization_level: The choice of optimization level. The default is 3, which means speed priority. In this case, some optimization rules that are beneficial to performance but slightly affect accuracy are enabled. Lowering this configuration (e.g., changing it to 0) disables these optimization rules.
dataset: The quantization calibration dataset configuration for the rknn.build() interface, used to calculate appropriate quantization parameters (scale / zero_point) for each tensor during the quantization process. If a calibration dataset that differs significantly from the actual deployment scenario is selected, accuracy degradation may occur. In addition, having too many or too few calibration images will also affect accuracy (generally 20~200 images are chosen).
To check quantization parameter configuration issues specifically, generally follow these steps:
a. Directly perform quantization inference, and then check the inference results and compare them with the inference results of the original model under the original inference framework. If the difference in results is not very large, it can be considered that the quant_img_RGB2BGR and dataset parameters are basically correct.
b. If the difference in results is still obvious:
If the input image format of the original model is BGR (common in caffe models), modify quant_img_RGB2BGR to True. As for the RGB order of the model input, it can actually be determined from the input data processing code in the previous FP16 inference accuracy verification step.
First use a single image for quantization (leave only one line in dataset.txt), and also use this image for inference. If the accuracy of this single image improves considerably, it indicates that the previously selected quantization calibration dataset was a poor choice, and images that better match the deployment scenario can be re-selected (if the improvement is not obvious, it may not be a problem with the dataset).
If only one image was originally used for quantization (there is only one line in dataset.txt), try using more images for quantization, which can be increased to about 20~200 images.
After the above configuration checks, there should not be a case where the quantization results are completely wrong. If completely wrong results occur, please recheck the above configurations. If the accuracy of the model is still not sufficient after confirming that the configurations are correct, try modifying related configurations such as the quantization method and algorithm.
Quantization methods and quantization algorithms
Some models are inherently unfriendly to quantization. In such cases, try switching to different quantization methods and quantization algorithms. There are mainly three quantization methods: layer, channel, and group (group is only effective for linear layers, see 2.2.1.3 Quantization Granularity), which can be set through the quantized_method parameter in the rknn.config() interface (default is channel). There are mainly four quantization algorithms: normal, kl_divergence, mmse, and gdq (see 2.2.3.2 Internal Quantization Algorithms), which can be set through the quantized_algorithm parameter in the rknn.config() interface (default is normal). The steps are as follows:
a. If the layer quantization method was originally used, switch to the channel quantization method. In general, the accuracy of the channel quantization method is much higher than that of the layer quantization method.
b. If the quantization method is already channel but the accuracy still cannot meet the requirements, change the quantization algorithm from normal to kl_divergence or mmse. This will significantly increase the quantization time, but delivers better accuracy than normal, while the runtime performance is not affected.
The characteristics of the quantization algorithms and the recommended amount of calibration data are summarized as follows:
| Quantization algorithm | Characteristics | Recommended amount of calibration data |
|---|---|---|
| normal (default) | Conventional calibration, fast | 20~100 images |
| kl_divergence | Good improvement when the feature distribution is uneven, slightly more time-consuming than normal | 20~100 images |
| mmse | Iteratively searches the quantization range, usually higher accuracy, but greatly increases time and memory | 20~50 images |
| gdq | Only effective under w4a16 and w8a16, can effectively improve weight quantization accuracy | More than 200 images |
It is recommended to start with normal, and then try kl_divergence, mmse, or gdq if the accuracy is unsatisfactory; the quantization algorithm only affects the model conversion stage and does not affect the on-board runtime performance.
If after using the above methods, the accuracy of the entire column of simulator_error in the analysis results is still not good, and some layers in the single column of simulator_error show a considerable accuracy drop, it may be that the weight value distribution of these layers is poor, causing a large accuracy decrease after quantization. For example, when the weight distribution of a Conv layer is highly uneven, consider using hybrid quantization to further improve the model accuracy. The steps are as follows:
a. First use the accuracy analysis interface to analyze the accuracy, find out the layers that cause the considerable accuracy decrease, and record the output tensor names of the corresponding layers. (Note that, because errors accumulate layer by layer, the earlier a layer is, the greater its impact on the final accuracy. Therefore, consider not only the accuracy loss in the single column of simulator_error, but also the position of the layer in the model.)
b. Use the hybrid quantization method and write the tensor names obtained in the previous step into the hybrid quantization configuration file (refer to Hybrid Quantization).
c. Complete the hybrid quantization steps and test the accuracy (the accuracy analysis interface can continue to be used to observe accuracy changes).
Generally, the accuracy of the model can be improved after hybrid quantization. If the improvement is not obvious or not sufficient, try applying hybrid quantization to more layers, but this will also cause a decrease in inference performance. Therefore, users need to balance accuracy and speed when applying hybrid quantization. Another special approach is that, when the Op with the accuracy drop is in the last layer, users can also choose to move the execution of that Op into post-processing, which likewise effectively avoids the accuracy problem of that layer.
QAT (Quantization-Aware Training)
If the accuracy is still insufficient after hybrid quantization, or if the accuracy is sufficient but the performance cannot meet the requirements due to hybrid quantization, try using quantization-aware training to retrain the model, and export the model with quantization parameters (e.g., in onnx/pt/pb/tflite formats). For more information on quantization-aware training, please refer to Quantization-Aware Training (QAT).
5.1.2 Runtime Accuracy Troubleshooting
When the accuracy of the simulator is normal, abnormal inference results may still occur when deploying the board-side C API. There are generally three reasons for this problem. The first is caused by a bug in the runtime of the board. The second is incorrect usage of the RKNPU2 C API when programming the interface. The third is incorrect pre-processing or post-processing of the model.
When encountering such problems, users can first use the board-connected function to quickly check whether it is caused by a bug in the runtime of the board. If there are no issues with the board-connected, then check the C API deployment problem.
5.1.2.1 BOARD-CONNECTED ACCURACY
-
After configuring the board-connected debugging environment (refer to NPU Device Environment Setup for the environment setup), connect the board to the computer via USB, and then use RKNN-Toolkit2 to perform board-connected inference (set the target parameter of rknn.init_runtime(), Such as target=’rk3566’), and check whether the inference results are roughly correct (because the simulator does not strictly simulate NPU hardware, the results may not be completely consistent with the simulator).
-
If the inference results in the above steps are significantly different from the simulator inference results, it can be initially determined that there is a bug in the runtime of the board. In this case, users can use the accuracy analysis interface (refer to Model Accuracy Analysis) to perform board-connected accuracy analysis (use rknn.accuracy_analysis() interface, and set the target parameter, such as target=’rk3566’). After the accuracy analysis is completed, the analysis results of each layer will be output.
-
Check the single_sim column of runtime_error in the analysis results. If its cos cosine distance is low or euc Euclidean distance is high (displayed in yellow or red), resulting in an increasing difference between the entire column of runtime_error and the entire column of simulator_error, it is possible that the runtime has accuracy loss or anomalies when implementing this layer. In this case, the analysis results and reproduced models can be fed back to the Rockchip NPU team for repair.
5.1.2.2 RUNTIME ACCURACY
If there is no problem with the board-connected accuracy but the accuracy is still problematic, the problem may lie in the C/C++ code itself that the user uses to call the RKNN C API for programming. In this case, the user needs to carefully check whether the interface configuration of the RKNN C API is correct, and whether the pre-processing and post-processing flows of the model are correct (they need to be completely consistent with the flows on the simulator side). Users can check by following these steps:
1. Check input configuration and data
Check whether the input of the C API is configured correctly. For example, if RKNN-Toolkit2 has already configured the mean and variance when converting the RKNN model, no normalization is needed in the C/C++ code. For 3-channel input, the channel order is consistent with the input channel set during model training; for 4-dimensional input shapes, fmt=NHWC; for non-4-dimensional input, fmt=UNDEFINED. If users use the general API, the size of the input buffer is equal to the number of input tensor elements * the number of bytes of each element. If users use the zero-copy API, refer to 3.1.6 RKNN Runtime Zero- Copy Interface for the memory size and input data format created by the rknn_create_mem interface.
After confirming that the configuration is correct, users need to check the data of the input layer. Users can set RKNN_LOG_LEVEL=5 before running the application, and then run the application. The layer-by-layer results during inference will be saved as numpy format files in the /data/dumps (Android system) or /userdata/dumps (Linux system) directory. Check whether the numpy file containing the InputOperator field meets expectations. If users use the general API, it is the result of input normalization; if users use the zero-copy API, it is the data before normalization.
2. Check output configuration and data
After ensuring that the input is correct, check whether the output in the code is configured correctly. For example, if users use the general API, when want_float=1 is set, the output is a float32 type result; when want_float=0 is set, the output is a quantized data type or float16 type (non-quantized data type). If users use the zero-copy API, refer to 3.1.6 RKNN Runtime Zero-Copy Interface for the memory size and input data format created by the rknn_create_mem() interface.
To check the data of the output layer, similarly, after the above layer-by-layer numpy files are generated, open the numpy file containing the OutputOperator field and check whether the data is correct. If the input results are confirmed to be correct but the output is still wrong, the Runtime may have a problem handling specific input/output types. In this case, feed the analysis results and a reproduction model back to the Rockchip NPU team for repair.