
Scope: RKNN2 V2.5.0 platform reference covering RK3562, the RK3566/3568/3576/3588 series and RV1126B. An ArmSoM board with the same SoC still needs a matching BSP, NPU driver and Runtime; do not copy Rockchip EVB power, USB or firmware assumptions directly. Host and driver requirements are listed below. No ArmSoM hardware validation was performed.
Adapted from the local Chinese and English V2.5.0 sources, retaining section numbers. Chinese uses Chinese figures; English, Russian and German use English-source figures. PDF wraps, continued tables and code indentation are restored. Example outputs are not ArmSoM tests.
RKNN2 V2.5.0 quickstart 1: deployment flow, platforms and SDK repositories
RKNN2 V2.5.0 quickstart 2: hardware connection and ADB checks
RKNN2 V2.5.0 quickstart 3: Toolkit, Android/Linux Runtime and compilers
RKNN2 V2.5.0 quickstart 4: MobileNet conversion and deployment
RKNN2 V2.5.0 quickstart 5: YOLOv5 detection and accuracy evaluation
RKNN2 V2.5.0 quickstart 6: Docker, startup issues and references
4.2 Run the Object Detection Example
This section takes the YOLOv5 model as an example to introduce the conversion, on-board running, board deployment, and accuracy evaluation of the object detection model. The example is located in the examples/yolov5 directory.
4.2.1 Convert the Model
Switch to the rknn_model_zoo/examples/yolov5/model directory and run the download_model.sh script. This script will download an available YOLOv5 ONNX model and store it in the current model directory. Refer to the following commands:
# Switch to the rknn_model_zoo/examples/yolov5/model directory
cd Projects/rknn_model_zoo/examples/yolov5/model

# Run the download_model.sh script to download the yolov5 ONNX model
# For example, the downloaded ONNX model is stored at model/yolov5s_relu.onnx
./download_model.sh
Switch to the rknn_model_zoo/examples/yolov5/python directory and run the convert.py script. This script converts the original ONNX model to the RKNN model. Refer to the following commands:
# Switch to the rknn_model_zoo/examples/yolov5/python directory
cd Projects/rknn_model_zoo/examples/yolov5/python

# Run the convert.py script to convert the original ONNX model to RKNN format
# Usage: python convert.py model_path [rk3566|rk3588|rk3562] [i8/fp] [output_path]
python convert.py ../model/yolov5s_relu.onnx rk3588 i8 ../model/yolov5s_relu.rknn
Where i8 enables 8-bit quantization. After the conversion is completed, the corresponding .rknn model file is generated in the model directory.
4.2.2 Run the RKNN Python Demo
The RKNN Python Demo runs the YOLOv5 model on the development board via on-board debugging. Switch to the rknn_model_zoo/examples/yolov5/python directory and execute the yolov5.py script:
# Run the yolov5.py script to run the yolov5 model on the board
# Usage: python yolov5.py --model_path {rknn_model} --target {target_platform} --img_show

# If the --img_show parameter is included, the result image will be displayed
# Note: Here, the example is for the rk3588 platform. If using a different board, modify the platform type in the command accordingly
python yolov5.py --model_path ../model/yolov5s_relu.rknn --target rk3588 --img_show

# If you want to run the original onnx model on the computer first, you can use the following command
# Usage: python yolov5.py --model_path {onnx_model} --img_show
python yolov5.py --model_path ../model/yolov5s_relu.onnx --img_show
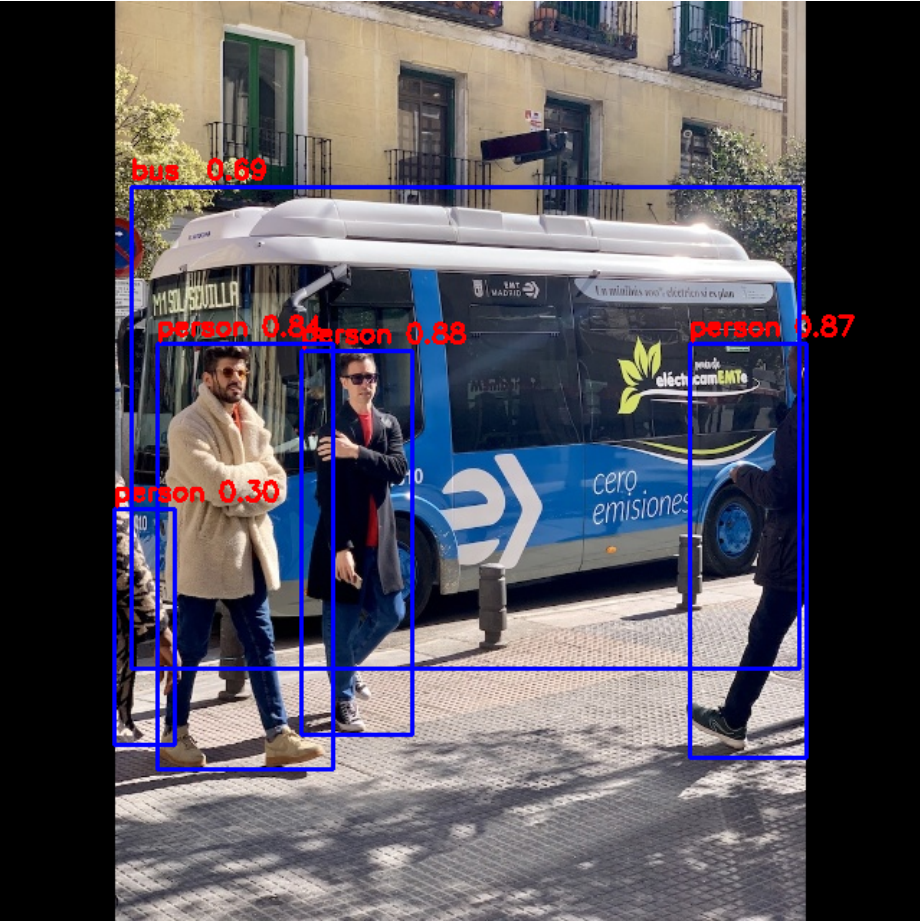
After the successful execution of the script, the output information will be as follows. In this context, the “class” field represents the predicted category, “score” is the confidence score, “ (xmin, ymin)” are the coordinates of the top-left corner of the detection box, and “(xmax, ymax)” are the coordinates of the bottom-right corner of the detection box.
# class @ (xmin, ymin, xmax, ymax) score
person @ (209 244 286 506) 0.884
person @ (478 238 559 526) 0.868
person @ (110 238 230 534) 0.825
bus @ (94 129 553 468) 0.705
person @ (79 354 122 516) 0.339
The default input image is model/bus.jpg and the result image is as shown below:
English source figure · PDF 27
Figure 4-1 Visualization result of RKNN Python Demo
4.2.3 Run the RKNN C Demo
To run an RKNN C Demo, you need to first compile the C/C++ source code into an executable file, then push it to the board, and finally run it on the board. Before compiling, install the compilation tools first (see Section 3.4): configure ANDROID_NDK_PATH at the beginning of the build-android.sh script for Android boards, or GCC_COMPILER at the beginning of the build-linux.sh script for Linux boards. For the parameters of the build scripts, refer to the README.md in each example directory.
1. Compilation
# Board running on the Android system
# Note: configure ANDROID_NDK_PATH at the beginning of the build-android.sh script
cd Projects/rknn_model_zoo
./build-android.sh -t rk3588 -a arm64-v8a -d yolov5

# Board running on the Linux system
# Note: configure GCC_COMPILER at the beginning of the build-linux.sh script
cd Projects/rknn_model_zoo
./build-linux.sh -t rk3588 -a aarch64 -d yolov5
2. Push Files to the Board
After compilation, the executable file is located in the rknn_yolov5_demo folder under the install directory:
# Board running on the Android system
adb root
adb push install/rk3588_android_arm64-v8a/rknn_yolov5_demo /data/

# Board running on the Linux system
adb push install/rk3588_linux_aarch64/rknn_yolov5_demo /userdata/
3. Run the Demo on the Board
# Switch to the board
adb shell

# Switch to the rknn_yolov5_demo directory
# /data/rknn_yolov5_demo for Android, /userdata/rknn_yolov5_demo for Linux
cd /userdata/rknn_yolov5_demo

# Set the library dependency environment
export LD_LIBRARY_PATH=./lib

# Run the executable file
# Usage: ./rknn_yolov5_demo <model_path> <input_path>
./rknn_yolov5_demo model/yolov5s_relu.rknn model/bus.jpg
By default, the output image is saved at the path rknn_yolov5_demo/out.png . You can use the adb tool to pull it from the board to the local machine. In the local computer terminal, execute the following command:
# Pull to the local current directory
adb pull /userdata/rknn_yolov5_demo/out.png .
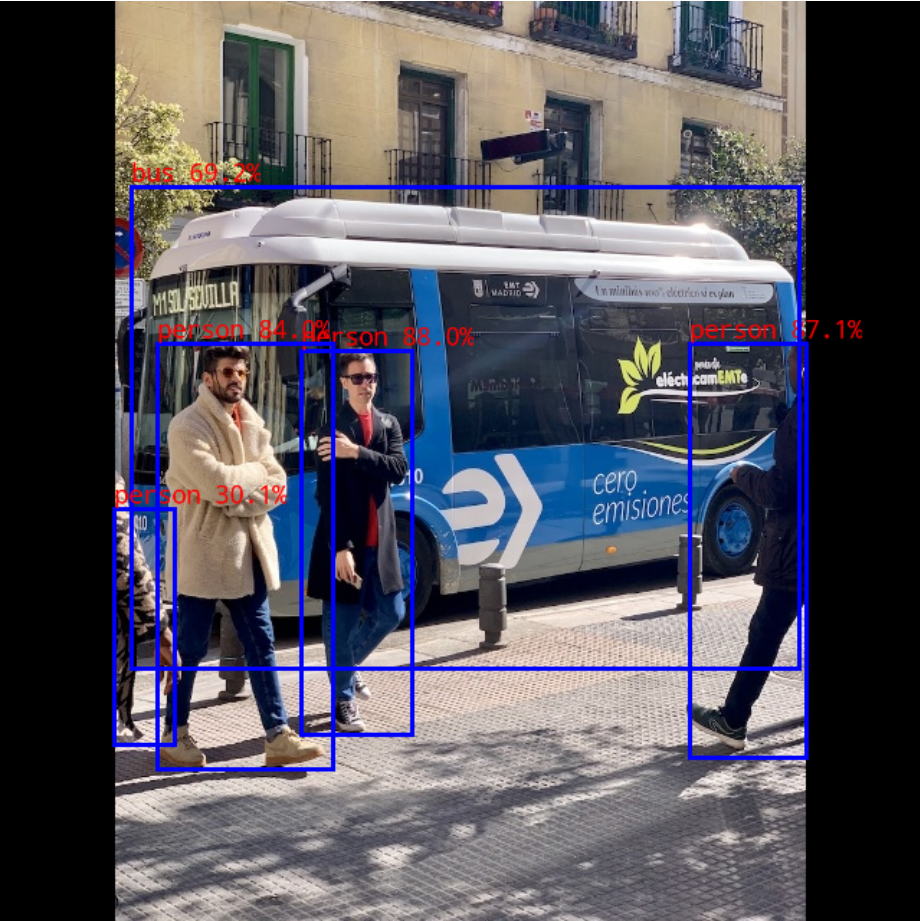
The output image is as follows:
English source figure · PDF 29
Figure 4-2 Visualization result of RKNN C Demo
For the first run, you only need to confirm that the Demo finishes normally and generates out.png . The actual detection results may vary with the model version, input image, and runtime environment.
4.2.4 Dataset Accuracy Evaluation (Optional)
The rknn_model_zoo/datasets directory stores datasets for accuracy evaluation. You need to download the evaluation dataset first and save it to this directory. For example, for the YOLOv5 model, the COCO dataset needs to be downloaded. Switch to the rknn_model_zoo/datasets/COCO directory and run the download_eval_dataset.py script. This script will download the val2017 dataset and store it in the current COCO directory. Refer to the following commands:
# Switch to the rknn_model_zoo/datasets/COCO directory
cd Projects/rknn_model_zoo/datasets/COCO

# Run the download_eval_dataset.py script to download the COCO dataset
python download_eval_dataset.py
When performing dataset accuracy evaluation, you need to specify the –coco_map_test parameter and the dataset path –img_folder . Refer to the following commands:
# Please install pycocotools first
pip install pycocotools

# Switch to the rknn_model_zoo/examples/yolov5/python directory
cd Projects/rknn_model_zoo/examples/yolov5/python

# Run the yolov5.py script
python yolov5.py \
    --model_path ../model/yolov5s_relu.rknn \
    --target rk3588 \
    --img_folder ../../../datasets/COCO/val2017 \
    --coco_map_test
Note: For model-level accuracy analysis (comparing the inference results of the quantized model with those of the floating-point model layer by layer), use the rknn.accuracy_analysis() interface of RKNN-Toolkit2. For details, refer to the “Model Accuracy Analysis” section in the RKNN2 SDK Development Guide document.