
Scope: RKNN2 V2.5.0 platform reference covering RK3562, the RK3566/3568/3576/3588 series and RV1126B. An ArmSoM board with the same SoC still needs a matching BSP, NPU driver and Runtime; do not copy Rockchip EVB power, USB or firmware assumptions directly. Host and driver requirements are listed below. No ArmSoM hardware validation was performed.
Adapted from the local Chinese and English V2.5.0 sources, retaining section numbers. Chinese uses Chinese figures; English, Russian and German use English-source figures. PDF wraps, continued tables and code indentation are restored. Example outputs are not ArmSoM tests.
RKNN2 V2.5.0 quickstart 1: deployment flow, platforms and SDK repositories
RKNN2 V2.5.0 quickstart 2: hardware connection and ADB checks
RKNN2 V2.5.0 quickstart 3: Toolkit, Android/Linux Runtime and compilers
RKNN2 V2.5.0 quickstart 4: MobileNet conversion and deployment
RKNN2 V2.5.0 quickstart 5: YOLOv5 detection and accuracy evaluation
RKNN2 V2.5.0 quickstart 6: Docker, startup issues and references
3. Host and Board Environment Preparation
3.1 Install RKNN-Toolkit2
This quick start only covers the recommended Conda + pip installation path. For Docker-based installation, please refer to Chapter 5.
3.1.1 Install the Python Environment
If Python 3.8 (recommended version) is not installed on your system, or if there are multiple versions of Python installed, it is recommended to use Miniforge Conda to create a new Python 3.8 environment.
Step 1: Install Miniforge Conda
In the terminal window on the computer, execute the following command to check whether Miniforge Conda is installed. If already installed, you can skip this step.
conda -V
# Reference output: conda 23.3.1, indicating that the Miniforge Conda version is 23.3.1
# If it shows 'conda: command not found', it means Miniforge Conda is not installed.
If Miniforge Conda is not installed, you can download the Miniforge Conda installer from the following link: https://github.com/conda-forge/miniforge/releases/download/25.3.0-1/Miniforge3-25.3.0-1-Linux-x86_64.sh
Then, install Miniforge Conda using the following command:
# Copy to the user directory
cp /path/to/Miniforge3-25.3.0-1-Linux-x86_64.sh ~

# Grant executable permissions
chmod 777 Miniforge3-25.3.0-1-Linux-x86_64.sh

# Run the installation script
bash Miniforge3-25.3.0-1-Linux-x86_64.sh
Step 2: Create the Python Environment
After installing Miniforge Conda, execute the following command in the terminal window on the computer to switch to the Conda base environment:
source ~/miniforge3/bin/activate # The installation directory of Miniforge
# Upon success, the command prompt will change to the following form:
# (base) xxx@xxx:~$
Create a Python 3.8 environment named toolkit2 using the following command:
conda create -n toolkit2 python=3.8
Activate the toolkit2 environment. RKNN-Toolkit2 will be installed in this environment:
conda activate toolkit2
# Upon success, the command prompt will change to the following form:
# (toolkit2) xxx@xxx:~$
Note: The subsequent Python commands are executed in the toolkit2 environment by default.
3.1.2 Install RKNN-Toolkit2
After activating the toolkit2 environment, you can install RKNN-Toolkit2 using either the pip source or a local wheel package.
Method 1: Install via pip source
pip install rknn-toolkit2 -i https://pypi.org/simple

# If RKNN-Toolkit2 is already installed, you can upgrade it with the following command
pip install rknn-toolkit2 -i https://pypi.org/simple --upgrade
Method 2: Install via local wheel package
# Switch to the rknn-toolkit2 directory
cd Projects/rknn-toolkit2/rknn-toolkit2

# Please choose the appropriate requirements file based on the Python version and processor architecture:
# where cpxx is the Python version
pip install -r packages/x86_64/requirements_cpxx.txt
# pip install -r packages/arm64/arm64_requirements_cpxx.txt

# Install RKNN-Toolkit2
# Please choose the appropriate wheel package file based on the Python version and processor architecture:
# where x.x.x is the RKNN-Toolkit2 version number, cpxx is the Python version
pip install packages/x86_64/rknn_toolkit2-x.x.x-cpxx-cpxx-manylinux_2_17_x86_64.manylinux2014_x86_64.whl
# pip install packages/arm64/rknn_toolkit2-x.x.x-cpxx-cpxx-manylinux_2_17_aarch64.manylinux2014_aarch64.whl
3.2 Verify the Toolkit Installation
Keep the toolkit2 environment activated and execute:
python -c "from rknn.api import RKNN; print('RKNN-Toolkit2 import OK')"
If the output is:
RKNN-Toolkit2 import OK
the basic Toolkit import check passes.
If the installation fails, please refer to Section 5.4.2 “RKNN-Toolkit2 Installation Issue” in the RKNN2 SDK Development Guide document, which provides detailed solutions for resolving RKNN-Toolkit2 environment installation failures.
3.3 Install or Check the RKNPU2 Environment on the Board
Before running the Demo on the board, make sure that the NPU driver, the rknn_server service, and the Runtime library are correctly installed.
3.3.1 Confirm the NPU Driver Version
You can execute the following command on the board to query the RKNPU2 driver version:
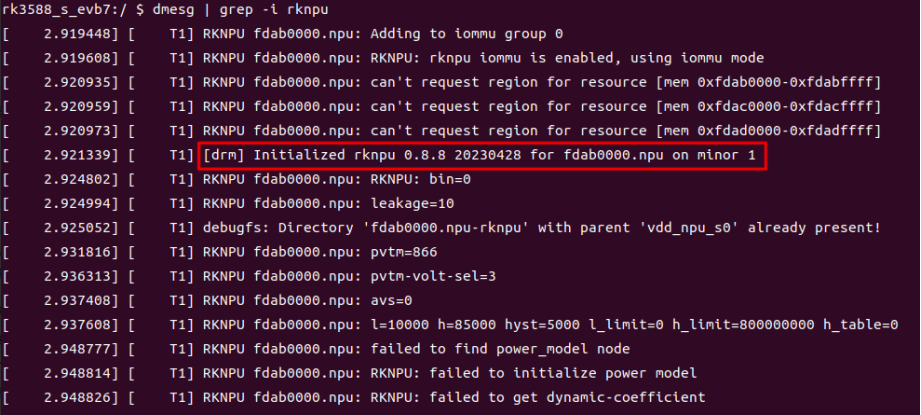
dmesg | grep -i rknpu
As shown in the following figure, the current RKNPU2 driver version is 0.8.8.
English source figure · PDF 16
Figure 3-1 RKNPU2 driver version information
The official firmware of Rockchip development boards all installs the RKNPU2 driver. If the above command cannot query the NPU driver version, you may be using third-party firmware, which may not have the NPU driver installed. If you have the firmware source code, you can change the value of the CONFIG_ROCKCHIP_RKNPU option in the kernel config to ‘y’ to integrate the NPU driver, then recompile the kernel driver and flash it. It is recommended that RKNPU2 driver version >= 0.9.8.
3.3.2 Check rknn_server and the Runtime Library
The on-board debugging feature of RKNN-Toolkit2 requires the board to have the RKNPU2 environment installed and the rknn_server service running. If the board does not have rknn_server and the Runtime library installed, or if their versions are inconsistent, you need to reinstall the RKNPU2 environment.
In most cases, the development board is already equipped with a version-consistent RKNPU2 environment by default. You can confirm this with the following commands. (If the RKNPU2 environment is not installed or the versions are inconsistent, please follow the steps in Section 3.3.3 to install/update the RKNPU2 environment.)
1. Board running on the Android system
Check if the RKNPU2 environment is installed: if you can start the rknn_server service, it means that the RKNPU2 environment is already installed on the board.
# Switch to the board
adb shell

# Start rknn_server
su
setenforce 0
/vendor/bin/rknn_server &
If the following output is displayed, it means that the rknn_server service has been successfully started, indicating that the RKNPU2 environment is installed.
start rknn server, version: x.x.x
Check if the versions are consistent:
# Query rknn_server version
strings /vendor/bin/rknn_server | grep -i "rknn_server version"

# Query librknnrt.so library version
# For 64-bit systems
strings /vendor/lib64/librknnrt.so | grep -i "librknnrt version"
# For 32-bit systems
strings /vendor/lib/librknnrt.so | grep -i "librknnrt version"
If the following output is displayed, it means that the rknn_server version is x.x.x, and the version of librknnrt.so is x.x.x.
rknn_server version: x.x.x
librknnrt version: x.x.x
2. Board running on the Linux system
Check if the RKNPU2 environment is installed: if you can start the rknn_server service, it means that the RKNPU2 environment is already installed on the board.
# Switch to the board
adb shell

# Start rknn_server
restart_rknn.sh
If the following output is displayed, it means that the rknn_server service has been successfully started, indicating that the RKNPU2 environment is installed.
start rknn server, version: x.x.x
Check if the versions are consistent:
# Query rknn_server version
strings /usr/bin/rknn_server | grep -i "rknn_server version"

# Query librknnrt.so library version
strings /usr/lib/librknnrt.so | grep -i "librknnrt version"
If the following output is displayed, it means that the rknn_server version is x.x.x, and the version of librknnrt.so is x.x.x.
rknn_server version: x.x.x
librknnrt version: x.x.x
3.3.3 Install/Update the RKNPU2 Environment
Different board systems require the installation of different RKNPU2 environments. The following sections introduce the installation methods for each system.
Note: If you have already installed a version-consistent RKNPU2 environment, you can skip this section.
1. Board running on the Android system
Switch to the rknpu2 directory, use the adb tool to push the corresponding rknn_server and librknnrt.so to the board, then start rknn_server. Refer to the following commands:
# Switch to the rknpu2 directory
cd Projects/rknn-toolkit2/rknpu2

# Switch to root user permissions
adb root

# Remount the file system as read-write
adb remount

# Push the rknn_server executable
# Note: In a 64-bit Android system, BOARD_ARCH corresponds to the arm64 directory; in 32-bit systems, it corresponds to the arm directory.
adb push runtime/Android/rknn_server/${BOARD_ARCH}/rknn_server /vendor/bin/

# Push the librknnrt.so library
# For 64-bit systems
adb push runtime/Android/librknn_api/arm64-v8a/librknnrt.so /vendor/lib64/
# For 32-bit systems
adb push runtime/Android/librknn_api/armeabi-v7a/librknnrt.so /vendor/lib/

# Switch to the board
adb shell

# Grant executable permissions
chmod +x /vendor/bin/rknn_server

# Restart the rknn_server service
su
setenforce 0
/vendor/bin/rknn_server &
2. Board running on the Linux system
Switch to the rknpu2 directory, use the adb tool to push the corresponding rknn_server and librknnrt.so to the board, then start rknn_server. Refer to the following commands:
# Switch to the rknpu2 directory
cd Projects/rknn-toolkit2/rknpu2

# Push rknn_server to the board
# Note: In 64-bit Linux systems, BOARD_ARCH corresponds to the aarch64 directory; in 32-bit systems, it corresponds to the armhf directory.
adb push runtime/Linux/rknn_server/${BOARD_ARCH}/usr/bin/* /usr/bin

# Push librknnrt.so
adb push runtime/Linux/librknn_api/${BOARD_ARCH}/librknnrt.so /usr/lib

# Switch to the board
adb shell

# Grant executable permissions
chmod +x /usr/bin/rknn_server
chmod +x /usr/bin/start_rknn.sh
chmod +x /usr/bin/restart_rknn.sh

# Restart the rknn_server service
restart_rknn.sh
3.4 Install Compilation Tools
3.4.1 Install CMake
In the computer terminal, execute the following command:
# Update package list
sudo apt update

# Install cmake
sudo apt install cmake
3.4.2 Install Compilers
3.4.2.1 Confirm the System Type and Architecture of the Development Board
For convenience, the remainder of this document uses “board” to refer to the development board side.
Step 1: Confirm the system type of the board
In the computer terminal, execute the following command:
adb shell getprop ro.build.version.release
If the output is a number (Android system version), it indicates that the board is running on the Android system.
12
Otherwise, the board is running on the Linux system.
/bin/sh: getprop: not_found
Step 2: Confirm the system architecture of the board
If the board is running on the Android system, you can execute the following command on the computer to query the system architecture:
adb shell getprop ro.product.cpu.abi
The reference output for this command is as follows, where arm64-v8a indicates ARM 64-bit architecture, ABI version 8.
arm64-v8a
If the board is running on the Linux system, you can execute the following command on the computer to query the system architecture:
adb shell uname -a
The reference output for this command is as follows, where aarch64 indicates ARM 64-bit architecture.
Linux Rockchip 5.10.160 #183 SMP Tue Oct 24 18:52:11 CST 2023 aarch64 GNU/Linux
3.4.2.2 Install NDK on the Android System Development Board
Scope: This section is applicable to development boards with the Android system. If the board is running on the Linux system, please skip this section.
NDK download URL (it is recommended to download the r19c version): https://dl.google.com/android/repository/android-ndk-r19c-linux-x86_64.zip
Extract the software package
It is recommended to extract the NDK software package to the Projects folder. The location is as follows:
Projects
├── rknn-toolkit2
├── rknn_model_zoo
└── android-ndk-r19c # This path will be used when compiling the RKNN C Demo
At this point, the path to the NDK compiler is Projects/android-ndk-r19c .
3.4.2.3 Install the GCC Cross-Compiler on the Linux System Development Board
Scope: This section is applicable to development boards with the Linux system. If the board is running on the Android system, please skip this section.
GCC download URL
Board is a 64-bit system: https://developer.arm.com/-/cdn-downloads/permalink/legacy-linaro-gnu-toolchains/6.3-2017.05/gcc-linaro-6.3.1-2017.05-x86_64_aarch64-linux-gnu.tar.xz
Board is a 32-bit system: https://developer.arm.com/-/cdn-downloads/permalink/legacy-linaro-gnu-toolchains/6.3-2017.05/gcc-linaro-6.3.1-2017.05-x86_64_arm-linux-gnueabihf.tar.xz
Extract the software package
It is recommended to extract the GCC software package to the Projects folder. Taking the GCC package for a 64-bit system as an example, the location is as follows:
Projects
├── rknn-toolkit2
├── rknn_model_zoo
└── gcc-linaro-6.3.1-2017.05-x86_64_aarch64-linux-gnu # This path will be used when compiling the RKNN C Demo
At this point, the path to the GCC compiler is Projects/gcc-linaro-6.3.1-2017.05-x86_64_aarch64-linux-gnu/bin/aarch64-linux-gnu .
3.5 Environment Pre-Check
Before starting model conversion, it is recommended to complete the following checks at once:
# Toolkit
conda activate toolkit2
python -c "from rknn.api import RKNN; print('Toolkit OK')"

# Compilation tools
cmake --version

# Devices
adb devices
If you need to run the RKNN C Demo, also confirm the compiler path according to the board system:
Board running on the Android system: confirm the NDK path (e.g., Projects/android-ndk-r19c );
Board running on the Linux system: confirm the GCC compiler path (e.g., Projects/gcc-linaro-6.3.1-2017.05-x86_64_aarch64-linux-gnu/bin/aarch64-linux-gnu ).