
Scope and historical source
This is a complete technical adaptation of the supplied English Magisk installation guide for Rockchip Android Pie and Android Q. Its cover says V1.0.1, but its revision table reaches V1.0.2; both identifiers are retained as a source discrepancy. The instructions describe the historical MagiskManager, Magisk Hide and SafetyNet workflow. They are not a current installation recommendation or a guarantee that integrity checks can be passed. No specific ArmSoM board, BSP build or kernel version is verified; check the actual boot-image layout and matching SDK first. No flashing, root installation or hardware tests were performed. The one English source screenshot is used in all four languages because no Chinese PDF was supplied.
1 Introduction
The source describes Magisk as an open-source toolkit for customizing Android, supporting Android 5.0 (API 21) and later. It covers root, boot scripts, SELinux patches and removal of AVB2.0, dm-verity and forceencrypt. Its Systemless Interface changes system or vendor behavior while leaving the actual partitions intact. The historical text also describes concealing modifications from integrity checks in banking applications, corporate monitoring applications, game anti-cheat systems and Google SafetyNet; this is a source claim, not a verified present-day capability.
Upstream reference: Magisk.
2 Installation methods
The source provides two integration methods:
- Flash a boot image patched by Magisk Manager.
- Flash a Magisk ZIP through third-party recovery, such as TWRP.
3 Flash a boot image patched by Magisk Manager
The source says most Rockchip devices are non-A/B. In Android Pie, non-A/B devices use system-as-root, with no ramdisk in boot.img. Because Magisk places its files in the boot-image ramdisk, that ramdisk must be present. In Android Q, the ramdisk returns to boot.img. Following the A/B-device arrangement, a ramdisk can be added to boot.img, with skip_initramfs in the cmdline to skip it.
3.1 Preparation
Build boot.img with a ramdisk: enable BOOTIMG_SUPPORT_MAGISK and build the boot image. The source prints the BoardConfig location as device/rockchip/rk3328/rk3328_box BoardConfig.mk (with a space); verify the actual file path instead of interpreting this as a command.
BOOTIMG_SUPPORT_MAGISK := true
make bootimage
For Android Q, skip this build-preparation step because boot.img already contains a ramdisk. Download MagiskManager from the upstream releases, selecting a version that matches this historical workflow.
3.2 Installation
- Push
boot.imgto the device.
adb push path/to/boot.img /storage/emulated/0/Download
- Install MagiskManager.
adb install /path/to/MagiskManager.apk
- In MagiskManager, choose install → Patch Boot Image File, then select the
boot.imgcopied in step 1. MagiskManager downloads the Magisk ZIP and patches the image automatically. - Pull the patched image to the PC.
adb pull /storage/emulated/0/Download/boot_patched.img
- Flash
boot_patched.imgto the boot partition with AndroidTools.
Source notes:
- If the APK crashes after choosing Patch Boot Image File, the source suggests installing a third-party file explorer, giving ES File Explorer File Manager as its historical example.
- If adb becomes unavailable after installation, disable Settings → Settings → Magisk Hide, then reboot.
- Connect to the network after installing MagiskManager. Without network access, the install button may be missing, as in Figure 1.
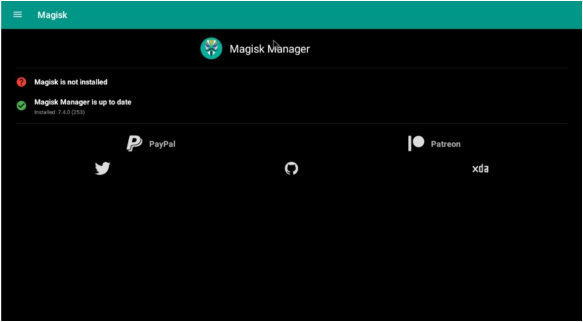
Figure 1. MagiskManager without the installation button; original English PDF, page 5.
4 Flash the Magisk ZIP through TWRP
4.1 Preparation
- Build Rockchip TWRP.
- Build
boot.imgwith a ramdisk as above. - Download
Magisk.zipfrom the Magisk releases.
4.2 Installation
- Flash TWRP (
recovery.img) andboot.imgwith AndroidTool. - Push
Magisk.zipto the device.
adb push /path/to/Magisk.zip /sdcard/
- Reboot into recovery.
adb reboot recovery
- Install
Magisk.zipthrough TWRP. - Reboot the device.
- Install MagiskManager.
adb install /path/to/MagiskManager.apk
5 SafetyNet check — historical source procedure
The source divides SafetyNet into CTS compatibility and Basic integrity. It describes CTS as a server-side check that is difficult to spoof and Basic integrity as a lower-security device-side check. Some applications only use Basic integrity and may work even if the complete SafetyNet check fails. These descriptions are retained in their historical context.
The source says that if Basic integrity is true but SafetyNet fails, Google may not trust the device. Its proposed remedy is to match property values to a ROM that passes, notably ro.build.fingerprint, using the MagiskHide Props Config module. This does not establish certification or guarantee a successful check.
The original installation options are the Magisk Manager Downloads section, or a ZIP from the Manager/module support thread installed through Magisk Manager → Modules or recovery such as TWRP. After installing the module and rebooting, the source gives:
adb shell
su
props
Select a certified fingerprint from the provided list. The source references MagiskHide SafetyNet documentation and MagiskHidePropsConf.
Source note: remove any other integrated root tools first.
ArmSoM platform documentation: docs.armsom.org.