
Based on Chinese and English RK-SM-YF-352 V2.0.2 (2024-05-16), with Chinese as the technical baseline. All five chapters, commands, test parameters and screenshots are retained. This is an ArmSoM platform reference: verify the actual board, SoC, SDK/BSP and peripherals. No device tests were executed. Warning: the source dd writes overwrite partitions, SD creation/upgrading includes flash erasure, and the recovery menu includes wipe all. Back up data and verify targets; do not run these examples on devices containing valuable data. killall bash also terminates unrelated Bash processes.
1. Functions Test
1.1 Buildroot
1.1.1 Video
Video:
rkisp_demo --device=/dev/video1 --output=/tmp/isp.yuv --iqfile=/etc/iqfiles/OV5695.xml
Play video: Pull the file in the /tmp/cif.yuv directory to PC: adb pull /tmp/cif.yuv /tmp/cif.yuv , and play it through a YUV tool.
1.1.2 Recording
arecord -c channel -r sampling frequency -f sampling bits -d recording duration/recording storage path/recording file name . Channel ch_tbl=”2 4 6 8” Sampling frequency: fs_tbl=”8000 11025 16000 22050 32000 44100 48000 64000 88200 96000 176400 192000” Sampling bits: bits_tbl=”S16_LE S24_LE S32_LE” Package format “wmv, wav, mp3, etc.” For example: Time-limited recording- after recording for 10 seconds will exit and save automatically:
arecord -c 2 -r 44100 -f S16_LE –d 10 /tmp/record.wav
Unlimited time recording -ctrl+c: exit to save:
arecord -c 2 -r 44100 -f S16_LE /tmp/record.wav
Play recording files:
aplay /tmp/record.wav
1.1.3 Wi-Fi Connecting
Method 1: wifi_start.sh script If the sdk integrates the wifi_start.sh script, you can add ssid and password directly after the script.
wifi_start.sh WiFi-AP password
Method 2: Modify the configuration file
$ vi /data/cfg/wpa_supplicant.conf
ctrl_interface=/var/run/wpa_supplicant #It is not recommended to modify by default!
ap_scan=1
update_config=1 #This configuration enables the hotspots configured by the wpa_cli command to be saved in the
conf file (wpa_cli save_config)
#Encrypted wi-fi
network={
    ssid="WiFi-AP"   # Wi-Fi name
    psk="password"   # Wi-Fi password
    key_mgmt=WPA-PSK # Authentication method
}
#Unencrypted Wi-Fi:
network={
    ssid="WiFi-AP"  # Wi-Fi name
    key_mgmt=NONE   # Authentication method
}

#Let the wpa_supplicant process re-read the above configuration:
wpa_cli -i wlan0 -p /var/run/wpa_supplicant reconfigure
#Initiate connection:
wpa_cli -i wlan0 -p /var/run/wpa_supplicant reconnect
Method 3: wpa_cli tool
#EncryptedWi-Fi:
wpa_cli -i wlan0 -p /var/run/wpa_supplicant remove_network 0
wpa_cli -i wlan0 -p /var/run/wpa_supplicant ap_scan 1
wpa_cli -i wlan0 -p /var/run/wpa_supplicant add_network
wpa_cli -i wlan0 -p /var/run/wpa_supplicant set_network 0 ssid "WiFi-AP"
wpa_cli -i wlan0 -p /var/run/wpa_supplicant set_network 0 key_mgmt WPA-PSK
wpa_cli -i wlan0 -p /var/run/wpa_supplicant set_network 0 psk '"password"'
wpa_cli -i wlan0 -p /var/run/wpa_supplicant select_network 0
wpa_cli -i wlan0 -p /var/run/wpa_supplicant save_config #Save the above configuration to the conf file
#Unencrypted Wi-Fi:
wpa_cli -i wlan0 -p /var/run/wpa_supplicant remove_network 0
wpa_cli -i wlan0 -p /var/run/wpa_supplicant ap_scan 1
wpa_cli -i wlan0 -p /var/run/wpa_supplicant add_network
wpa_cli -i wlan0 -p /var/run/wpa_supplicant set_network 0 ssid "WiFi-AP"
wpa_cli -i wlan0 -p /var/run/wpa_supplicant set_network 0 key_mgmt NONE
wpa_cli -i wlan0 -p /var/run/wpa_supplicant select_network 0
wpa_cli -i wlan0 -p /var/run/wpa_supplicant save_config
Check connection status:
wpa_cli -i wlan0 -p /var/run/wpa_supplicant status
For details, please refer to Rockchip_Developer_Guide_Linux_WIFI_BT_CN.pdf
1.1.4 Music Player
aplay /media/usb0/musicdemo.wmv
1.1.5 System Time
date                               #check system time
date --set='2018-12-24 15:17:42'   #Set system time
hwclock --show                     #check hardware time
hwclock --systohc                  #synchronous display of hardware time and system time
1.1.6 RTC Clock
Check whether the time has changed in the current state or after restart.
cat /sys/class/rtc/rtc0/time
1.1.7 Video Playback
Video playback in single window:
gst-play-1.0 /oem/SampleVideo_1280x720_5mb.mp4
Video playback in multi-window:
sh /rockchip-test/video/test_gst_multivideo.sh
1.1.8 SD Card Upgrade and Boot
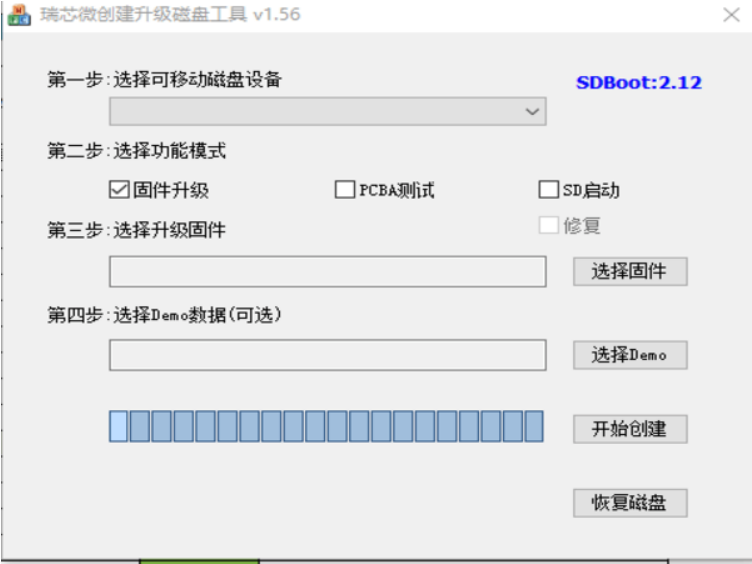
Insert the SD card into PC, execute the SD_Firmware_Tool.exe on PC, select firmware upgrade/SD boot, select firmware- update.img, and start creating. After the SDK enters the maskrom and erases the flash, power off. Insert the prepared SD card, power on the SDK, and it will automatically burn the firmware.
1.1.9 Search the File
find ./ -name ***
1.1.10 Check Memories
cat /proc/meminfo or free –h
1.1.11 Check Disk Usage (source heading: Check Memory Usage)
df -h
1.2 Debian
1.2.1 Terminal Position
Terminal position: start -> System Tools -> LXTerminal
1.2.2 Wi-Fi Connection
Enter the following command in the serial port:
nmcli r wifi on  #steps 1:turn on Wi-Fi
nmcli dev wifi   #steps 2:scan nearby AP
#steps 3:connect AP
nmcli dev wifi connect "DIR-803" password "839919060" ifname wlan0
nmcli r wifi off #steps 4:turn off Wi-Fi
1.2.3 Dual-screen with Different Display
Use xrandr to make sure how many display devices there are. For example, the following two devices, HDMI-1 and DP-1 can be detected:
root@linaro-alip:/# xrandr
Screen 0: minimum 320 x 200, current 1920 x 1920, maximum 16384 x 16384
HDMI-1 connected primary 1920x1080+0+0 (normal left inverted right x axis y axis) 0mm x 0mm
   1920x1080     60.00 +  60.00*   50.00    30.00    24.00
   1920x1080i    60.00    50.00    50.00
   1280x1024     60.02
   1280x720      60.00    50.00    50.00
   720x576       50.00    50.00
   720x576i      50.00
   720x480       59.94    59.94
   720x480i      59.94
HDMI-2 disconnected (normal left inverted right x axis y axis)
DSI-1 connected 1080x1920+0+0 (normal left inverted right x axis y axis) 0mm x 0mm
   1080x1920     59.90*+
DP-1 disconnected (normal left inverted right x axis y axis)
DP-2 disconnected (normal left inverted right x axis y axis)
xrandr is used to set the relationship between the two screens:
su linaro-c "DISPLAY=:0 xrandr--output HDMI-1--above DSI-1"
The –above can be replaced by right-of, left-of, below, same-as, preferred, off, etc. For more detals, please refer to Rockchip_Developer_Guide_Linux_Graphics_CN.pdf
1.2.4 Dual-screen with Different Audio
Method 1: Open the Sound&Video—->PulseAudio Volume Control in the bottom left corner:
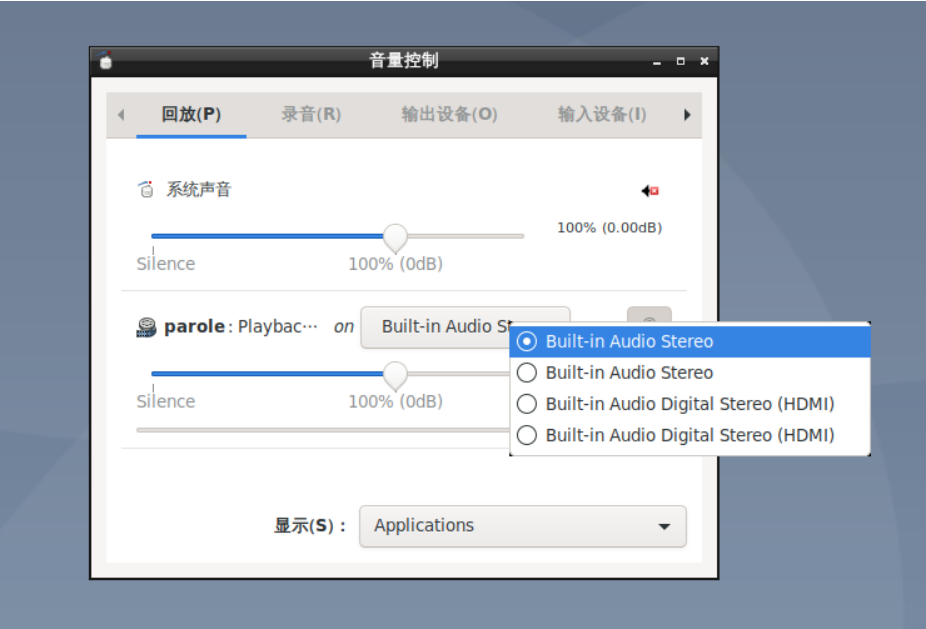
Method 2: Use aplay to confirm the sound card and select the sound card to play:
root@linaro-alip:/# aplay -l
**** List of PLAYBACK Hardware Devices ****
card 0: rockchipdp0 [rockchip,dp0], device 0: rockchip,dp0 spdif-hifi-0 [rockchip,dp0 spdif-hifi-0]
  Subdevices: 1/1
  Subdevice #0: subdevice #0
card 1: rockchipes8388 [rockchip-es8388], device 0: dailink-multicodecs ES8323.7-0011-0 [dailink-multicodecs
ES8323.7-0011-0]
  Subdevices: 1/1
  Subdevice #0: subdevice #0
card 2: rockchiphdmi0 [rockchip-hdmi0], device 0: rockchip-hdmi0 i2s-hifi-0 [rockchip-hdmi0 i2s-hifi-0]
  Subdevices: 1/1
  Subdevice #0: subdevice #0

dp0: aplay-Dplughw:0,0/dev/urandom
es8388: aplay-Dplughw:1,0/dev/urandom
hdmi0: aplay-Dplughw:2,0/dev/urandom
Method 3: Open a song and drag it from the main screen to the secondary screen, and then select a sound card to play in the same way on the main screen to complete the dual-screen with different audio function. For more detals, please refer to Rockchip_Developer_Guide_Linux_Graphics_CN.pdf
1.2.5 Display Rotation
Rotation normal/left/right:
vi /etc/X11/xorg.conf.d/20-modesetting.conf
Change the normal to left/right/ and it will take effect after reboot.
2. Performance Test
2.1 Disk Read and Write Test
Check device nodes with fdisk -l first. The source uses the last partition, mmcblk0p8 (14.6G), as writable userdata for eMMC performance testing. This does not establish that every board’s last partition is writable; the following write test overwrites its data.
root@linaro-alip:~# fdisk -l
Disk /dev/mmcblk0: 29.1 GiB, 31268536320 bytes, 61071360 sectors
Units: sectors of 1 * 512 = 512 bytes
Sector size (logical/physical): 512 bytes / 512 bytes
I/O size (minimum/optimal): 512 bytes / 512 bytes
Disklabel type: gpt
Disk identifier: 1124E418-9008-41F8-9E3D-8D872216C8A1
Device           Start      End  Sectors  Size Type
/dev/mmcblk0p1    16384    24575     8192    4M unknown
/dev/mmcblk0p2    24576    32767     8192    4M unknown
/dev/mmcblk0p3    32768   163839   131072   64M unknown
/dev/mmcblk0p4   163840   425983   262144  128M unknown
/dev/mmcblk0p5   425984   491519    65536   32M unknown
/dev/mmcblk0p6   491520 29851647 29360128   14G unknown
/dev/mmcblk0p7 29851648 30113791   262144  128M unknown
/dev/mmcblk0p8 30507008 61071295 30564288 14.6G unknown
2.1.1 eMMC Read and Write
Write:
dd if=/dev/zero of=/dev/mmcblk0p8 bs=1M count=2000 oflag=direct,nonblock
Read:
dd if=/dev/mmcblk0p8 of=/dev/null bs=1M count=2000 iflag=direct,nonblock
2.1.2 U disk Read and Write
Write:
dd if=/dev/zero of=/dev/sda1 bs=1M count=2000 oflag=direct,nonblock
Read:
dd if=/dev/sda1 of=/dev/null bs=1M count=2000 iflag=direct,nonblock
2.2 Set Performance Mode
echo performance | tee $(find /sys/ -name *governor)
2.3 Check CPU DDR Frequency
cat /sys/kernel/debug/clk/clk_summary |grep -E "cpu|arm|ddr"
2.4 glmark2 Performance Score
Buildroot glmark2 Display screen performance score:
sh /rockchip-test/gpu/test_fullscreen_glmark2.sh
Do not display screen performance score:
sh /rockchip-test/gpu/test_offscreen_glmark2.sh
3. Hardware Stability Test
3.1 IO-DOMAINS
The hardware supply voltage of all GPIO power domains is required to match the software configuration. Please re-examine the correctness of the project voltage configuration before mass production, especially the configuration of Wi-Fi, FLASH, and Ethernet IO power supplies. Otherwise, the following problems will occur: If the software configuration is 1.8V, but the hardware power supply is 3.3V, it will cause the low withstand voltage circuit working in overvoltage state, and the chipset will be damaged after long time working. If the software configuration is 3.3V, but the hardware power supply is 1.8V, the circuit will work abnormally; For the configuration check method, please refer to the documentation under the corresponding chip platform. For example, for RK3568, please refer to: Rockchip_RK356X_Introduction_IO_Power_Domains_Configuration_CN.pdf
3.2 Power Supply
It is recommended that the power supply design for the project’s hardware use our reference design. If there are changes to the power supply solution or differences in component selection, especially when using discrete power supplies instead of our matched PMIC power supply solution, Necessary tests (includes testing the power-up sequence during cold starts and restarts, voltage, and ripple under high load conditions) need to be done on all core power supplies related to the chip booting, such as: VDD_LOGIC, VDD_ARM, VCC_PMU, VCC_DDR supplies, etc.
3.3 Signal
After the project’s hardware schematics are completed, it is recommended to submit them through the Redmine system for our engineers to review, especially the DDR section, which needs to strictly follow our template for design. At the same time, the selection of DDR, EMMC, and FLASH chips must be from our AVL, which can be obtained through Redmine.
3.4 High and Low Temperature Test
In addition to stability testing at room temperature, it is recommended that customers complete CPU stress, DDR stress, reboot stress, and cold boot tests in high and low temperature environments that are the actual working temperatures of the product to ensure the stability of the product in high and low temperature operating environments.
4. Software Stability Test
This section primarily introduces the basic tools utilized by the Rockchip test suite and And how to use the rockchip test suite to complete the software stability testing for products.
4.1 Basic Tools
4.1.1 stressapptest
4.1.1.1 Overview
Stressapptest will create threads to copy and directly read from and write to the disk. It tries to maximize the system’s memory load as much as possible to conduct more effective testing. Additionally, it aims to randomize data from the processor and I/O to memory, creating a simulated real-world environment to test the stability of current hardware devices. It has been used at Google for some time and now it is available under the apache 2.0 license. stressapptest may be used for the following purposes: Stress test: as described here. Hardware qualification and debugging. Memory interface test: see the Theory behind this. Disk testing.
4.1.1.2 Usage
To execute, a typical command would be:
stressapptest -s 20 -M 256 -m 8 -W    # Test 256MB, running 8 "warm copy" threads. Exit after 20 seconds.
stressapptest --help                  # list the available arguments.
Common arguments
| Option | Meaning / default |
|---|---|
-M mbytes |
RAM megabytes to test; automatically detect available memory |
-s seconds |
Seconds to run; 20 |
-m threads |
Memory-copy threads; automatically detect CPU count |
-W |
More CPU-intensive copying; false |
-n ipaddr |
Network thread connecting to ipaddr; none |
--listen |
Listen and respond to network threads; 0 |
-f filename |
Disk thread using temporary filename; none |
-F |
Do not check every transaction; use libc memcpy; false |
-l logfile |
Log output file; none |
-v level |
Verbosity 0–20; default 8 |
4.1.2 memtester
4.1.2.1 Overview
A userspace utility for testing the memory subsystem for faults. It’s portable and should compile and work on any 32- or 64-bit Unix-like system. (Yes, even weird, proprietary Unices, and even Mac OS X.) For embedded system developers, memtester can be told to test memory starting at a particular physical address as of memtester version 4.1.0.
4.1.2.2 Usage
memtester [-p physaddrbase [-d device]] <mem>[B|K|M|G] [loops]
Detailed test items within the loop:
Stuck Address
Random Value
Compare XOR
Compare SUB
Compare MUL
Compare DIV
Compare OR
Compare AND
Sequential Increment
Solid Bits
Block Sequential
Checkerboard
Bit Spread
Bit Flip
Walking Ones
Walking Zeroes
8-bit Writes
16-bit Writes
4.2 Rockchip Test
The log output path for Rockchip test stress testing is /userdata/rockchip-test, so please ensure that the directory has read and write permissions before testing. A complete serial port log is helpful for better analysis and problem location. Therefore, during testing, the product needs to be connected with a serial port, and the serial port host machine should have the capability to save all logs.
4.2.1 Configuration Enablement
In the buildroot, to enable the Rockchip-test package, the following configurations need to be enabled:
#  - stress test on cpu and memory
BR2_PACKAGE_STRESSAPPTEST=y
#  - memtest used to testing the memory subsystem for faults
BR2_PACKAGE_MEMTESTER=y
#  - audio, reboot, bluetooth, ddr, dvfs, flash, suspend/resume, wifi
BR2_PACKAGE_ROCKCHIP_TEST=y
4.2.2 Test List
The currently supported stress test list is as follows:
# bash /rockchip-test/rockchip_test.sh
"******************************************************"
"***                                                ***"
"***          *****************************         ***"
"***          *     ROCKCHIP TEST TOOLS    *         ***"
"***          *  V2.0 updated on 20220928  *         ***"
"***          *****************************         ***"
"***                                                ***"
"*****************************************************"

"*****************************************************"
"ddr test:              1 (ddr stress test)"
"cpu test:              2 (cpu stress test)"
"gpu test:              3 (gpu stress test)"
"npu test:              4 (npu stress test)"
"suspend_resume test:   5 (suspend resume test)"
"reboot test:           6 (auto reboot test)"
"power lost test:       7 (power lost test)"
"flash stress test:     8 (flash stress test)"
"recovery test:         9 (recovery wipe all test)"
"audio test:           10 (audio test)"
"camera test:          11 (camera test)"
"video test:           12 (video test)"
"bluetooth test:       13 (bluetooth on off test)"
"wifi test:            14 (wifi on off test)"
"chromium test:        15 (chromium with video test)"
"*****************************************************"
4.2.3 Testing Scale
It is recommended that each test project is deployed for 10 units * 24 hours or more, with adjustments made according to the degree of stability required by the project.
4.2.4 Testing Methods
Below is an example of the testing methods for each unit in the DDR stress test using memtester . Unit testing can be executed from the rockchip_test script or by directly running the corresponding script.
4.2.4.1 Rockchip Test
bash rockchip-test/rockchip_test.sh
Enter the corresponding number 1 for DDR Test in the input stress test list
"*****************************************************"
"***                                               ***"
"***            DDR TEST                           ***"
"***                                               ***"
"*****************************************************"
"*****************************************************"
"memtester:                                      1"
"stressapptest:                                  2"
"stressapptest + memtester:                      3"
"ddr auto scaling:                               4"
"stressapptest + memtester + ddr auto scaling:   5"
"*****************************************************"
Then enter the number 1 corresponding to the test item memtester to start the test.
4.2.4.2 Execute Directly
bash /rockchip-test/ddr/memtester_test.sh
4.2.5 Test Details
4.2.5.1 DDR Testing
DDR stress testing supports the following five test scenarios:
"memtester:                                      1"
"stressapptest:                                  2"
"stressapptest + memtester:                      3"
"DDR auto scaling:                               4"
"stressapptest + memtester + DDR auto scaling:   5"
If the product does not support frequency scaling, you can choose option 3, which is to use the stressapptest + memtester scaling for testing. If the product supports frequency scaling, you can choose option 5, which is to use the stressapptest + memtester + DDR automatic frequency variation scenario for testing. CPU stress testing consists of the entry script ddr_test.sh and the following three scripts:
/rockchip-test/ddr/ddr_freq_scaling.sh
/rockchip-test/ddr/memtester_test.sh
/rockchip-test/ddr/stressapptest_test.sh
4.2.5.1.1 DDR Frequency Scaling
Without arguments, the DDR frequency-scaling script automatically changes frequency.
bash /rockchip-test/ddr/ddr_freq_scaling.sh
cnt: 0, ddr freq: success change to 528000000 Hz
..
cnt:100, ddr freq: success change to 324000000 Hz
When the script is executed with a frequency argument that is within the supported frequencies, it will scale to the corresponding frequency.
bash /rockchip-test/ddr/ddr_freq_scaling.sh 528000000
ddr freq: success change to 528000000 Hz
If the script is executed with a frequency argument that is not within the supported frequencies, it will print the available frequencies and the current frequency.
bash /rockchip-test/ddr/ddr_freq_scaling.sh 1
ddr freq: 1 is not in available frequencies: 324000000 528000000
ddr freq: now 528000000 Hz
Stop the test
killall bash
4.2.5.1.2 stressapptest_test
By default, stressapptest uses half the available memory and stops after 24 hours. Stop the test:
killall stressapptest
4.2.5.1.3 memtester_test
By default, memtester uses half the available memory. Stop the test:
killall memtester
Note: Memtester will not automatically stop the test if an error occurs; it is necessary to monitor the log of the program’s running process.
4.2.5.2 CPU Testing
CPU stress testing supports the following three test scenarios:
"stressapptest test:                               1"
"cpu auto scaling:                                 2"
"stressapptest + cpu auto scaling:                 3"
If the product does not support frequency variation, you can choose option 2, which is to use the stressapptest scenario for testing. If the product supports frequency variation, you can choose option 3, which is to use the stressapptest combined with CPU automatic frequency scaling for testing. The CPU stress test consists of the entry scripts cpu_test.sh and cpu_freq_scaling.sh .
4.2.5.2.1 CPU Frequency Scaling
Without arguments, the script automatically changes frequency.
bash /rockchip-test/cpu/cpu_freq_scaling.sh
cnt: 0, cpu freq policy:0 success change to 816000 KHz
...
cnt: 100, cpu freq policy:0 success change to 1104000 KHz
If the script is executed with a frequency argument that is within the supported frequencies, it will scale to the corresponding frequency.
bash /rockchip-test/cpu/cpu_freq_scaling.sh 1104000
cpu freq policy:0 success change to 1104000 KHz
If the script is executed with a frequency argument that is not within the supported frequencies, it will print the supported frequency points as well as the current frequency.
bash /rockchip-test/cpu/cpu_freq_scaling.sh 1
cpu freq: 1 is not in available frequencies: 600000 816000 1008000 1104000 1416000
cpu freq: now 1104000 Hz
Stop the test:
killall bash
4.2.5.3 Flash Testing
Generate 7 random source data files within 5MB in $test_dir/src_test_data , copy them into the five subdirectories of $test_dir/des_test_data , and compare the md5 values, looping for 200 times.
4.2.5.4 Standby&Wake-up Test
Enabling automatic standby&wake-up requires the presence of an RTC (Real-Time Clock) in the system, which must be functioning properly. By default, the system will execute the standby&wake-up process 10,000 times before exiting, with each wake-up period being a random number between 3 and 6 seconds.
4.2.5.5 Reboot Testing
Default behavior is to stop testing after 10,000 reboots, with the system automatically shutting down 8 seconds after each startup. Stop of testing in advance
echo off > /userdata/rockchip_test/reboot_cnt
If the system has CONFIG_PSTORE_RAM enabled, the script will check for logs of crashes or other abnormalities during the shutdown process after each booting, and will automatically stop the test if any are found.
4.2.5.6 GPU Testing
The GPU stress test is based on glmark-es2, utilizing the test_stress_glmark2.sh script, which primarily executes glmark- es2 with the run-forever parameter. glmark-es2 is a benchmark for OpenGL ES 2.0. It only employs the subset of the OpenGL 2.0 API that is compatible with OpenGL ES 2.0.
4.2.5.7 Camera Testing
Camera stress testing can be performed using either of the following two methods:
- camera_stresstest_rkisp_demo.sh Ensure that the buildroot has the following configuration enabled:
BR2_PACKAGE_CAMERA_ENGINE_RKAIQ_RKISP_DEMO=y
Using rkisp_demo does not require configuring the ISP pipeline through media-ctl . This method does not perform stress testing on the USB camera. The testing process involves a loop that captures camera data from the ISP CIF interface for 100 frames each, but does not verify the file size.
- camera_stresstest_v4l2.sh Ensure that the buildroot has the following configuration enabled:
BR2_PACKAGE_LIBV4L_UTILS=y
Using v4l2-ctl may require configuring the ISP pipeline through media-ctl . This method performs stress testing on the USB camera. The testing process captures camera data from the USB ISP CIF interface in a loop at a resolution of 640x480 for 5 frames each and verifies the file size. Choose either of the above methods based on the actual application scenario.
4.2.5.8 Video Testing
Video stress testing involves continuously playing video files located in either the /mnt/udisk/videos or /userdata/videos directory. Before testing, place the video file to be tested in either of the directories mentioned above. The /userdata/videos directory is checked first. If neither of the two directories exists, the test will prompt a message and exit.
4.2.5.9 Wi-Fi BT Testing
Wi-Fi BT testing involves automatic on and off testing.
4.3 User Scenario Testing
In addition to the aforementioned unit tests for system functionality, we can also simulate realistic scenarios to perform stress tests, serving as a supplement to system stability testing. For example, for the product form of a dictionary pen, a typical user scenario might be:
Power on → scan and recognize → play the translation → leave idle until second-level standby → wake and use again, with random Wi-Fi/BT toggles.
We can use the commands from the basic script mentioned above to construct this realistic scenario:
Power on → loop (v4l2 capture → aplay playback → pm-suspend → RTC wake), with random Wi-Fi/BT toggles while awake.
5. TO DO
5.1 Adding Common Problem Analysis Methods
5.2 Adding NPU, Recovery, Audio, Browser, Power-off Test Instructions
Source differences, source defects and execution limits
- Both sources are V2.0.2: Chinese 20 pages, English 14. English uniquely adds file search in 1.1.9, shifting the memory/disk subsections by one. Its df -h heading incorrectly says memory usage; Chinese correctly says disk space.
- The two scenario sequences on English page 14 overflow the layout and are absent from extracted text. They are restored from Chinese page 20 and treated as prose, not code. Chapter 5 is a source TODO, not completed instructions for NPU, recovery, audio, browser or power-loss testing.
- Recording writes /tmp/isp.yuv but playback pulls /tmp/cif.yuv: reconcile filenames before use. The printed –d in arecord and –h in free require ASCII -d and -h; “or” is not a shell operator. The wmv/mp3 container list and aplay musicdemo.wmv are source examples, not guarantees of format support.
- Chinese text and the actual xrandr output identify HDMI-1 and DSI-1; English prose incorrectly says DP-1. English xrandr and aplay-Dplughw examples omit spaces. Chinese provides su linaro -c “DISPLAY=:0 xrandr –output HDMI-1 –above DSI-1” and aplay -Dplughw:0,0 /dev/urandom (use card 1 or 2 as applicable). –preferred/–off are not position options and cannot be substituted mechanically.
- The DDR paragraph incorrectly says CPU stress. The CPU menu maps 1=stressapptest, 2=cpu auto scaling, 3=combined, but both prose versions recommend 2 without frequency scaling. Check the actual script menu. CPU examples generally use KHz, while the final invalid-frequency output says Hz; DDR uses Hz. Do not conflate units.
- stressapptest -W and -F default to false; Chinese mistranslates false as “wrong.” The parameter table clarifies the disabled default. /userdata/rockchip-test logs and /userdata/rockchip_test/reboot_cnt use different separators: check the actual scripts. Original code comments, diagnostic output, SSIDs and passwords are source examples only; none were executed or used.