
Based on RK-KF-YF-379 Chinese V4.1.1 (2025-04-16, 44 pages), compared with English V4.0.0 (2024-01-11, 40 pages). The complete English technical text is followed by the newer Chinese additions, including their code and tables. Covers all chapters, technical figures and code; front matter, legal/contact material and revision history are excluded. ArmSoM platform reference only: no hardware validation was performed. Check the board, SDK, medium, boot chain and TEE version. OTP/eFuse programming is irreversible and may permanently lock a device. Never use example secrets or passwords in production. Commands are source records, not executed or certified safe to paste.
| Platform (Chinese V4.1.1) | Signing | Medium | TEE level configurable | Special notes |
|---|---|---|---|---|
| RK3308 / RK3328 / RK3326 / PX30 / RK3358 | AVB | OTP | No | No |
| RK3399 | AVB | EFUSE | No | No |
| RK3566 / RK3568 | FIT | OTP | No | No |
| RK3588 / RK3576 / RK3562 | FIT | OTP | Yes | No |
| RV1126 | FIT | OTP | No | Yes |
| RV1106 / RV1103 / RK3506 | FIT | OTP | Yes | Yes |
| RV1126B | FIT | OTP | Yes | No |
1. Secure Boot Introduction
Secure Boot is a set of verification processes designed to ensure the integrity and legitimacy of the firmware running on a device. Its primary purpose is to act as a protective measure against malicious software injection by unauthorized third-party users. Upon enabling Secure Boot, if the protected partition is tampered with, the device will generate an error or even halt its operation. Secure Boot mainly protects the pre-boot partition of the system. For the system and user partitions, this document provides partition encryption and verification schemes.
| System-Verity | System-Encryption | |
|---|---|---|
| On disk | Cleartext | Ciphertext |
| System key | Cleartext public key in Boot.img (source wording; see root-hash clarification) | Encrypted key in RPMB [1] |
| Anti-copy | No | Yes |
| Anti-tamper | Yes; unauthorized changes cause I/O errors | Yes in source; changes produce incorrect decryption, not an authenticated-integrity guarantee |
Before proceeding, refer to Product Version to know the classification of chip platforms. Different platforms have varying chip resources and adopt different security strategies. Read relevant sections according to the classification. This document is based on the general SDK and aims to assist customers in building a firmware security solution from scratch. Additionally, it provides some scripts to help customers manage and streamline the process of building a secure firmware.
1.1 Linux Secure Boot Process
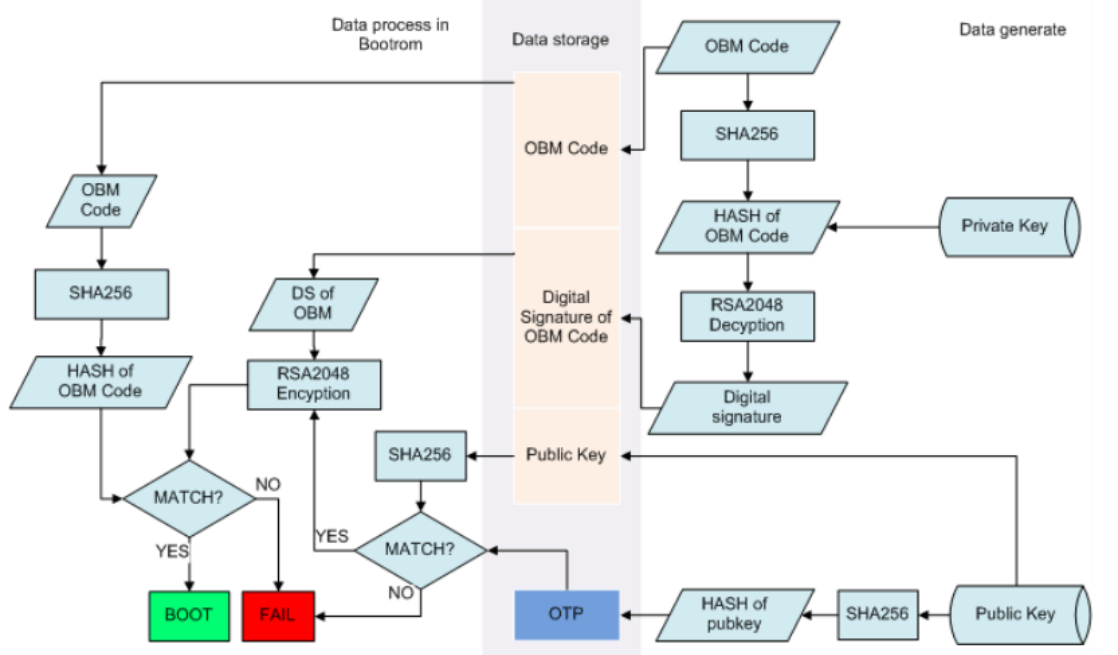
The above flowchart illustrates the process of Bootrom verifying the loader, and the verification process for other firmware is similar. In summary, a signed firmware package consists of Firmware (OBM Code) + Digital Signature + Public Key. Both the Digital Signature and Public Key are added by the signing tool. In terms of storage, the signed firmware is placed on eMMC or Flash, while the Public Key Hash is stored in OTP (eFuse) of the chip. During startup, the firmware’s public key is verified using the hash in OTP, and then the digital signature is verified using the public key. This process ensures the binding of the chip with the signed code. Please refer to “Rockchip-Secure-Boot-Application-Note-V1.9.pdf” for details.
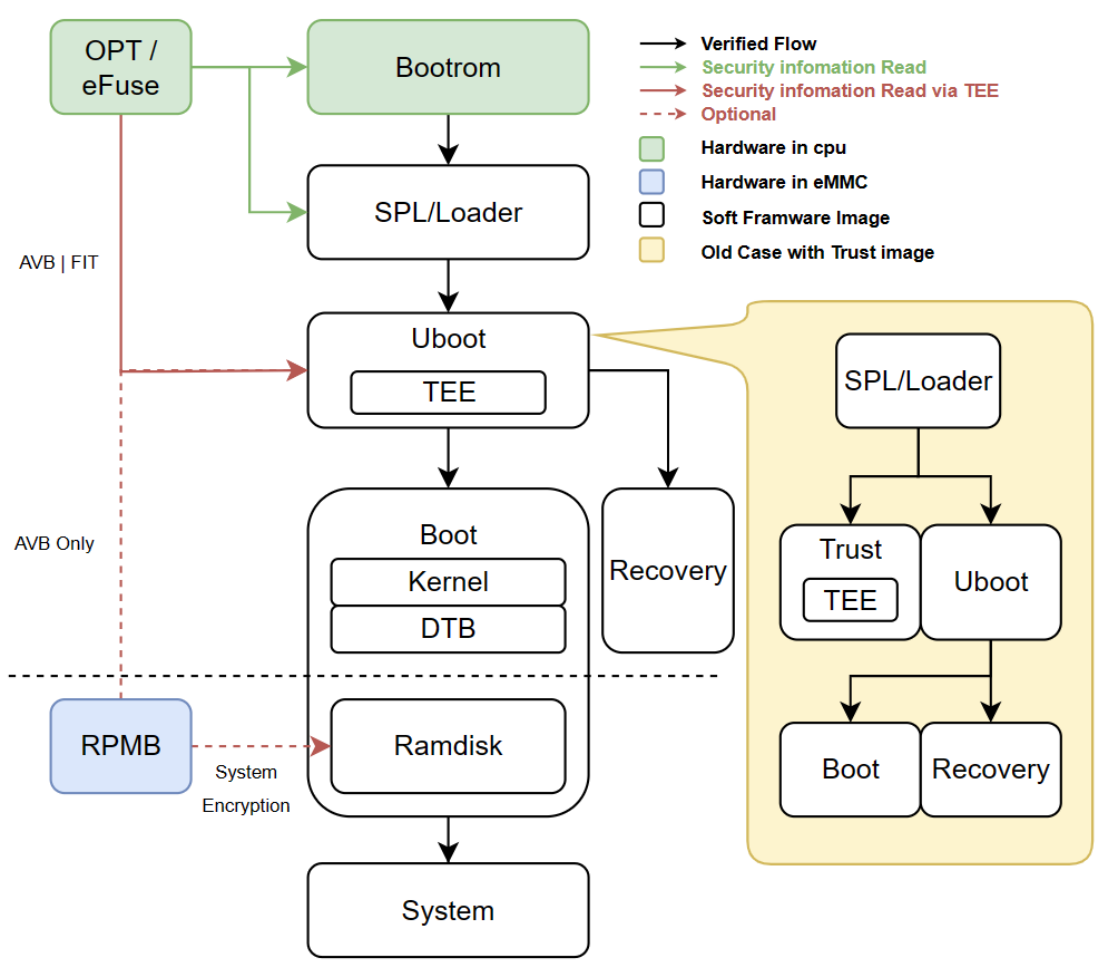
Note: The Trust firmware is at the same level as the Uboot firmware, both verified by SPL or Loader, following the same verification process as Uboot. On new chip platforms, the Trust firmware has been integrated into the Uboot firmware. Based on the above rules, each firmware utilizes the same set of keys for signing, It only requires writing a Public Key Hash to OTP/eFuse. Then, each firmware verifies the subsequent firmware in a cascading manner using the Public Key Hash, forming a trusted chain to ensure that the firmware in the chain is both intact and legitimate. The primary code for Secure Boot is provided by U-boot, ensuring the security of the firmware behind U-boot. The verification or encryption of the System is handled by Ramdisk (please refer to the System Security section).
1.2 Secure Storage
To enhance the security of the trusted chain, the trusted root of the chain needs to be stored in a hardware module and establish a strong binding state with the hardware. In addition to the trusted root storage, the Linux platform provides several security storage areas for customers to store custom information:
| Storage area | Description |
|---|---|
| OTP / eFuse | Inside the SoC; irreversible fuse programming. Miniloader/SPL can program OTP; eFuse requires PC tools. Historical English list: eFuse RK3399/RK3288; OTP RK3308/RK3326/PX30/RK3328. Capacity varies, usually only one or two keys. |
| RPMB | Physical eMMC partition, invisible as a filesystem; authenticated SoC/TEE access only, encrypted, cannot be mounted. |
| Security Partition | Logical flash partition replacing absent RPMB; encrypted and accessible through TEE, cannot be mounted. Forced erasure is possible. English V4.0.0 says TEE fails and Secure Boot cannot start; Chinese V4.1.1 instead says TEE reinitializes it and old contents are lost. |
Note: Since OTP (eFuse) is mainly used internally by Rockchip, customer security information should prioritize other areas such as RPMB/Security. If there are specific requirements, please apply for the corresponding information through the business channel.
2. Secure Boot
In the Linux system, there are two Secure Boot schemes: the FIT scheme and the AVB scheme. The effects of both schemes are the same, but they cannot be used interchangeably. Please refer to the Product Version section to determine which scheme to adopt for each chip specifically.
2.1 FIT
FIT (Flattened Image Tree) is a booting solution supported by U-Boot for a new type of firmware, it supports the packaging and verification of multiple images. FIT utilizes an its (Image Source File) to describe image information, and ultimately generates a itb (Flattened Image Tree Blob) using the mkimage tool. The its file follows the syntax rules of DTS (Device Tree Source), providing great flexibility and direct compatibility with the libfdt library and related tools. It also comes with a new set of security verification methods. For more detailed information about FIT, refer to Chapter Twelve of the Rockchip_Developer_Guide_UBoot_Nextdev .
2.1.1 Keys Generation
Execute the following three commands within the U-Boot project to generate an RSA key pair for signing. Typically, this process only needs to be done once. Subsequently, use this key pair for signing and verifying firmware. Please handle and store them securely.
# 1. The directory where the key is placed: keys
mkdir -p keys

# 2. Use Rockchip's "rk_sign_tool" tool to generate RSA2048 private keys,
privateKey.pem and publicKey.pem, rename and store them as keys/dev.key and
keys/dev.pubkey respectively. The command is:
../rkbin/tools/rk_sign_tool kk --bits 2048 --out .
ln -s privateKey.pem keys/dev.key
ln -s publicKey.pem keys/dev.pubkey

# 3.Use -x509 and the private key to generate a self-signed certificate:
keys/dev.crt (the effect is essentially the same as the public key)
openssl req -batch -new -x509 -key keys/dev.key -out keys/dev.crt
If the error message is that there is no .rnd file in the user directory: Can’t load /home4/cjh//.rnd into RNG 140522933268928:error:2406F079:random number generator:RAND_load_file:Cannot open file:../crypto/rand/randfile.c:88:Filename=/home4/cjh//.rnd Please create manually first: touch ~/.rnd Use ls keys/ to view the results:
dev.crt dev.key dev.pubkey
Note: The above names of “keys”, “dev.key”, “dev.crt” and “dev.pubkey” are fixed and should not be altered. Because these names have been statically defined in its file, packaging will fail if they are changed.
2.1.2 Configuration
Opens the following configuration of U-Boot’s defconfig:
# Required
CONFIG_FIT_SIGNATURE=y
CONFIG_SPL_FIT_SIGNATURE=y

# Optional
CONFIG_FIT_ROLLBACK_PROTECT=y       # boot.img Rollback protect
CONFIG_SPL_FIT_ROLLBACK_PROTECT=y   # uboot.img Rollback protect
It is recommended to select configurations by “make menuconfig” and then update the original defconfig file with “make savedefconfig.” In this way, you can avoid incorrect dependencies caused by imposing defconfig configuration, which in turn leads to compilation failure.
2.1.3 U-Boot Compilation and Firmware Signing
During U-Boot compilation, boot.img, recovery.img, loader.bin, and uboot.img are signed simultaneously. Therefore, before compilation, it is necessary to determine the locations of boot.img and recovery.img to be signed. (1) Basic Commands (Non-rollback):
./make.sh rv1126 --spl-new --boot_img boot.img --recovery_img recovery.img
Compilation result:
#......
# After compilation is completed, generate signed uboot.img, boot.img and
recovery.img.
start to sign rv1126_spl_loader_v1.00.100.bin
# ......
sign loader ok.
# ......
Image(signed, version=0):  uboot.img (FIT with uboot, trust...) is ready
Image(signed, version=0):  recovery.img (FIT with kernel, fdt, resource...) is
ready
Image(signed, version=0):  boot.img (FIT with kernel, fdt, resource...) is ready
Image(signed):  rv1126_spl_loader_v1.05.106.bin (with spl, ddr, usbplug) is ready
pack uboot.img okay! Input: /home4/cjh/rkbin/RKTRUST/RV1126TOS.ini

Platform RV1126 is build OK, with new .config(make rv1126-secure_defconfig)
(2)Extended command 1: If anti-rollback is enabled, the rollback parameter must be added to (1) above. For example:
// Specify the minimum version numbers of uboot.img, boot.img and recovery.img as
10, 12 and 12 respectively.
./make.sh rv1126 --spl-new --boot_img boot.img --recovery_img recovery.img --
rollback-index-uboot 10 --rollback-index-boot 12 --rollback-index-recovery 12
Compilation result:
...

// After the compilation is completed, the signed uboot.img, boot.img and
recovery.img are generated, and include the anti-rollback version number.
start to sign rv1126_spl_loader_v1.00.100.bin
......
sign loader ok.
......
Image(signed, version=0, rollback-index=10):  uboot.img (FIT with uboot, trust)
is ready
Image(signed, version=0, rollback-index=12):  recovery.img (FIT with kernel, fdt,
resource...) is ready
Image(signed, version=0, rollback-index=12):  boot.img (FIT with kernel, fdt,
resource...) is ready
Image(signed):  rv1126_spl_loader_v1.00.100.bin (with spl, ddr, usbplug) is ready
(3)Extended command 2: If you want to burn the public key hash to OTP/eFUSE, you must add the parameter –burn-key- hash to the above (1) or (2). For example:
# Specify the minimum version numbers of uboot.img, boot.img and recovery.img as
10, 12 and 12 respectively.
# Require burning the public key hash into OTP/eFUSE in the SPL stage.
./make.sh rv1126 --spl-new --boot_img boot.img --recovery_img recovery.img --
rollback-index-uboot 10 --rollback-index-boot 12 --rollback-index-recovery 12 --
burn-key-hash
After turning on rollback, the updated version number must not be lower than the previous version (can be same), otherwise the system will not allow startup Compilation result:
#......
# Enable burn-key-hash
### spl/u-boot-spl.dtb: burn-key-hash=1

# After compilation is completed, generate signed uboot.img, boot.img and
recovery.img, and include the anti-rollback version number.
start to sign rv1126_spl_loader_v1.00.100.bin
# ......
sign loader ok.
# ......
Image(signed, version=0, rollback-index=10):  uboot.img (FIT with uboot, trust)
is ready
Image(signed, version=0, rollback-index=12):  recovery.img (FIT with kernel, fdt,
resource...) is ready
Image(signed, version=0, rollback-index=12):  boot.img (FIT with kernel, fdt,
resource...) is ready
Image(signed):  rv1126_spl_loader_v1.00.100.bin (with spl, ddr, usbplug) is ready
When powering on the device, you should see the SPL print: “RSA: Write key hash successfully.” Note: Whether the public key hash is burned will only affect whether Maskrom verifies loader, and once burned, it cannot be revoked. The verification process for loader, U-Boot, and subsequent stages remains consistent. Therefore, during the debugging phase, it is advisable not to use “burn-key-hash”. (4) Extended Command 3: FIT Firmware Signing Extended Command 3 For the convenience of updating boot and recovery, U-Boot also supports signing boot or recovery firmware separately. It requires a complete compilation of the U-Boot firmware with signing at least once before.
./make.sh rv1126 --spl-new
# Before compilation, ensure that U-Boot has been compiled at least once with
signing enabled.

./scripts/fit.sh --boot_img boot.img            # Sign boot.img separately
./scripts/fit.sh --recovery_img recovery.img    # Sign recovery.img separately
Please make sure U-boot contains the scripts: fit.sh: repack boot / recovery individually patch (Change-Id: Ib9c0396625971469e13e8092d233e2aea5714486) (5) Notes: –boot_img : Optional. Specifies the boot.img to be signed. –recovery_img : Optional. Specifies the recovery.img to be signed. –rollback-index-uboot , –rollback-index-boot , –rollback-index-recovery : Optional. Specifies the anti-rollback version numbers. –spl-new : If this parameter is not included in the compilation command, it will use the spl file from rkbin to generate the loader by default. Otherwise, it will use the spl file compiled at the moment to package the loader.
Because the u-boot-spl.dtb needs to contain the RSA public key (provided by users), the SDK released by Rockchip will not submit spl files that support secure boot to the rkbin repository. Therefore, users need to specify the –spl-new parameter when compiling. However, users can also submit their own spl version to the rkbin project, and after that, they do not need to specify this parameter during firmware compilation. They can use this stable version of the spl file every time. After compilation, three firmware files will be generated: loader, uboot.img, boot.img. As long as the RSA Key remains unchanged, it is allowed to individually update any of these firmware files.
2.1.4 Enable Log
The firmware configuration is normal. Burn the Key Hash into the OTP according to “Key Hash”. You will see the following log.
...
Trying to boot from MMC1
//SPL completes signature verification
sha256,rsa2048:dev+
// Anti-rollback detection: The current uboot.img firmware version number is 10,
and the minimum version number of this device is 9
rollback index: 10 >= 9, OK
// SPL completes hash verification of each sub-mirror
### Checking optee ... sha256+ OK
### Checking uboot ... sha256+ OK
### Checking fdt ... sha256+ OK

Jumping to U-Boot via OP-TEE
I/TC:
E/TC:0 0 plat_rockchip_pmu_init:2003 0
E/TC:0 0 plat_rockchip_pmu_init:2006 cpu off
E/TC:0 0 plat_rockchip_pmusram_prepare:1945 pmu sram prepare 0x14b10000 0x8400880
0x1c
E/TC:0 0 plat_rockchip_pmu_init:2020 pmu sram prepare
E/TC:0 0 plat_rockchip_pmu_init:2056 remap
I/TC: OP-TEE version: 3.6.0-233-g35ecf936 #1 Tue Mar 31 08:46:13 UTC 2020 arm
I/TC: Next entry point address: 0x00400000
I/TC: Initialized
......
### Loading kernel from FIT Image at 3d8122c0 ...
   Using 'conf' configuration
   // Uboot completes signature verification
   Verifying Hash Integrity ... sha256,rsa2048:dev+ OK
   // Anti-rollback detection: The current boot.img firmware version number is
22, and the minimum version number of this device is 21
   Verifying Rollback-index ... 22 >= 21, OK
   Trying 'kernel' kernel subimage
......
   Verifying Hash Integrity ... sha256+ OK  // hash verification of kernel is
completed
### Loading ramdisk from FIT Image at 3d8122c0 ...
   Using 'conf' configuration
   Trying 'ramdisk' ramdisk subimage
......
   Verifying Hash Integrity ... sha256+ OK  // hash verification of ramdisk is
completed
   Loading ramdisk from 0x3dd3d4c0 to 0x0a200000
### Loading fdt from FIT Image at 3d8122c0 ...
   Using 'conf' configuration
   Trying 'fdt' fdt subimage
......
   Verifying Hash Integrity ... sha256+ OK // hash verification of Fdt is
completed
   Loading fdt from 0x3d812ec0 to 0x08300000
   Booting using the fdt blob at 0x8300000
   Loading Kernel Image from 0x3d8234c0 to 0x02008000 ... OK
   Using Device Tree in place at 08300000, end 0831359d
Adding bank: 0x00000000 - 0x08400000 (size: 0x08400000)
Adding bank: 0x0848a000 - 0x40000000 (size: 0x37b76000)
Total: 236.327 ms

Starting kernel ...
Replacing any non-signed firmware will result in the system being unable to start properly.
2.2 AVB
AVB (Android Verified Boot) is primarily used in the Android system and establishes a complete trusted chain around U-Boot firmware, starting from a hardware-protected trusted root and extending all the way to the bootloader and partitions before and after U-Boot (such as boot or recovery partitions). On Linux systems, due to the absence of Android system components, AVB is cropped to perform verification only for the boot and recovery partitions. The verification from Loader to U-Boot is handled by RK’s proprietary solution.
2.2.1 Keys Generation
Verification from Loader to U-Boot is completed by RK’s proprietary solution, which requires generating a set of RSA key pairs, the same sa the FIT solution, please refer to FIT Keys Generation. In addition to this, AVB includes the following four keys: Product RootKey (PRK): The Root Key of AVB, verified by Base Secure Boot’s Key in eFuse devices. In OTP devices, it is directly read from PRK-Hash information pre-stored in OTP. Product Intermediate Key (PIK): An intermediate key with intermediary roles. Product Signing Key (PSK): Used for signing firmware. Product Unlock Key (PUK): Used for unlocking the device.
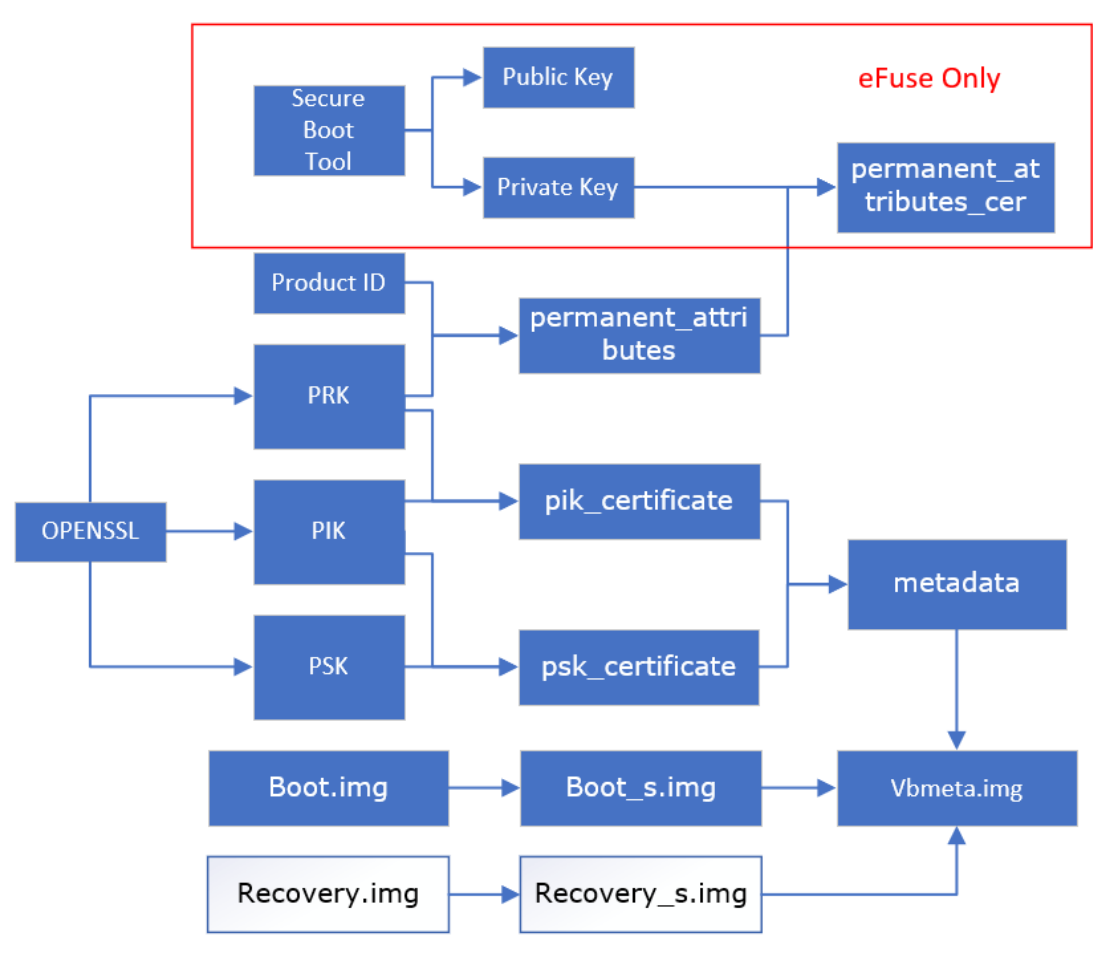
AVB derives a series of files based on these four keys, as shown in the image above. For details, refer to Google AVB open source documentation:https://android.googlesource.com/platform/ext ernal/avb/+/master/README.md. In comparison to the original AVB, on Linux, we have mainly focused on extracting the core firmware verification functionality of AVB. To adapt it to the Rockchip platform on eFuse devices, we have additionally generated permanent_attributes_cer.bin . This allows us to save space in eFuse by directly verifying permanent_attributes.bin information using the loader’s public key, without the need to store it in eFuse. A set of test certificates and keys is already available under tools/linux/Linux_SecurityAVB/avb_keys . You can use these during the debugging phase for convenience. However, for the final product, please replace them with your own private keys. You can generate them following the steps below.
cd tools/linux/Linux_SecurityAVB/
touch avb_keys/temp.bin

# Input 16 bytes product id, like "0123456789ABCDE"
# Or use random id,
# head -c 16 /dev/urandom | od -An -t x | tr -d ' \n' > avb_keys/product_id.bin
echo -n $PRODUCT_ID > avb_keys/product_id.bin

# Generate test keys.
openssl genpkey -algorithm RSA -pkeyopt rsa_keygen_bits:4096 -outform PEM -out
avb_keys/testkey_prk.pem
openssl genpkey -algorithm RSA -pkeyopt rsa_keygen_bits:4096 -outform PEM -out
avb_keys/testkey_psk.pem
openssl genpkey -algorithm RSA -pkeyopt rsa_keygen_bits:4096 -outform PEM -out
avb_keys/testkey_pik.pem
openssl genpkey -algorithm RSA -pkeyopt rsa_keygen_bits:4096 -outform PEM -out
avb_keys/testkey_puk.pem

# Generate certificate.bin and metadata.
python scripts/avbtool make_atx_certificate --output=avb_keys/pik_certificate.bin
--subject=avb_keys/temp.bin --subject_key=avb_keys/testkey_pik.pem --
subject_is_intermediate_authority --subject_key_version 42 --
authority_key=avb_keys/testkey_prk.pem
python scripts/avbtool make_atx_certificate --output=avb_keys/psk_certificate.bin
--subject=avb_keys/product_id.bin --subject_key=avb_keys/testkey_psk.pem --
subject_key_version 42 --authority_key=avb_keys/testkey_pik.pem
python scripts/avbtool make_atx_certificate --output=avb_keys/puk_certificate.bin
--subject=avb_keys/product_id.bin --subject_key=avb_keys/testkey_puk.pem --
usage=com.google.android.things.vboot.unlock --subject_key_version 42 --
authority_key=avb_keys/testkey_pik.pem
python scripts/avbtool make_atx_metadata --output=avb_keys/metadata.bin --
intermediate_key_certificate=avb_keys/pik_certificate.bin --
product_key_certificate=avb_keys/psk_certificate.bin

# Generate permanent_attributes.bin
python scripts/avbtool make_atx_permanent_attributes --
output=avb_keys/permanent_attributes.bin --product_id=avb_keys/product_id.bin --
root_authority_key=avb_keys/testkey_prk.pem

# If eFuse device used, generate permanent_attributes.bin.
openssl dgst -sha256 -out avb_keys/permanent_attributes_cer.bin -sign dev.key
avb_keys/permanent_attributes.bin
Therefore, AVB solution Keys includes the following two parts, located in two directories:
PC:~/SDK$ tree u-boot/keys/
.
├── dev.key
└── dev.pubkey

PC:~/SDK$ tree tools/linux/Linux_SecurityAVB/avb_keys
.
├── metadata.bin
├── permanent_attributes.bin
├── pik_certificate.bin
├── product_id.bin
├── psk_certificate.bin
├── puk_certificate.bin
├── testkey_pik.pem
├── testkey_prk.pem
├── testkey_psk.pem
└── testkey_puk.pem
# testkey_*.pem is the key of AVB, and the other bin files are key certificates
derived from the AVB key according to specific uses.
2.2.2 Configuration
2.2.2.1 Trust
Enter rkbin/RKTRUST, take RK3308 as an example, find RK3308TRUST.ini, and change:
[BL32_OPTION]
SEC=0
To:
[BL32_OPTION]
SEC=1
BL32_OPTION is enabled by default in the trust with TOS format, such as RK3288TOS.ini
2.2.2.2 U-boot
U-boot requires the following features:
# OPTEE support
CONFIG_OPTEE_CLIENT=y
CONFIG_OPTEE_V1=y           #RK312x/RK322x/RK3288/RK3228H/RK3368/RK3399 and V2
are mutually exclusive
CONFIG_OPTEE_V2=y           #RK3308/RK3326 and V1 are mutually exclusive

# CRYPTO support
CONFIG_DM_CRYPTO=y          # IT is required for eFuse device
CONFIG_ROCKCHIP_CRYPTO_V1=y # For eFuse devices,For example, RK3399/RK3288,
select according to chip
CONFIG_ROCKCHIP_CRYPTO_V2=y # eFuse device, For example, RK1808, select according
to chip
# AVB support
CONFIG_AVB_LIBAVB=y
CONFIG_AVB_LIBAVB_AB=y
CONFIG_AVB_LIBAVB_ATX=y
CONFIG_AVB_LIBAVB_USER=y
CONFIG_RK_AVB_LIBAVB_USER=y
CONFIG_AVB_VBMETA_PUBLIC_KEY_VALIDATE=y
CONFIG_ANDROID_AVB=y
CONFIG_OPTEE_ALWAYS_USE_SECURITY_PARTITION=y # For a non-eMMC device, to enable
it, a security partition must exist.
CONFIG_ROCKCHIP_PRELOADER_PUB_KEY=y          # Only available for eFuse devices
CONFIG_RK_AVB_LIBAVB_ENABLE_ATH_UNLOCK=y

#fastboot support
CONFIG_FASTBOOT=y
CONFIG_FASTBOOT_BUF_ADDR=0x2000000           # Can be modified if necessary
CONFIG_FASTBOOT_BUF_SIZE=0x08000000          # Can be modified if necessary
CONFIG_FASTBOOT_FLASH=y
CONFIG_FASTBOOT_FLASH_MMC_DEV=0
On some platforms, fastboot is not enabled by default in U-boot configuration. During a normal boot, you can view the current memory status by holding Ctrl-M . To manually configure CONFIG_FASTBOOT_BUF_* , ensure that the starting address and size do not conflict with the current memory configuration. Use ./make.sh xxxx to generate uboot.img , trust.img , and loader.bin .
2.2.2.3 Parameter
The vbmeta is a mandatory item in the partition table, and the security partition can be optionally added depending on the hardware: The vbmeta partition stores the signature information for target partitions and has a size of 1M. The security partition is generally used as an alternative to RPMB. If the device does not have RPMB on non-eMMC devices, this partition needs to be added with a size of 4M. If CONFIG_OPTEE_ALWAYS_USE_SECURITY_PARTITION is enabled, the use of the security partition is enforced. Therefore, a typical partition table allocation can be as follows:
# AVB parameter:
0x00002000@0x00004000(uboot),0x00002000@0x00006000(trust),0x00002000@0x00008000(
misc),0x00010000@0x0000a000(boot),0x00010000@0x0001a000(recovery),0x00010000@0x0
002a000(backup),0x00020000@0x0003a000(oem),0x00300000@0x0005a000(system),0x00000
800@0x0035a000(vbmeta),0x00002000@0x0035a800(security),-
@0x0035c800(userdata:grow)
uuid:system=614e0000-0000-4b53-8000-1d28000054a9
When downloading, the partition name on the download tool must be modified simultaneously. After modification, parameter.txt must be reloaded.
2.2.3 Firmware Signature
The rk_sign_tool is used to sign Loader, Uboot, and Trust
export RK_SIGN_TOOL=${SDK_DIR}/rkbin/tools/rk_sign_tool
export KEYS=${SDK_DIR}/u-boot/keys    # Keys generates chapters. The key is
stored under uboot/keys by default,.
${RK_SIGN_TOOL} cc --chip $CHIP
${RK_SIGN_TOOL} lk --key $KEYS/dev.key --pubkey $KEYS/dev.pubkey

${RK_SIGN_TOOL} sl --loader < path to loader.bin >
${RK_SIGN_TOOL} si --img < path to trust.img or uboot.img >
The default signature does not burn the OTP Public Key Hash, which facilitates debugging. To burn OTP Public Key Hash, you need to add sign_flag=0x20 in ${SDK_DIR}/rkbin/tools/setting.ini The avbtool is used to sign Boot and Recovery:
# Sign boot.img
IMAG=boot.img # path to boot.img
SIZE=`ls ${IMAGE} -l | awk '{printf $5}'`
SIZE=$[(SIZE / 4096 + 18) * 4096] # Align 4K
python scripts/avbtool add_hash_footer --image ${IMAGE} --partition_size ${SIZE}
--partition_name boot --key avb_keys/testkey_psk.pem --algorithm SHA512_RSA4096
# Generate the boot.img with signed information

python scripts/avbtool make_vbmeta_image --public_key_metadata
avb_keys/metadata.bin --include_descriptors_from_image ${IMAGE} --algorithm
SHA256_RSA4096 --rollback_index 0 --key avb_keys/testkey_psk.pem  --output
out/vbmeta.img
# Generated the out/vbmeta.img corresponding to boot.img

# Sign recovery.img
IMAG=recovery.img # path to recovery.img
SIZE=$(get_from_parameter) # Get the size of the recovery partition from
parameter. Partition size must be 4K aligned.
python scripts/avbtool add_hash_footer --image ${IMAGE} --partition_size ${SIZE}
--partition_name boot --key avb_keys/testkey_psk.pem --algorithm SHA512_RSA4096 -
-public_key_metadata avb_keys/metadata.bin
# Generate recovery.img with signed information. Recovery does not need to be
bound to vbmeta and comes with metadata information.
2.2.4 AVB Keys Burning Process
AVB firmware allows the device to operate in Lock and Unlock two states: Lock: The device undergoes strict firmware verification, and if firmware verification fails, the boot process will be stopped. This mode is suitable for production. Unlock: The device operates in a flexible firmware verification mode, where it will issue an error warning upon firmware verification failure but will not stop the boot process. This mode is suitable for debugging purposes. These two locking states of AVB can be modified in “fastboot” mode. Therefore, after burning the AVB firmware, the device needs to be restarted, entered into fastboot mode, and combined with PC fastboot commands to burn the AVB Keys into the device and lock it to achieve security protection. Depending on the U-boot version, some versions may directly enter fastboot mode when AVB is first started, while others may boot directly into the system. If the device boots directly into the system, you can use the reboot fastboot command to force the device into fastboot mode. In fastboot mode, use the following commands to burn AVB Keys and lock the device.
cd ${SDK_DIR}/tools/linux/Linux_SecurityAVB

# download permanent_attributes.bin
./scripts/fastboot stage avb_keys/permanent_attributes.bin
./scripts/fastboot oem fuse at-perm-attr

# If eFuse device:
./scripts/fastboot stage avb_keys/permanent_attributes_cer.bin
./scripts/fastboot oem fuse at-rsa-perm-attr

# Lock device
./scripts/fastboot oem at-lock-vboot
After the lock is successful and then restarted, you can see the following log:
ANDROID: reboot reason: "(none)"
read_is_device_unlocked() ops returned that device is LOCKED
If you need to unlock the device, use the following command:
./scripts/fastboot oem at-get-vboot-unlock-challenge
./scripts/fastboot get_staged raw_unlock_challenge.bin
python ./scripts/avb-challenge-verify.py raw_unlock_challenge.bin
avb_keys/product_id.bin # Generate unlock_challenge.bin
python ./scripts/avbtool make_atx_unlock_credential --
output=unlock_credential.bin --
intermediate_key_certificate=avb_keys/pik_certificate.bin --
unlock_key_certificate=avb_keys/puk_certificate.bin --
challenge=unlock_challenge.bin --unlock_key=$KEYS/testkey_puk.pem
./scripts/fastboot stage unlock_credential.bin
./scripts/cmd_fastboot oem at-unlock-vboot
2.2.5 Enable Log
After completely burning the AVB firmware and locking the device, you can see the following output:
DDR Version V1.31 20210118
...
Boot1 Release Time: Mar 29 2021 14:15:15, version: 1.27
...
StorageInit ok = 10694
SecureMode = 1                            # OTP / eFuse have been burned
Secure read PBA: 0x4
# Head flags=0x20b3                       # | Only when burning the signature
loader with Sign_flag = 0x20 for the first time
# SecureCheckHeader 0, 0, 0               # | The OTP burning Log will be
printed, and then power on the computer again, but there will be no such Log.
# SecureWriteOTP                          # |
# enable secure flag!                     # |
# otp write key success! !!               # |
atags_set_pub_key: ret:(0)                # public key verification is valid
SecureInit ret = 0, SecureMode = 1        # Start by SecureMode
...
U-Boot 2017.09-gfae486e407-210107 #zain (Aug 18 2021 - 17:34:57 +0800)
...
Hit key to stop autoboot('CTRL+C'):  0
ANDROID: reboot reason: "(none)"
Vboot=1, AVB images, AVB erify
read_is_device_unlocked() ops returned that device is LOCKED # The device is in
Lock state
Fdt Ramdisk skip relocation
Booting IMAGE kernel at 0x00680000 with fdt at 0x1f00000...  # Kernel loads
normally and no errors are reported.
...
2.2.6 Quick Script
To simplify the above AVB operation steps, management scripts are provided in tools/linux/Linux_SecurityAVB/ , and avb_user_avb_user_tool.sh provides the following shortcut functions:
# Generate AVB Keys
./avb_user_tool.sh -n <Product ID> #The size of Product ID is 16 bytes.

# Sign boot and recovery, final image in `out`.
./avb_user_tool.sh -s -b < /path/to/boot.img > -r < /path/to/recovery.img > #
Remove -r option if no recovery.img
# Loader / Uboot / Trust still use `rk_sign_tool`.

# Lock and Unlock device
# Save root password for fastboot operation.
./avb_user_tool.sh --su_pswd < /user/password >
# Mark eFuse tool, and generate permanent_attributes_cer.bin. OTP device skip
this step.
./avb_user_tool.sh -f < /path/to/privatekey.pem >
# download AVB Keys
./avb_user_tool.sh -d
# Lock device
./avb_user_tool.sh -l # reboot device after finishing lock.

# Unlock device
./avb_user_tool.sh -u # reboot device after finishing unlock.
2.2.7 Simplified Modification of AVB Functionality
The conventional use of AVB requires a separate AVB key download step outside the normal firmware download process, complicating the flashing process and increasing production costs. This is because the normal AVB key download uses AVB’s public key, which is only used for verification purposes. Therefore, as long as the public key is not tampered with, it can be kept the clear text in the firmware. Based on this principle, this section provides a solution to package the AVB public key into the U-boot code. U-boot will be verified by the loader as usual, ensuring that
the public key is legitimate and valid. Compared to the standard AVB solution, the AVB key download step via fastboot can be omitted. This solution differs from the standard AVB process and is considered a non-standard modification. As a result, the code must be manually applied and cannot be merged into the mainline.
diff --git a/common/android_bootloader.c b/common/android_bootloader.c
index 5525fe620e8..7d59257633f 100644
--- a/common/android_bootloader.c
+++ b/common/android_bootloader.c
@@ -801,6 +801,7 @@ static AvbSlotVerifyResult android_slot_verify(char
*boot_partname,
        if (ops->read_is_device_unlocked(ops, (bool *)&unlocked) !=
AVB_IO_RESULT_OK)
                printf("Error determining whether device is unlocked.\n");

+       unlocked = 0; /* Lock State Fixed */
        printf("read_is_device_unlocked() ops returned that device is %s\n",
               (unlocked & LOCK_MASK)? "UNLOCKED" : "LOCKED");

diff --git a/lib/avb/libavb_user/avb_ops_user.c
b/lib/avb/libavb_user/avb_ops_user.c
index 18c0c1fb237..bb96a4bade2 100644
--- a/lib/avb/libavb_user/avb_ops_user.c
+++ b/lib/avb/libavb_user/avb_ops_user.c
@@ -42,6 +42,7 @@
 #include <android_avb/avb_vbmeta_image.h>
 #include <android_avb/avb_atx_validate.h>
 #include <boot_rkimg.h>
+#include <android_avb/avb_root_pub.h>

 static void byte_to_block(int64_t *offset,
                          size_t *num_bytes,
@@ -192,21 +193,17 @@ validate_vbmeta_public_key(AvbOps *ops,
                           size_t public_key_metadata_length,
                           bool *out_is_trusted)
 {
-/* remain AVB_VBMETA_PUBLIC_KEY_VALIDATE to compatible legacy code */
-#if defined(CONFIG_AVB_VBMETA_PUBLIC_KEY_VALIDATE) || \
-    defined(AVB_VBMETA_PUBLIC_KEY_VALIDATE)
-       if (out_is_trusted) {
-               avb_atx_validate_vbmeta_public_key(ops,
-                                                  public_key_data,
-                                                  public_key_length,
-                                                  public_key_metadata,
-                                                  public_key_metadata_length,
-                                                  out_is_trusted);
+       if (!public_key_length || !out_is_trusted || !public_key_data) {
+               printf("%s: Invalid parameters\n", __func__);
+               return AVB_IO_RESULT_ERROR_IO;
        }
-#else
-       if (out_is_trusted)
+
+       *out_is_trusted = false;
+       if (public_key_length != avb_root_pub_bin_len)
+               return AVB_IO_RESULT_ERROR_IO;
+       if (memcmp(public_key_data, avb_root_pub_bin, public_key_length) == 0)
                *out_is_trusted = true;
-#endif
+
        return AVB_IO_RESULT_OK;
 }

@@ -558,21 +555,17 @@ AvbIOResult validate_public_key_for_partition(AvbOps *ops,
                                              bool *out_is_trusted,
                                              uint32_t
*out_rollback_index_location)
 {
-/* remain AVB_VBMETA_PUBLIC_KEY_VALIDATE to compatible legacy code */
-#if defined(CONFIG_AVB_VBMETA_PUBLIC_KEY_VALIDATE) || \
-    defined(AVB_VBMETA_PUBLIC_KEY_VALIDATE)
-       if (out_is_trusted) {
-               avb_atx_validate_vbmeta_public_key(ops,
-                                                  public_key_data,
-                                                  public_key_length,
-                                                  public_key_metadata,
-                                                  public_key_metadata_length,
-                                                  out_is_trusted);
+       if (!public_key_length || !out_is_trusted || !public_key_data) {
+               printf("%s: Invalid parameters\n", __func__);
+               return AVB_IO_RESULT_ERROR_IO;
        }
-#else
-       if (out_is_trusted)
+
+       *out_is_trusted = false;
+       if (public_key_length != avb_root_pub_bin_len)
+               return AVB_IO_RESULT_ERROR_IO;
+       if (memcmp(public_key_data, avb_root_pub_bin, public_key_length) == 0)
                *out_is_trusted = true;
-#endif
+
        *out_rollback_index_location = 0;
        return AVB_IO_RESULT_OK;
 }
Generate a public key file and put it into U-boot, waiting for compilation.
./scripts/avbtool extract_public_key --key avb_keys/testkey_psk.pem --output
avb_root_pub.bin

echo "#ifndef __AVB_ROOT_PUB_H_" > avb_root_pub.h
echo "#define __AVB_ROOT_PUB_H_" >> avb_root_pub.h
echo "" >> avb_root_pub.h
xxd -i avb_root_pub.bin >> avb_root_pub.h
echo "" >> avb_root_pub.h
echo "#endif /* __AVB_ROOT_PUB_H_ */" >> avb_root_pub.h

cp avb_root_pub.h $UBoot/include/android_avb/.
Following AVB U-boot Configuration, and compile the signed U-boot.
3. System Security
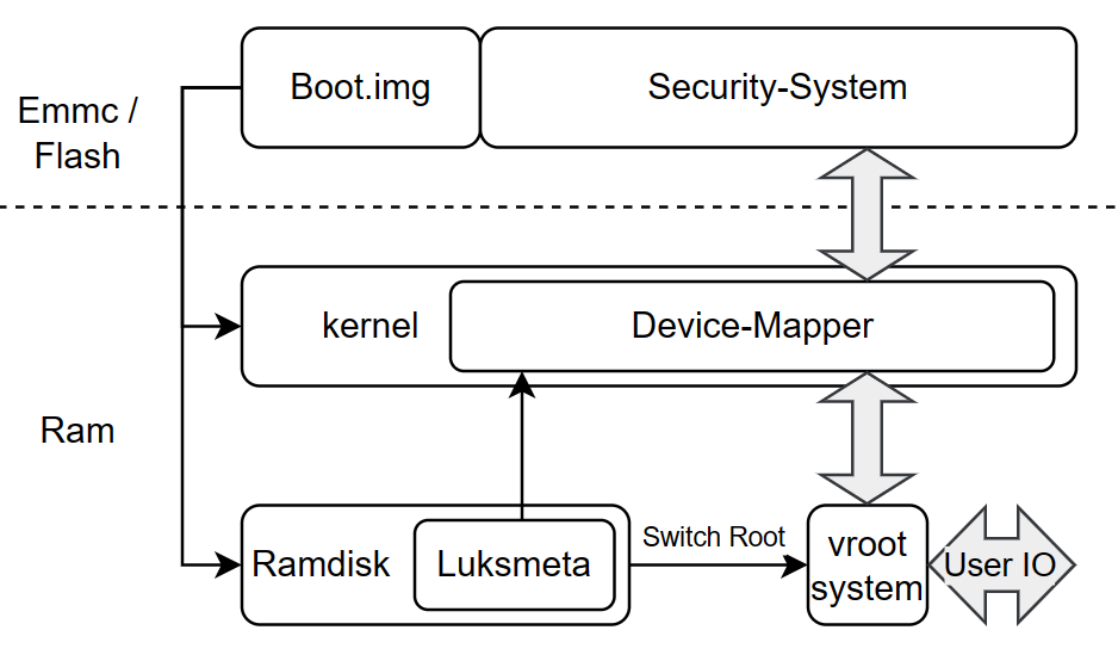
The above diagram roughly illustrates how boot.img verifies or decrypts the system:
-
Boot.img must be protected under Secure Boot to ensure the security foundation of this mechanism.
-
Ramdisk uses the Luksmeta toolset, calls the Kernel’s Device-Mapper feature to virtualize the Security-System as a vroot system node, and then switches to the final system using the switch_root command.
-
Reads and writes to the root filesystem by the final system or users are reflected in the Security-System partition via Device-Mapper.
-
Once any tampering with the content of the system partition is detected, the system will return IO errors, and the tampered parts will not function properly.
3.1 DM Introduction
System partitions are generally much larger in volume. Calculating a hash for the entire partition during boot would consume a lot of time. Therefore, the verification of the system partition needs to be done in the Kernel by enabling the Device-Mapper feature, which can significantly reduce boot time. Combining Device-Mapper technology with Crypt can achieve rapid verification or encryption/decryption of large firmware. Let’s take rapid verification as an example to introduce. The Device-Mapper-Verity mechanism divides the verification firmware into 4K chunks, calculates a hash for each 4K data chunk, iterates through multiple layers, and generates a corresponding Hash-Map and Root-Hash.
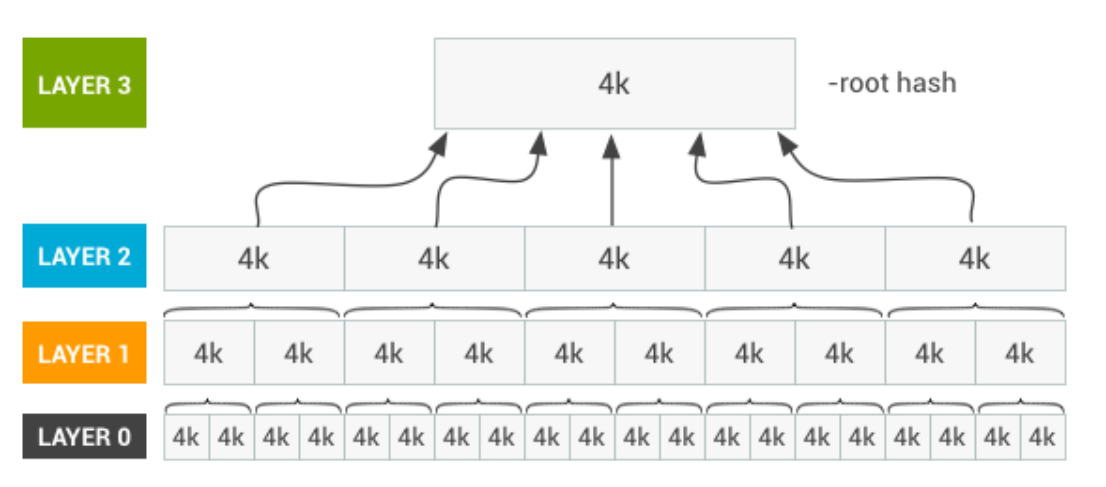
Root-Hash first verifies the Hash-Map to ensure its accuracy, and then a virtual partition is created through Device-Mapper-Verity and mounted . When using the partition, Kernel performs hash verification separately for the 4K partition where the access I/O occurs and compares it with the Hash-Map. When an error is detected during verification, it returns an I/O error, similar to symptoms of filesystem corruption. Similarly, encryption and decryption is to change the Hash algorithm into a symmetric encryption algorithm. The advantages of Device-Mapper include fast verification, and the larger the firmware, the more noticeable the effect. The disadvantages is that storage read speed may be slightly affected. For more details, you can refer to the Kernel documentation under Documentation/device- mapper/ or https://source.android.google.cn/security/verifiedboot/dm-verity.
3.1.1 Configuration
The Device-Mapper feature requires the Kernel to enable the following configuration:
CONFIG_BLK_DEV_DM=y
CONFIG_DM_CRYPT=y
CONFIG_BLK_DEV_CRYPTOLOOP=y
CONFIG_DM_VERITY=y
At this point, the boot.img generated by the Kernel compilation does not have the capability to actively verify or decrypt the system. As shown in the diagram in System Security, it is necessary to package the Ramdisk and Kernel together to have the ability for active verification or decryption, as introduction in the Ramdisk Configuration section.
3.2 System Processing
Choose one of the following operations as needed.
3.2.1 System-Verity
System verification is accomplished by the third-party tool veritysetup . veritysetup is a command-line tool used in Linux systems to set up and manage dm-verity (Device-Mapper- Verity). dm-verity is a module in the Kernel, based on Device-Mapper, and is used to provide block-level data integrity protection. It is typically used to prevent unauthorized modifications to the filesystem or system files. veritysetup generates Hash-Map and Root-Hash based on the target system image. The Hash- Map can be directly appended to the end of the system image using a tool, while the Root-Hash is packaged into the Ramdisk of boot.img . During startup, Ramdisk is responsible for using the Root-Hash to virtualize the target image as a vroot block device through dm-verity. After mounting, it switches to the target system using the switch_root command. On a PC, processing is done on the system image by attaching to the Hash-Map at the end of the system image and saving the Root-Hash
target_image=$(realpath $path_to_system_img)             #Enter the system image,
and the verification information is directly attached to the input image.

sectors=$(ls -l "$target_image" | awk '{printf $5}')     # Get image size
hash_offset=$[(sectors / 1024 / 1024 + 2) * 1024 * 1024] # The system is aligned
at 1M, calculates the offset of Hash-Map placement, and the 2M space behind the
system image
result=$(veritysetup --hash-offset=$hash_offset format "$target_image"
"$target_image")
# Save data for subsequent operations
echo "root_hash=$(echo ${result##*:})" > security.info
echo "hash_offset=$hash_offset" >> security.info
The Root-Hash is stored in security.info and will be used in the Ramdisk Initial Script Configuration. Note: Images created by this method contain an additional segment of Hash-Map data compared to the original image. They can still be treated as regular systems and can be directly mounted and used without going through veritysetup processing.
3.2.2 System-Encryption
System-Encryption is achieved by the third-party tool dmsetup . dmsetup is a command-line tool used in Linux systems to manage Device Mapper devices. It allows users to create and manage virtual block devices, which can perform various operations such as merging, splitting, remapping, and encryption. On a PC, dmsetup is used to create an encryption container using Device Mapper, where the system to be encrypted is placed inside the container to complete the encryption process.
target_image=$(realpath $path_to_system_img)    # Enter system image
security_system=${path_to_output_system}        # Output encryption system
key=$(cat ${path_to_key_file})                  # To read the encryption key, the
key length must match the following algorithm
cipher=${cipher_name}                           # Symmetric encryption algorithm
name, such as aes-cbc-plain

sectors=$(ls -l "$target_image" | awk '{printf $5}')
sectors=$[(sectors + (21 * 1024 * 1024) - 1) / 512] # remain 20M for partition
info / unit: 512 bytes

#Create an encrypted container
loopdevice=$(losetup -f)
mappername=encfs-$(shuf -i 1-10000000000000000000 -n 1)
dd if=/dev/null of="$security_system" seek=$sectors bs=512
sudo losetup $loopdevice "$security_system"
sudo dmsetup create $mappername --table "0 $sectors crypt $cipher $key 0
$loopdevice 0 1 allow_discards"

#Put the system into an encrypted container
sudo dd if="$target_image" of=/dev/mapper/$mappername conv=fsync

sync && sudo dmsetup remove $mappername
sudo losetup -d $loopdevice

# Save data for subsequent operations
echo "cipher=$cipher" > security.info
echo "key=$key" >> security.info
The packaged encrypted system is encrypted text and cannot be directly decoded for use. Similar to system verification, when using the encrypted system, the Ramdisk is involved. It provides the encryption algorithm and key to Ramdisk, the system partition is virtualized into the /dev/mapper/vroot node using the dmsetup tool and then mounted for use. For Ramdisk configuration, refer to the Ramdisk Initial Script Configuration section. In contrast to System-Verity, the encryption keys for System-Encryption cannot be directly stored in the Ramdisk firmware.
3.2.2.1 Key Storage
In contrast to System-Verity, the encryption keys for System-Encryption cannot be directly stored in the Ramdisk firmware. The SDK stores the key in misc.img by default, the Ramdisk reads the keys from misc.img , and then transfers them to secure storage (RPMB or the Security partition), simultaneously clearing misc.img . On a PC, you can package the keys into misc.img by the following command:
# The key is stored at an offset of 10K in the misc image by default.
MISC=misc.img                                             # Original misc file
key="af16857cf77982040e6dbeee739d00619847b0e16a25c8a9589b4ce93aced6b1"
dd if="$MISC" of=security-misc.img bs=1k count=10
echo -en "\x40\x00" >> security-misc.img                  # Declare that the key
length bit is 64 bytes (0x40)
echo -n "$key" >> security-misc.img                       # write key
skip=$[10 * 1024 + 64 + 2]
dd if="$MISC" of=security-misc.img seek=$skip skip=$skip bs=1
# Generate security-misc.img of the key
In the Ramdisk, the key handling process is depicted in the diagram:
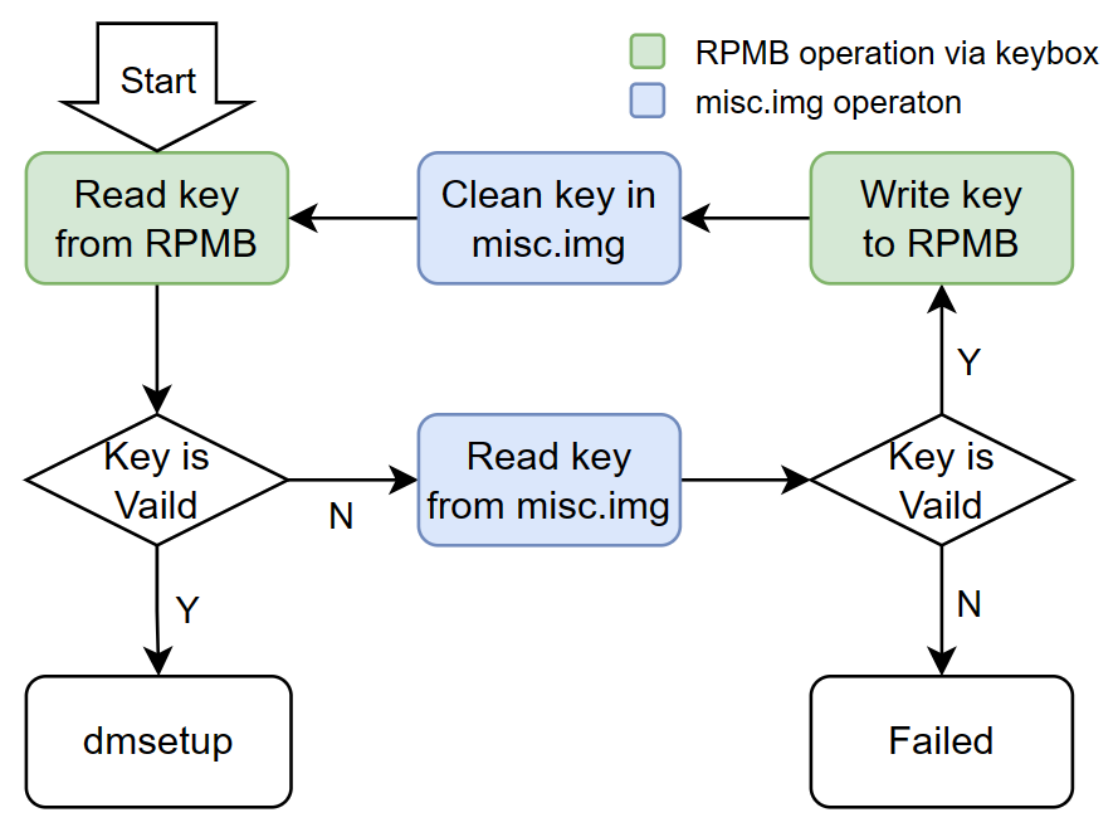
In the diagram, operations for reading and writing keys from RPMB are all performed through the KeyBox software. Additionally, certain runtime restrictions have been implemented to prevent KeyBox from being extracted from the Ramdisk for unauthorized use. For example, it must run within a program with PID=1 and must be executed in the Ramdisk. For more details on KeyBox, you can refer to the KeyBox section.
3.3 Ramdisk Configuration
In the Linux SDK, the Ramdisk is a small system generated by Buildroot, packaged together with the Kernel into the boot.img. In the system security solution, the Ramdisk is primarily responsible for decrypting or verifying the system. After completing system decryption or verification, it uses switch_root to switch to the target system and then self-destructs. Different configurations are required depending on the purpose of use.
3.3.1 Ramdisk Initial Script Configuration
In the Ramdisk, all tasks are carried out in the /init (buildroot/output/rockchip_${chip}_ramboot/target/init) script. The init script decrypts or verifies the system based on the packaging type of the system and uniformly generates vroot device. The general process is showed in the diagram below, which accommodates A/B systems, system verification, and system encryption.
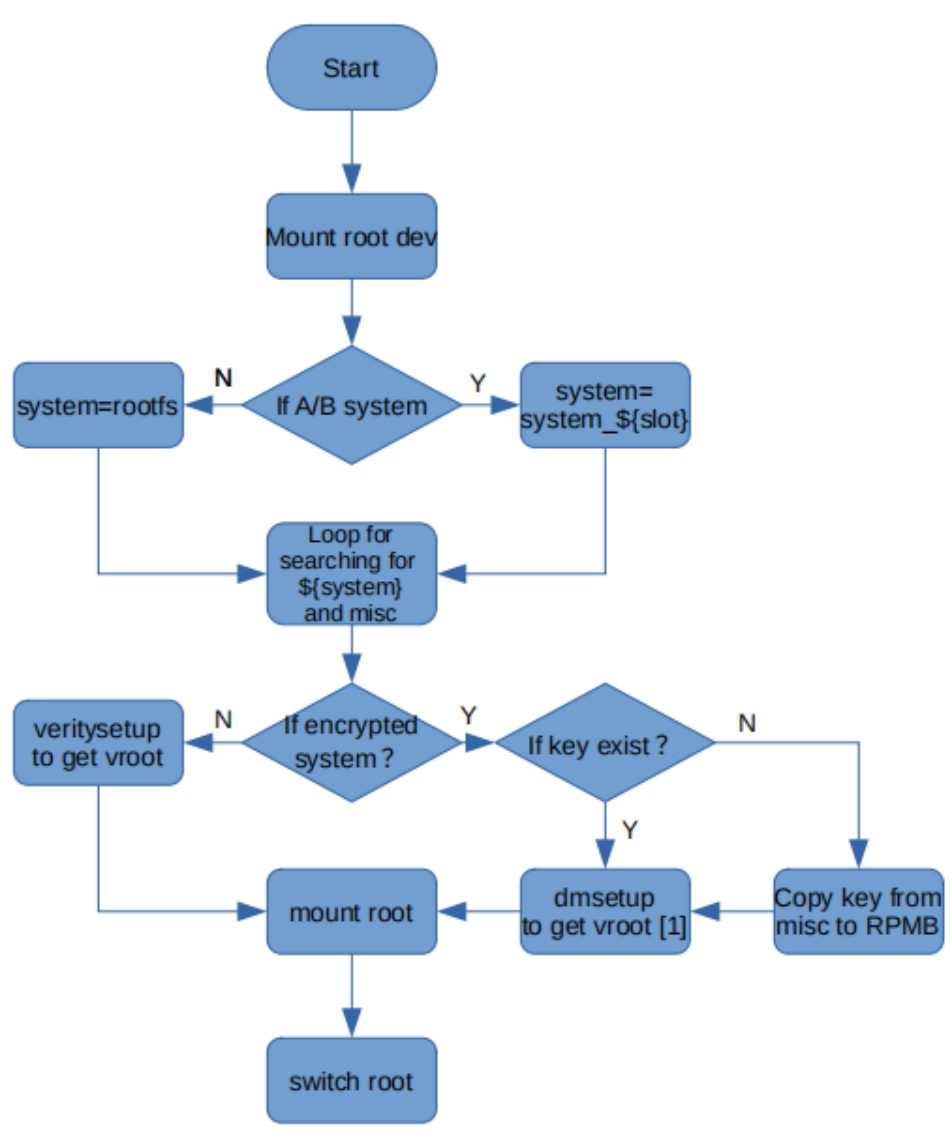
[1] Under the encrypted system, the system space will be expanded according to the actual size of the system partition.
The init script is modified and generated by buildroot/board/rockchip/common/security- ramdisk-overlay/init.in . Before operating, please generate the corresponding security.info according to the requirements of System-Verity or System-Encryption. The following operations will be used:
cp buildroot/board/rockchip/common/security-ramdisk-overlay/init.in \
   buildroot/board/rockchip/common/security-ramdisk-overlay/init
init_file=buildroot/board/rockchip/common/security-ramdisk-overlay/init
optee_storage=RPMB #Depending on the actual hardware conditions, optee_storage is
filled with RPMB or SECURITY (security partition)
source security.info

# Choose between system-Encryption or System-Verity:
# - System-Verity
sed -i "s/ENC_EN=/ENC_EN=false/" $init_file
sed -i "s/OFFSET=/OFFSET=$hash_offset/" $init_file
sed -i "s/HASH=/HASH=$root_hash/" $init_file
sed -i "s/# exec busybox switch_root/exec busybox switch_root/" "$init_file"

# - System-Encryption
sed -i "s/ENC_EN=/ENC_EN=true/" $init_file
sed -i "s/CIPHER=/CIPHER=$cipher/" $init_file
sed -i "s/SECURITY_STORAGE=RPMB/SECURITY_STORAGE=$optee_storage/" $init_file
sed -i "s/# exec busybox switch_root/exec busybox switch_root/" "$init_file"
3.3.2 Ramdisk Compilation Configuration
The default Ramdisk configuration is generally rockchip_<chip_name>_ramboot_defconfig . The configuration is set for the purpose of system verification (System-Verity). If the customer has system encryption (System-Encryption) requirements, add the following additional configuration:
BR2_PACKAGE_TEE_USER_APP=y # Refer to the KeyBox chapter configuration. Some SDKs
can be included "tee_aarch64_v2.config" directly.
BR2_PACKAGE_TEE_USER_APP_COMPILE_CMD="6432"
BR2_PACKAGE_TEE_USER_APP_TEE_VERSION="v2"
BR2_PACKAGE_TEE_USER_APP_EXTRA_TOOLCHAIN="$(PATH_TO_CROSS_COMPILE)"

BR2_PACKAGE_RECOVERY=y
BR2_PACKAGE_RECOVERY_UPDATEENGINEBIN=y # The encryption key is stored in misc,
and the Recovery option is to add the misc parsing program.
The default configuration will include BR2_ROOTFS_OVERLAY+=”board/rockchip/common/security-ramdisk-overlay/” , which will put the init script of Ramdisk Initial Script Configuration into Ramdisk . BR2_PACKAGE_TEE_USER_APP related configuration meaning, please refer to the KeyBox chapter, please configure flexibly according to actual needs. The essence of Ramdisk is also a complete middle layer system, so its compilation is the same as regular Buildroot compilation:
cd buildroot
./build/envsetup.sh rockchip_${chip}_ramboot_defconfig   # chip: Fill in
according to actual situation
make # Firmware is generated in
output/rockchip_${chip}_ramboot/images/rootfs.cpio.gz
Customers can also prepare their own Ramdisk and customize it according to the following requirements:
-
The Ramdisk must include the Luksmeta toolset, ensuring at least that veritysetup is available for system verification and dmsetup is available for system encryption.
-
In the case of a system encryption, TEE programs need to be ported to handle encryption key read/write operations. UpdateEngine programs also need to be ported to read the keys from misc, or this part can be separated into an independent program, or keys can be passed in from another source.
-
The init startup script of the Ramdisk needs to be modified based on Ramdisk Initial Script Configuration to meet the requirements of mounting the new system.
3.3.3 Ramdisk Packaging
The generated Ramdisk system needs to be packaged together with the Kernel firmware into boot.img . The packaging method varies depending on the usage solution:
# Package it with kernel into boot.img, choose one of FIT / AVB solutions
cd ${RK_SDK_DIR} # SDK root directory
# FIT solution
./device/rockchip/common/scripts/mk-fitimage.sh boot.img \
    device/rockchip/${chip}/boot4recovery.its \
    kernel/arch/arm64/boot/Image \
    kernel/arch/arm64/boot/dts/rockchip/${RK_KERNEL_DTB} \
    kernel/resource.img \
    buildroot/output/rockchip_${chip}_ramboot/images/rootfs.cpio.gz

#AVB solution
./kernel/scripts/mkbootimg \
    --kernel kernel/arch/arm64/boot/Image \
    --ramdisk buildroot/output/rockchip_${chip}_ramboot/images/rootfs.cpio.gz \
    --second kernel/arch/arm64/boot/dts/rockchip/${RK_KERNEL_DTB} \
    -o boot.img
Sign the boot.img generated above, please refer to FIT Firmware Signature Extension Command 3 or AVB Firmware Signature
4. KeyBox
When using partition or system encryption, a location for storing keys is required. Typically, keys are stored in RPMB or the Security partition through OPTEE. Since this code is designed to interact directly with the manufacturer’s private key, it is generally expected that manufacturers will design this part themselves. However, considering that some customers may not be familiar with OPTEE, the SDK includes an example code called KeyBox, which is used in System-Encryption for demonstration purposes. (It is recommended for customers to refactor the code.) The OPTEE-related code can be found in <SDK>/external/security/ and includes two repositories: bin and rk_tee_user . bin contains precompiled parts of non-public code and headers, forming the foundational library for OPTEE. rk_tee_user is a project for compiling customers’ own CA/TA, and it includes some demo test projects. For information on how to use OPTEE, please refer to the Rockchip_Developer_Guide_TEE_SDK_CN.pdf document, which provides detailed instructions. Here, we will focus on how to compile the KeyBox program.
4.1 Independent Compilation
KeyBox code is located in <SDK>/buildroot/package/rockchip/tee-user-app
# tree buildroot/package/rockchip/tee-user-app/
buildroot/package/rockchip/tee-user-app/
├── Config.in
├── extra_app
│   ├── host
│   │   ├── main.c
│   │   └── Makefile
│   └── ta
│       ├── include
│       │   ├── ta_keybox.h
│       │   └── user_ta_header_defines.h
│       ├── keybox.c
│       ├── Makefile
│       └── sub.mk
└── tee-user-app.mk
When compiling, you should put host and ta under extra_app into rk_tee_user respectively, for example:
# tree rk_tee_user/v2/host/extra_app/ rk_tee_user/v2/ta/extra_app/
rk_tee_user/v2/host/extra_app/
├── main.c
└── Makefile
rk_tee_user/v2/ta/extra_app/
├── include
│   ├── ta_keybox.h
│   └── user_ta_header_defines.h
├── keybox.c
├── Makefile
└── sub.mk
Compilation of rk_tee_user generates CA ( keybox_app ) and TA programs at the same time. These two programs run in different environments. CA runs in the user space of the system, and the compilation chain is consistent with the system compilation chain. TA runs in the TrustZone environment, and the compilation chain needs to be consistent with BL32 (TEE). Without special declaration, the default is the 32-bit compilation chain. Therefore, rk_tee_user compilation may require two different compilation chain configurations. Take the system as a 64-bit system and the TA as a 32-bit system as an example:
cd rk_tee_user/v2 # v1 is the same, but the compilation directory is different.
./build.sh 6432
ARM32_TOOLCHAIN=${ARM32_CROSS_COMPILER_PATH} \
AARCH64_TOOLCHAIN=${AARCH64_CROSS_COMPILER_PATH} \
./build.sh 6432                     # Compile 64-bit CA, 32-bit TA
# Generate program:
# out/ta/extra_app/8c6cf810-685d-4654-ae71-8031beee467e.ta
# out/extra_app/keybox_app
4.2 tee_user_app Compilation
The KeyBox program is in Buildroot and compiled using the tee_user_app package. Taking a 64- bit system with 32-bit TA compilation as an example, configure the following content to achieve compilation.
BR2_PACKAGE_TEE_USER_APP=y
BR2_PACKAGE_TEE_USER_APP_COMPILE_CMD="6432"
BR2_PACKAGE_TEE_USER_APP_TEE_VERSION="v2"
BR2_PACKAGE_TEE_USER_APP_EXTRA_TOOLCHAIN="$(PATH_TO_CROSS_COMPILE)"
The generated KeyBox program and TA are automatically integrated into the system.
4.3 Enable OPTEE in Kernel
KeyBox is developed based on the OPTEE function. When used, OPTEE support is added to the Kernel.
CONFIG_TEE=y
CONFIG_OPTEE=y
At the same time, configure the optee node in dts
optee: optee {
        compatible = "linaro,optee-tz";
        method = "smc";
        status = "okay";
}
4.4 KeyBox Modification Recommendations
The KeyBox section lists a common operation for key storage, and this is an open-source solution to all customers. To enhance the security of key storage, customers are advised to make modifications to the KeyBox program and consider the following suggestions: The usage environment of KeyBox must be within a secure environment and should be used together with FIT security solutions or AVB security solutions. TA files can be signed according to Chapter 5, TA Signing , in the Rockchip_Developer_Guide_TEE_SDK_CN.pdf document. After signing, third parties will not be able to run custom TAs on the customer’s device. Strictly limit the CA usage environment to prevent the key from being read out in other non- secure environments after the CA is copied. In the default code, KeyBox can perform key writing operations under any circumstances but can only read keys in the Ramdisk and within a program with PID=1. Modify CA-TA interaction. In the default code, some simple random verifications are performed in the CA-TA interaction. If there is an error in the CA-TA interaction, random keys are directly output.
5. Secure Information Burning
5.1 Key Hash
Different chips use different media for secure storage. Confirm the storage media used by the chip based on the Product Version and follow the required steps.
5.1.1 OTP
If the chip uses OTP to enable Secure Boot functionality, ensure that the OTP pins of the chip are powered during the Loader phase. Download the firmware using AndroidTool (Windows) / upgrade_tool (Linux). Upon the first reboot, the Loader will be responsible for writing the Key’s Hash into OTP, activating Secure Boot. Upon the next reboot, the firmware will be in protection mode.
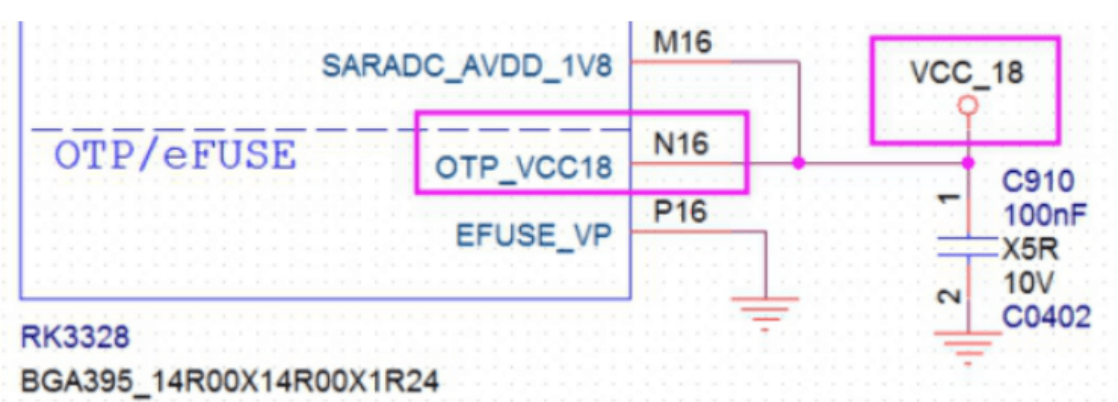
5.1.2 eFuse
If the chip uses eFuse to enable Secure Boot functionality, ensure that VCC_IO has power in the MaskRom state (default hardware state), and VCC_EFUSE requires the following power control circuit.
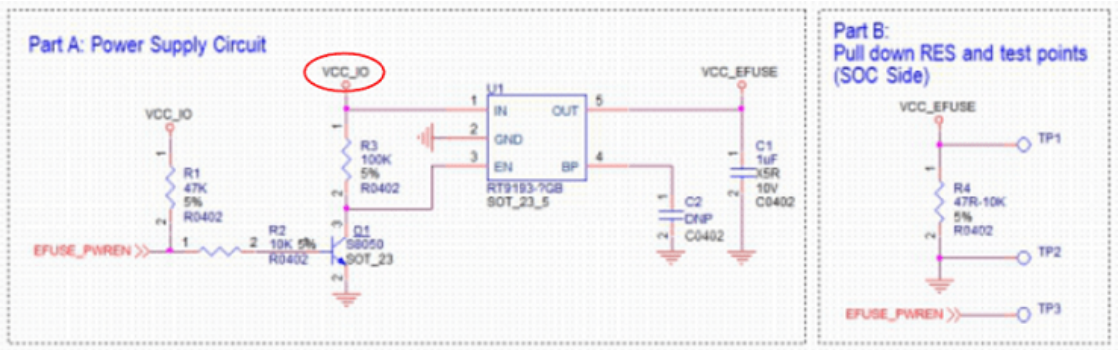
Use tools/windows/eFusetool_vXX.zip to put the board into MaskRom state. Click “Firmware,” select the signed update.img or Miniloader.bin, click “Start” to begin burning eFuse.
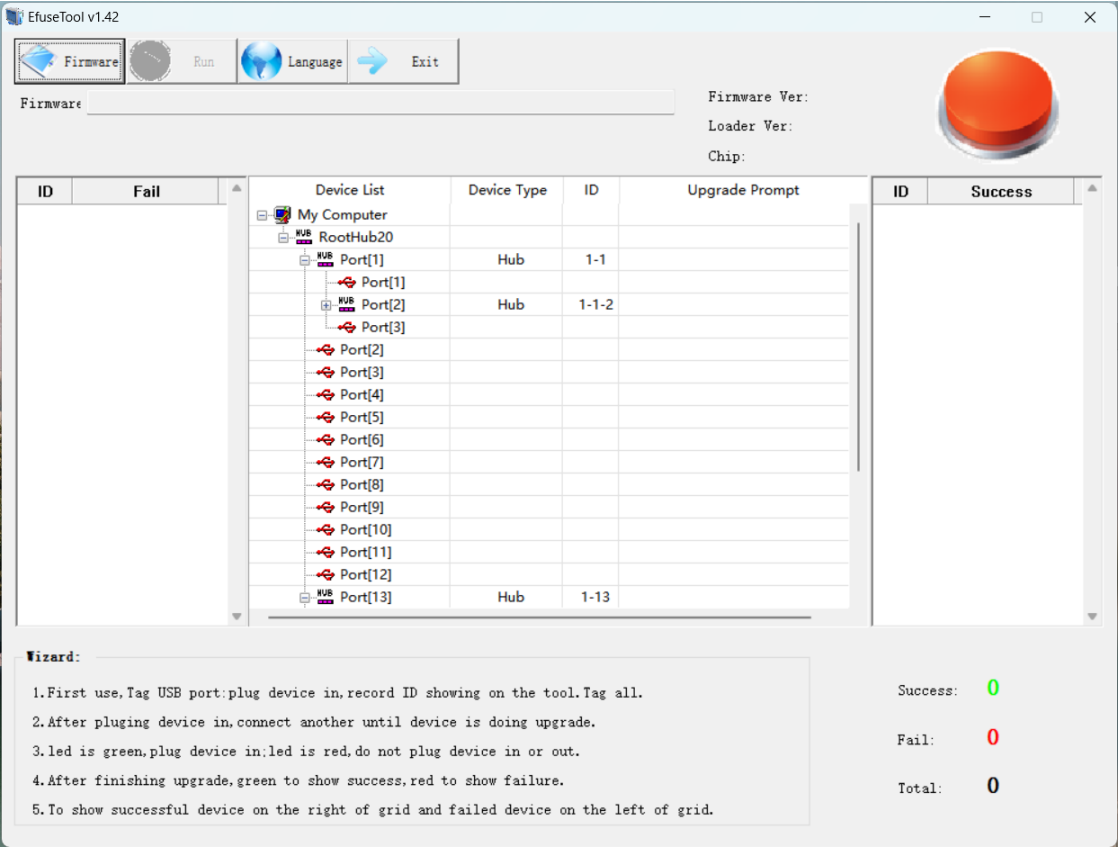
After successfully burning eFuse, power off and restart the board, enter MaskRom mode, and download other signed firmware to the board.
5.2 Custom Security Information
For custom security information, it is recommended to use OPTEE storage. Please refer to the Rockchip_Developer_Guide_TEE_SDK_CN.pdf document for details.
6. Security Demo
The previous sections described how to build a firmware security solution from scratch. To simplify the setup process, the SDK provides several management scripts that are integrated into the common compilation script build.sh . With a few simple configurations, you can achieve system encryption or system verification. Note: This section does not provide detailed explanations of the principles and operations. If you need to understand the details of your operations, please refer to the above sections. Regarding the simplified scripts, they are developed based on a common SDK. However, because the SDK is update iteratively, and some SDK versions may conflict with the common SDK, it cannot be guaranteed that the simplified scripts will work correctly for every SDK version. If you encounter errors with the simplified scripts, please refer to the earlier sections and try debugging.
Due to the sensitivity of firmware security, and because this solution is open-source for all customers, it is recommended that customers, while quickly setting up a system, thoroughly analyze its principles, modify and optimize the solution to create secure firmware that meets their own standards.
6.1 SDK Configuration
In the SDK root directory, you can use make menuconfig for SDK compilation configuration. Security-related configurations are centralized under RK_SECURITY :
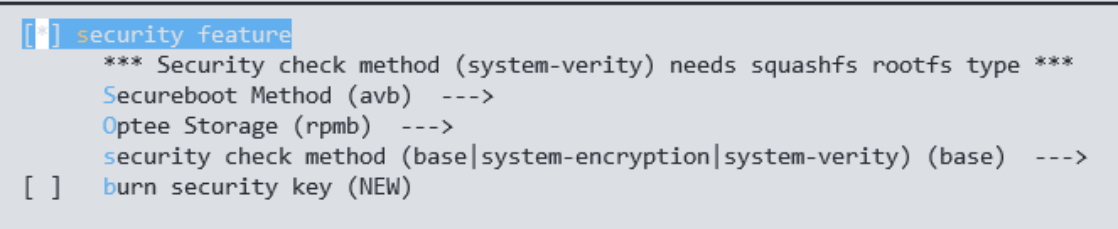
The sdetailed configuration is as follows:
RK_SECURITY                             # Security function is enabled

RK_SECUREBOOT_FIT                       # Basic security function mode, choose
one of FIT / AVB
RK_SECUREBOOT_AVB

RK_SECURITY_OPTEE_STORAGE_RPMB          # OPTEE Secure Storage Medium,choose one
between the two
RK_SECURITY_OPTEE_STORAGE_SECURITY      # Choose RPMB for eMMC storage and
SECURITY for flash storage.

RK_SECURITY_CHECK_SYSTEM_BASE           # Just check loader + uboot + boot
RK_SECURITY_CHECK_SYSTEM_VERITY         # Add rootfs verification to the base
RK_SECURITY_CHECK_SYSTEM_ENCRYPTION     # Add rootfs encryption to the base

RK_SECURITY_INITRD_BASE_CFG             # When there is rootfs verification or
encryption, ramboot needs to be configured
RK_SECURITY_INITRD_TYPE
RK_SECURITY_FIT_ITS

RK_SECURITY_BURN_KEY                    # Enable public key hash burning function
Pay attention to RK_SECURITY_BURN_KEY. For the sake of convenience during debugging, it is closed by default. When it is closed, the Key Hash will not be written to OTP, the loader.bin is considered secure by default, does not require verification, and can be replaced. But starting from the loader, strict verification will be applied to u- boot, following a process similar to that of burning OTP. When producing official production products, please open this option and burn the Key Hash. After configuring the options mentioned above, you can use ./build.sh or make to build. During this process, there may be errors, which can be resolved based on the error messages and prompts. Alternatively, you can continue to make modifications according to the documentation. The error checking during compilation only checks critical configurations, and
default configurations may vary between SDKs. It cannot guarantee that the resulting firmware will have fully functional security features, so the final verification is essential. If there are issues, first check which part of the firmware verification is problematic, and then refer to the documentation for specific debugging steps.
6.2 Detailed Configuration
6.2.1 Key Generation
Key generation
./build.sh createkeys
If system encryption is used, store the user password with root permissions in U-Boot
echo "Password for sudo" > u-boot/keys/root_passwd
When building an encryption system, the loopback feature of the system will be used. This requires users to have root operation permissions on the compilation computer, which means that this method cannot be compiled in a server environment (unless user has root permissions).
6.2.2 U-Boot Modification
According to the “Kernel verification method” of Product Version, U-Boot configuration is divided into: FIT solution needs to be added:
CONFIG_FIT_SIGNATURE=y
CONFIG_SPL_FIT_SIGNATURE=y
AVB solution needs to be added There are quite a few modifications to U-Boot for AVB, please refer to AVB U-boot Configuration for details.
6.2.3 Kernel Modification
Kernel needs to add OPTEE and Device Mapper configuration:
CONFIG_BLK_DEV_DM=y
CONFIG_DM_CRYPT=y
CONFIG_BLK_DEV_CRYPTOLOOP=y
CONFIG_DM_VERITY=y

CONFIG_TEE=y                 # It is required in encryption system
CONFIG_OPTEE=y               # It is required in encryption system
DTS files need to add OPTEE nodes:
optee: optee {
        compatible = "linaro,optee-tz";
        method = "smc";
        status = "okay";
}
6.2.4 Buildroot Modification
Buildroot system configuration needs to be added:
BR2_ROOTFS_OVERLAY+="board/rockchip/common/security-system-overlay"
6.2.5 Ramdisk Modification
The configuration of Ramdisk is configured according to system verification by default. If you need to change it to system encryption, you need to add the following configuration
BR2_PACKAGE_TEE_USER_APP=y                   # Refer to the KeyBox chapter
configuration. Some SDKs can directly include "tee_aarch64_v2.config"
BR2_PACKAGE_TEE_USER_APP_COMPILE_CMD="6432"
BR2_PACKAGE_TEE_USER_APP_TEE_VERSION="v2"
BR2_PACKAGE_TEE_USER_APP_EXTRA_TOOLCHAIN="$(PATH_TO_CROSS_COMPILE)"

BR2_PACKAGE_RECOVERY=y
BR2_PACKAGE_RECOVERY_UPDATEENGINEBIN=y     # The encryption key is stored in
misc, and the Recovery option is to add the misc parser
6.3 Verification Method
The security solution outlined in the document protects several levels: loader, trust, U-Boot, boot, and system. Following the document’s method, build a secure firmware, download the keys correctly, and start up the system normally. If there are any abnormal boot-up issues, please troubleshoot them first.
Next, prepare a non-secure firmware or a firmware that has had its keys replaced. Replacing any image from the second firmware set with the protected partitions of the secure system will render the system unable to start. During the replacement process, if you find that protection has been compromised in a certain partition, refer to the Partition Security Process diagram to identify which part of the verification has failed. Then, review the specific sections of the documentation to check the configuration.
6.4 Debugging Method
If the init process cannot transition to the system properly, you can enable debugging and use the DEBUG function to add some private prints. Follow the instructions in Ramdisk Initial Script Configuration to determine its runtime status.
diff --git a/board/rockchip/common/security-ramdisk-overlay/init.in
b/board/rockchip/common/security-ramdisk-overlay/init.in
index 756d0b5375..c3267e28b1 100755
--- a/board/rockchip/common/security-ramdisk-overlay/init.in
+++ b/board/rockchip/common/security-ramdisk-overlay/init.in
@@ -16,7 +16,7 @@ BLOCK_TYPE_SUPPORTED="
 mmcblk
 flash"

-MSG_OUTPUT=/dev/null
+MSG_OUTPUT=/dev/kmsg
 DEBUG() {
        echo $1 > $MSG_OUTPUT
 }
7. References
Rockchip_Developer_Guide_UBoot_Nextdev_CN.pdf Rockchip-Secure-Boot-Application-Note-V1.9.pdf Rockchip-Secure-Boot2.0.pdf Rockchip_Developer_Guide_TEE_SDK_CN.pdf SDK/kernel/ Documentation/device-mapper/ https://android.googlesource.com/platform/external/avb/+/master/README.md https://source.android.google.cn/security/verifiedboot/dm-verity
Chinese V4.1.1 additions and replacement configuration
1.4 Key types (Chinese V4.1.1)
The following table identifies keys, storage, purpose and provisioning stage for the applicable chip and use case.
| Key | Storage [1] | Purpose | Provisioning |
|---|---|---|---|
| Secure Boot Public Key Hash | OTP or EFUSE | Verifies Bootrom through U-Boot; FIT also verifies Boot/Recovery. | SPL firmware provisioning (eFuse: see PC-tool restriction). |
| AVB permanent_attributes.bin | OTP or RPMB [2] | AVB only [3]. OTP preferred; otherwise RPMB. Verifies vbmeta and AVB fastboot data; vbmeta verifies Boot/Recovery. | U-Boot, Fastboot |
| AVB permanent_attributes_cer.bin | EFUSE (source label) | AVB only [3]; skip on OTP SoCs. Verifies permanent_attributes.bin stored in RPMB. | U-Boot, Fastboot |
| System Encryption Key [4] | RPMB [2] | Decrypts the system. Demo moves the cleartext key from misc to RPMB on first boot and overwrites misc. | Ramdisk, KeyBox |
[1] Storage areas are described in Secure Storage. [2] RPMB is specific to eMMC; use Security as an alternative on non-eMMC devices. [3] Consult the platform table.
[4] See System-Encryption. The demo initially places the cleartext key in misc, then transfers it to secure storage on first boot and overwrites the cleartext.
Chinese V4.1.1, source page 9:
# 1. 放key的⽬录:keys
mkdir -p keys

# 2. 使⽤RK的"rk_sign_tool"⼯具⽣成RSA2048的私钥privateKey.pem和publicKey.pem,分别更名存放为:
keys/dev.key和keys/dev.pubkey。命令为:
../rkbin/tools/rk_sign_tool kk --bits 2048 --out $(pwd)/keys/
ln -s privateKey.pem keys/dev.key
ln -s publicKey.pem keys/dev.pubkey

# 3. 使⽤-x509和私钥⽣成⼀个⾃签名证书:keys/dev.crt (效果本质等同于公钥)
openssl req -batch -new -x509 -key keys/dev.key -out keys/dev.crt
2.1.2 FIT rkbin configuration (new Chinese placement)
In rkbin/RKTRUST, find RK3308TRUST.ini for the source RK3308 example and change the following setting. This is the source example, not a claim that RK3308 uses FIT in the platform table.
Chinese V4.1.1, source page 10:
[BL32_OPTION]
SEC=0
Change to:
Chinese V4.1.1, source page 10:
[BL32_OPTION]
SEC=1
TOS-format trust such as RK3288TOS.ini enables BL32_OPTION by default. Chinese AVB section 2.2.2.1 refers back to this shared configuration.
Chinese V4.1.1, source page 10:
# 必选。
CONFIG_OPTEE_CLIENT=y
CONFIG_OPTEE_V1=y           #RK312x/RK322x/RK3288/RK3228H/RK3368/RK3399 与V2互斥
CONFIG_OPTEE_V2=y           #RK3308/RK3326/RV1126B 与V1互斥
CONFIG_SPL_ROCKCHIP_SECURE_OTP=y
CONFIG_FIT_SIGNATURE=y
CONFIG_SPL_FIT_SIGNATURE=y

# 可选。
CONFIG_FIT_ROLLBACK_PROTECT=y       # boot.img防回滚
CONFIG_SPL_FIT_ROLLBACK_PROTECT=y   # uboot.img防回滚
CONFIG_SPL_ROVOKE_PUB_KEY=y         # 密钥撤销

# RV1126B新增keylad模块,需要开启keylad相关配置。
CONFIG_SPL_KEYLAD=y
CONFIG_SPL_KEYLAD_SUPPORT=y
CONFIG_ROCKCHIP_CIPHER=y
CONFIG_SPL_ROCKCHIP_CIPHER=y
2.1.5 Key revocation (RV1126B only)
Only RV1126B supports the revocation procedure described here. (1) Put the original first key in u-boot/ori_keys and the new key in u-boot/keys; generate it as in FIT key generation. (2) Enable the following U-Boot option.
Chinese V4.1.1, source page 13:
CONFIG_SPL_ROVOKE_PUB_KEY=y
(3) Build and flash using the U-Boot signing procedure: the new key is written and enabled. (4) For subsequent operation disable the macro:
Chinese V4.1.1, source page 13:
CONFIG_SPL_ROVOKE_PUB_KEY=n
ori_keys is no longer needed; build normally. (5) Current U-Boot supports one revocation by default. Multiple revocations require the relevant procedure in Rockchip_Developer_Guide_UBoot_Nextdev_CN.pdf. This platform-specific replacement is not erasure or reversal of OTP/eFuse programming.
2.2.8 AVB precautions with the security partition
If security storage is selected, the Chinese source requires the simplified AVB modification that forces Lock in verified U-Boot code. AVB lock state stored in security may be lost when the logical partition is erased, causing default Unlock initialization and loss of protection. RPMB requires authenticated access and does not have the same accidental-erasure behavior described here. Do not rely on the older English claim that security erasure necessarily stops Secure Boot.
| System-Verity | System-Encryption | |
|---|---|---|
| On disk | Cleartext | Ciphertext |
| System key | Cleartext public key in Boot.img (source wording; see root-hash clarification) | Encrypted key in RPMB [1] |
| Anti-copy | No | Yes |
| Anti-tamper | Yes; unauthorized changes cause I/O errors | Yes in source; changes produce incorrect decryption, not an authenticated-integrity guarantee |
| Filesystem support | All filesystems, read-only mount only | No UBIFS; read/write mount [2] |
[1] The demo initially stores a cleartext key in misc, transfers it into RPMB on first boot and overwrites the misc key. [2] UBIFS does not expose a writable block device, so this writable encryption scheme cannot be applied to it. For read-only encryption, convert to UBI_SQUASHFS first; it is read-only and generally smaller than UBIFS. The source also misspells it UBI_SQUAHSFS; preserve the distinction when checking tools.
Chinese V4.1.1, source page 31:
BR2_PACKAGE_TEE_USER_APP=y # 参考KeyBox章节配置,部分SDK可以直接 include "tee_aarch64_v2.config"
或 "tee_arm_v2.config"
BR2_PACKAGE_TEE_USER_APP_COMPILE_CMD="6432" # 32位处理器件,填写"3232"
BR2_PACKAGE_TEE_USER_APP_TEE_VERSION="v2"
BR2_PACKAGE_TEE_USER_APP_EXTRA_TOOLCHAIN="$(PATH_TO_CROSS_COMPILE)" #
BR2_PACKAGE_TEE_USER_APP_COMPILE_CMD="6432" 需要补充32位编译链

BR2_PACKAGE_RECOVERY=y
BR2_PACKAGE_RECOVERY_UPDATEENGINEBIN=y # 加密Key是存放在misc中的,Recovery 选项是为了添加misc解析
程序
4.1 security partition (Chinese V4.1.1)
Non-eMMC devices need a security partition for OPTEE secure storage as an RPMB alternative. Prefer RPMB when available: security is a logical partition and can be accidentally erased. Contents are encrypted and cannot be decrypted by directly reading the partition. Minimum size is 1M, half (512K) reserved for backup. This minimum differs from the typical 4M allocation in AVB examples.
4.3.1 tee_user_app build failures
If Buildroot fails while building tee_user_app, diagnose the common errors below, then clean and rebuild that package.
Chinese V4.1.1, source page 34:
cd buildroot/output/${system_name}
make tee_user_app-dirclean # 或者 rm build/tee_user_app* -rf

make tee_user_app # 或者重新编译整个buildroot⼯程
Common errors:
- No module named Crypto.Signature indicates a missing Python cryptographic dependency on the build host. The source’s historical commands follow; do not apply global package removal automatically.
Chinese V4.1.1, source page 34:
pip uninstall Crypto
pip uninstall pycrypto
pip install pycrypto
- ModuleNotFoundError: No module named ‘Cryptodome’: source installation command is pip3 install [–user] pycryptodomex, where [–user] denotes an optional argument, not literal brackets. Older SDKs did not stop on tee_user_app build errors, potentially hiding failure. Check the following rk_tee_user patch; without it, compile tee_user_app independently and verify success.
Chinese V4.1.1, source page 35:
commit 2dcba4774da20ee5f4aebfe6c797eb3ee555468d
Author: Zain Wang <wzz@rock-chips.com>
Date:   Sat May 11 11:47:38 2024 +0800

 v1/v2: add errexit for build.sh

 Easier to be called by other scripts.

 Signed-off-by: Zain Wang <wzz@rock-chips.com>
 Change-Id: I7f8ff92d800ffec580c6f4fbba19c5f5c948ba23
4.5 TEE security level
Some platforms expose weak/strong TEE levels for debugging and default to the lowest level; see the platform table. Non-configurable platforms default to the strong scheme. Production devices must use the strong scheme. Follow Rockchip_Developer_Guide_TEE_SDK_CN.pdf for the platform-specific procedure.
4.7 TEE SDK usage
Further TEE information: Rockchip_Developer_Guide_TEE_SDK_CN.pdf.
Chinese V4.1.1, source page 39:
./build.sh security-createkeys
Chinese V4.1.1, source page 39:
CONFIG_BLK_DEV_DM=y
CONFIG_DM_CRYPT=y
CONFIG_DM_VERITY=y
CONFIG_BLK_DEV_LOOP=y
CONFIG_CRYPTO_USER=y
CONFIG_CRYPTO_USER_API_HASH=y
CONFIG_BLK_DEV_CRYPTOLOOP=y        # 低于 Kernel 6.1 的需要选上

CONFIG_TEE=y                                           # 加密系统必须选
CONFIG_OPTEE=y                                     # 加密系统必须选
If Buildroot includes the following patch, the security-system-overlay modification can be skipped.
Chinese V4.1.1, source page 40:
commit adf939df39823efa3e017463bc707a42e891e308
Author: Zain Wang <wzz@rock-chips.com>
Date:   Thu Nov 28 14:31:21 2024 +0800

board: security: Remove S00mount_sys.sh in security-system

Using "mount --move" in ramboot to mount devtempfs,
Other base serives can be mounted by system.

Signed-off-by: Zain Wang <wzz@rock-chips.com>
Change-Id: I3f29965ebcdfb02f311689c26e2d5d9718377e
When system encryption is used, complete the TEE security-level hardening described above.
6.5 Third-party systems
The earlier scripts target Buildroot. For non-Buildroot systems, process the third-party image before packaging update.img. Check whether the SDK scripts support this:
Chinese V4.1.1, source page 41:
# ./build.sh --help | grep security

security-createkeys                     create keys for security
security-misc                           build misc with system encryption key
security-ramboot[:system_image]         build security ramboot
security-system[:system_image]          build security system
clean-security                          cleanup security
The [:system_image] suffix on security-system indicates third-party image support.
First complete a full Security Demo build using the SDK security configuration. Processing follows that configuration but replaces the Buildroot target with the third-party image. Example Debian image: <SDK>/debian/linaro-rootfs.img.
Chinese V4.1.1, source page 42:
cd <SDK>
./build.sh security-system:debian/linaro-rootfs.img
# 在⽬标系统同级⽬录下,⽣成处理好的安全固件`debian/security_system.img`和安全信息⽂件
`debian/security.info`

./build.sh security-ramboot:debian/linaro-rootfs.img
# ⽣成附带安全信息的`ramboot`,打包并签名成`output/firmware/boot.img`

cd output/firmware
ln -rsf ../../debian/security_system.img/security_system.img rootfs.img
./build.sh updateimg
# 重新链接rootfs.img,并打包成update.img
If these script options are absent, manually process the system and ramboot according to System Processing and Ramdisk Configuration.
7. User-partition security
7.1 User-partition encryption
Encrypt the user-partition image on the PC:
Chinese V4.1.1, source page 42:
./device/rockchip/common/scripts/mk-security.sh system system-encryption
path_to_userdate_img
# path_to_userdate_img统计⽬录下,⽣成安全固件security_system.img和安全信息security.info

cat $(dirname "path_to_userdate_img")/security.info
touch="2024-12-27 15:46"
sectors=8972288
cipher=aes-cbc-plain
key=af16857cf77982040e6dbeee739d00619847b0e16a25c8a9589b4ce93aced6b1
Flash security_system.img to the target partition, for example userdata. On the device, mount encrypted userdata using the values from security.info:
Chinese V4.1.1, source page 42:
dmsetup create userdata --table "0 ${sectors} crypt ${cipher} ${key} 0 /dev/block/by-
name/userdata 0 1 allow_discards"
# ⽣成 /dev/mapper/userdata 节点

mount /dev/mapper/userdata userdata
# 挂载加密分区到userdata节点
Store the encryption key separately, not directly in the filesystem where it may be extracted. OPTEE storage is recommended; see KeyBox or the TEE guide.
7.2 User-partition verification
Prepare verification data for the user-partition image on the PC:
Chinese V4.1.1, source page 43:
./device/rockchip/common/scripts/mk-security.sh system system-verity path_to_userdate_img
# path_to_userdate_img统计⽬录下,⽣成安全固件security_system.img和安全信息security.info

cat $(dirname "path_to_userdate_img")/security.info
touch="2024-12-27 15:46"
hash_offset=4595908608
root_hash=23ea81cdc7f0b903257bcfd38c734064226a8b5d4e59493218418ec0c2fcd743
Flash security_system.img, for example into userdata. Use security.info to mount the verified partition. The source’s vroot/userdata mapper-name mismatch is discussed below.
Chinese V4.1.1, source page 43:
veritysetup --hash-offset=${hash_offset} create vroot /dev/block/by-name/userdata
/dev/block/by-name/userdata ${root_hash}
# ⽣成 /dev/mapper/userdata 节点

mount /dev/mapper/userdata userdata
# 挂载加密分区到userdata节点
8. SDK-specific handling
8.1 RK3506 SDK
RK3506 defaults target small RAM/storage and reserve no TEE runtime memory. For System-Encryption, KeyBox or OPTEE, enable TEE manually. In SDK make menuconfig, add the TRUST firmware setting:
Chinese V4.1.1, source page 43:
RK_UBOOT_TRUST_INI="RK3506TOS_TA.ini"
Reserve TEE runtime memory in the kernel DTS:
Chinese V4.1.1, source page 44:
+&reserved_memory {
+       ta_tee:ta-tee@3c00000 {
+               reg = <0x03c00000 0x00400000>;
+               no-map;
+       };
+};
Without these steps, TA invocation may report TEEC_Opensession failed with code 0xffff0008 origin 0x3. The same error does not prove that missing memory/firmware is the only cause.
8.2 RV-series IPC SDK
RV IPC SDK directory layout differs from the general SDK, so this document’s Security Demo cannot be used directly. Principles and independent compilation remain references. For IPC SDK build scripts, follow the corresponding chip’s Quick Start document.
9. Updated references
Rockchip_Developer_Guide_UBoot_Nextdev_CN.pdf; Rockchip-Secure-Boot-Application-Note-V1.9.pdf; Rockchip-Secure-Boot2.0.pdf; SDK/kernel/Documentation/device-mapper/; https://android.googlesource.com/platform/external/avb/+/master/README.md; https://source.android.google.cn/security/verifiedboot/dm-verity.
9.1 Other security documents
Search <SDK>/docs: OPTEE — Rockchip_Developer_Guide_TEE_SDK_CN.pdf; customer OTP fields — Rockchip_Developer_Guide_OTP_CN.pdf; anti-board-copying — Rockchip_Developer_Guide_Anti_Copy_Board_CN.pdf; crypto/HWRNG — Rockchip_Developer_Guide_Crypto_HWRNG_CN.pdf.
Version reconciliation and execution checks
- Chinese has nine chapters; English has seven. Newer material includes the key table, RV1126B key ladder/revocation, AVB Security-partition risk, TEE levels/build failures, third-party systems, user partitions and RK3506/RV IPC. All additions follow below. Historical English storage lists RK3288; that is not a claim of support in the newer platform table. Chinese replaces broad RK356X wording with specific models.
- The old comparison has four criteria; Chinese adds filesystem support. Its “cleartext public key” for System-Verity refers in context to a trusted root hash and verification metadata, not a secret decryption key. The aes-cbc-plain example has no authentication tag. The source’s anti-tamper claim describes corrupted decryption, not a cryptographic integrity or active-tampering guarantee; use an appropriate verification/authentication mechanism.
- Chinese updates RSA output to $(pwd)/keys/ and key generation to ./build.sh security-createkeys (English: current directory and createkeys). It adds tee_arm_v2.config and strong TEE requirements. CONFIG_BLK_DEV_CRYPTOLOOP is marked for kernels below 6.1. Match the SDK and do not combine mutually exclusive OPTEE V1/V2 choices.
- Security is erasable logical storage, not equivalent to RPMB. English says forced erasure prevents normal Secure Boot; Chinese says TEE reinitializes it, losing contents, and warns AVB lock state can reset. Follow the newer requirement to force Lock in verified U-Boot when using Security, rather than assuming the partition cannot be erased.
- The key table labels permanent_attributes_cer.bin storage EFUSE while describing Fastboot provisioning and RPMB verification. This shorthand is not a raw eFuse file layout. Likewise its SPL provisioning label does not override the PC-only eFuse restriction. Verify the actual SoC layout/tool.
- avb_user_avb_user_tool.sh is a duplicated source name; commands use avb_user_tool.sh. The Chinese page-21 duplicated table extraction is restored as one AVB key-generation code block. Code retains original comments and PDF wrapping; inspect split commands before use. Example private keys/passwords/hashes are not production secrets.
- Third-party ln -rsf repeats security_system.img/security_system.img; ./build.sh after cd output/firmware is also path-sensitive. Check actual paths. User-partition verity creates vroot but later comments/mount use userdata: unify the real mapper name before running. Original code and path_to_userdate_img spelling are retained for audit.
- pip/pycrypto troubleshooting records a historical environment, not current dependency or security advice; do not blindly change system Python. RK3506 TRUST/reserved memory apply only to its configuration; the TEEC_Opensession error has other possible causes. RV IPC cannot directly run this Security Demo: follow its Quick Start. Code copyrights/licenses, commit IDs and original comments remain. English technical figures are used for English/Russian/German; diagrams do not validate a board’s electrical design.
Also check AVB signing code: it assigns IMAG but reads IMAGE. The recovery example still uses –partition_name boot, and get_from_parameter is an implementation placeholder. Preserved verbatim, but verify against actual AVB/partition layout before execution. The historical diagram labels RSA2048 operations Encryption/Decryption; this schematic is not a specification of the actual signature scheme or padding.