
ArmSoM platform reference based on the supplied Chinese and English Rockchip sources. Match the actual board, SoC, SDK/BSP, kernel and peripherals individually; this does not claim support for every ArmSoM board. Source examples and measurements are not ArmSoM tests. No commands or hardware tests were executed.
Use the original Buildroot/Debian/Yocto matrix as historical reference; verify the actual GPU, driver package and APIs against the BSP.
Both V1.2.0; technical preface matrix and full body retained. ZH uses its 2 Chinese figures; EN/RU/DE use the 2 English figures. “No OPENGL” describes the source driver stack, not every chip, Mesa or later BSP. The source simplifies the relationship between drmModeSetCrtc/SetPlane/PageFlip; retain its explanation but verify actual API definitions against the selected libdrm version.
| Chip | Buildroot | Debian | Yocto |
|---|---|---|---|
| RK180X | Y | N | N |
| RK3036 | Y | N | N |
| RK312X/PX3SE | Y | N | N |
| RK322X | Y | N | N |
| RK3288 | Y | Y | Y |
| RK3308 | Y | N | N |
| RK3326/PX30 | Y | Y | Y |
| RK3358 | Y | N | N |
| RK3399/RK3399Pro | Y | Y | Y |
| RK356X | Y | Y | Y |
| RK3588 | Y | Y | Y |
1. Rockchip Linux Graphics Introduction
1.1 Overview
The Rockchip Linux graphics processing module, based on DRM and DMA-BUF technologies, provides an efficient graphics processing environment compliant with ARM Linux standards. Its main advantage lies in its universal architecture, which simplifies the customization development process and allows extensive use of existing components, making it the preferred adaptation platform for many open-source projects on the ARM side. Nonetheless, due to the complexity of the technology and architecture, understanding and applying this platform may require a learning process. Developers can obtain in-depth information and guidance by consulting the docs/cn/Common/DISPLAY/ , docs/cn/Linux/Graphics/ documents, and Rockchip wiki, which are vital resources for mastering the core technologies of the platform.
1.2 Chipset Hardware Modules Introduction
1.2.1 VOP (Video Output Processor)
VOP (Video Output Processor) is a display interface that transmits images from memory frame buffers to display devices, and is used by the display unit to present images (such as inputting NV12, RGB buffers, to be displayed on the screen). The fundamental features of VOP vary across different platforms, such as the maximum resolution supported by each display interface, whether 4K resolution is supported, AFBC (Arm Frame Buffer Compression) format compatibility, etc. For more specific details, refer to docs/cn/Common/DISPLAY/Rockchip_Developer_Guide_DRM_Display_Driver_CN.pdf .
1.2.2 GPU (Graphics Process Unit)
The GPU is a graphics acceleration platform based on open standards. It supports 2D graphics, 3D graphics, and General-Purpose computing on GPU (GPGPU). The GPU in Rockchip Linux provides APIs for OpenGles, EGL, and OpenCl, but does not support OPENGL. The types of support are as follows: Basically, Rockchip Linux GPUs provide APIs for OpenGLES, EGL, and OpenCl, but do not support OPENGL. The supported types are as follows (the types supported by each chip platform are different, please refer to the corresponding chip manual for details): OpenGL ES 3.0 OpenGL ES 2.0 OpenGL ES 1.1 OpenCL 1.2 OpenCL 1.1
OpenCL 1.0
1.2.3 RGA (Raster Graphic Acceleration)
The Rockchip RGA is a standalone two-dimensional raster graphics acceleration unit. It accelerates 2D graphic operations, such as pixel/line drawing, image scaling, rotation, bitmap operations, image composition, etc.The image formats supported by different chip platforms are different. For details, please refer to the corresponding chip manual. The code is located in the “SDK/external/linux-rga” directory. For more information, please refer to docs/en/Common/RGA/Rockchip_Developer_Guide_RGA_EN.pdf .
1.3 Image Software Module Introduction
The main focus is on understanding the relationships between libdrm, Wayland, and X11 (compositors), as well as Mesa, libmali, and GTK (applications). For more information, refer to the Linux_Graphics_Stack.
1.3.1 LIBDRM
LIBDRM is a cross-driver middleware that allows user space applications (for example, as Mesa and 2D drivers) to communicate with the kernel through DRI. Please refer to the following DRM structure diagram:
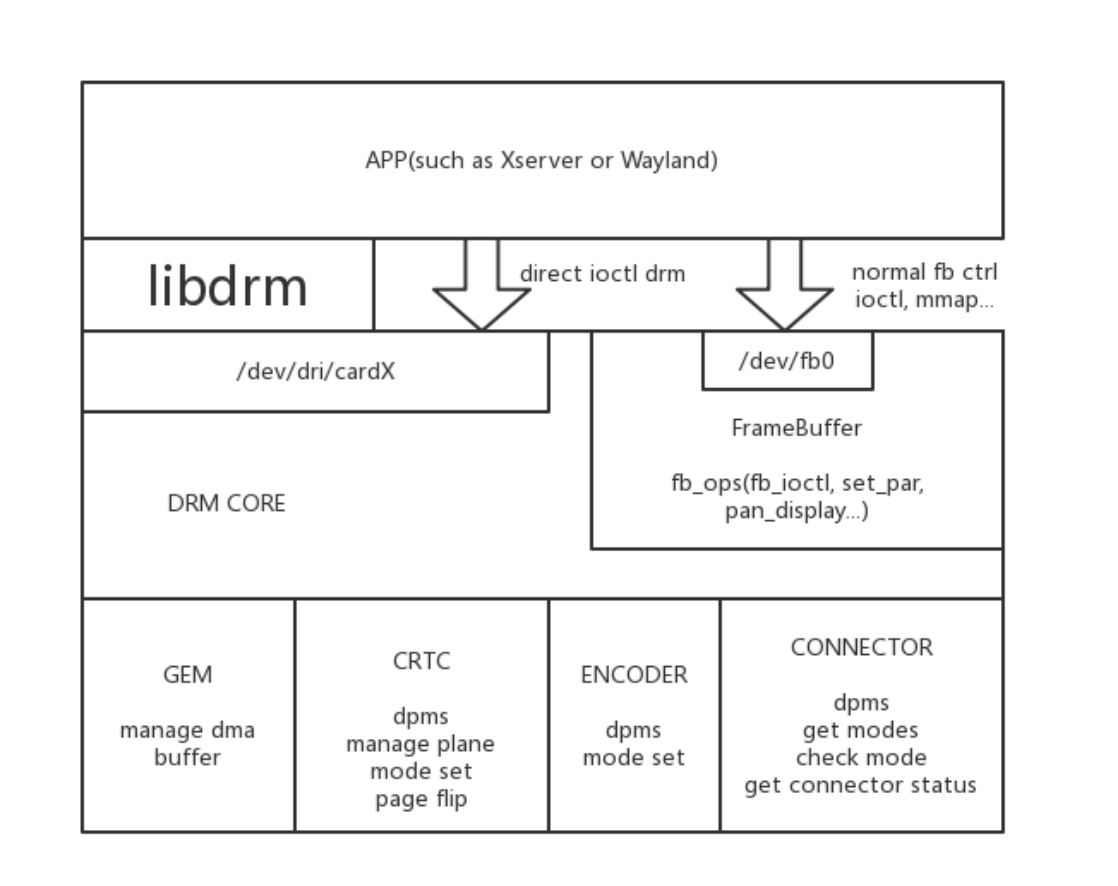
LIBDRM is a library under DRM for communication between driver and user layer. In the past, APP may directly use open (fb) to communicate with graphics drivers, but it is no longer suitable under the current hardware evolution. Reasons are as follows: What if there are multiple layers? What if there are multiple screens? How to deal with vsync problem, and how to sync without tearing? How to use dmabuf to achieve memory zero-copy? LIBDRM is used to facilitate to deal with these problems in user layer and drive, and provide APIs for display backends such as X11 and Wayland. If the program is relatively simple, such as an advertising machine that plays a video in a loop, you can call LIBDRM directly, but it is not recommended to use LIBDRM API directly. Reasons are as follows: First of all, LIBDRM is a relatively new API, and the users are limited to DRM driver development and Wayland/Xserver development. In addition, the evolution of LIBDRM is relatively fast. For example, APIs are divided into atomic and legacy, many effects depend on the implementation of manufacturers. Rockchip has modified some core API performance effects to assist product projects, so the same API may perform completely different on different platforms. It is not advise you to use X11 and Wayland, but to use what we have packaged. For example, if the advertising player plays the video in a loop, it is best to use GStreamer and then choose kmssink to display instead of directly calling the LIBDRM API. There are three concepts of crtc, plane, and connector in DRM, which can be understood as follows: connector is the screen, such as one HDMI with one connector num, and one DSI with one connector num. crtc means vop, and one screen generally corresponds to one crtc. The plane is layer. For example, the video layer is on plane2, the UI is on plane1, and the video is on top of UI. There are two groups of APIs in DRM, legacy and atomic. From the name legacy, you will know it is an early API, and most of our programs now use legacy API. There are several key functional interfaces to note, drmModeSetCrtc includes drmModeSetPlane and drmModePageFlip. drmModeSetCrtc is generally used to set UI layer and resolution. drmModeSetPlane is used to set the display of different layers, like video. The parameters are: the buffer fd to be displayed , the layer to be operated, the size to be displayed, and the size of the buffer. It will zoom the buffer and display it on the screen. On the Rockchip platform, this API is async. After two continuously calls, the previous one will be overwritten, at this time drmWaitVBlank may be needed. Why is drmModeSetPlane called by so many parts? Because we want to display multiple layers on the legacy API. Assuming that there are layer 1 and layer 2 currently, layer 1 calls drmModeSetPlane once, layer 2 also calls drmModeSetPlane once, and then they all wait for a vsync unit of time. If the screen refresh rate is 60hz, then the maximum number of frames is only 30fps ? In order to solve this problem, upstream engineers have developed atomic API.
The essence of atomic API can be known as a commit that includes the updated information of all layers. In this way, there is no need to call drmModeSetPlane twice, but one drmModeAtomicCommit to keep up with all the parameters.
mainline source code:
git clone https://gitlab.freedesktop.org/mesa/drm.git
Please refer to the following information for details: Rockchip wiki Official website wiki_Libdrm。 Official documents。 Examples of legacy: modetest in libdrm kmssink in gstreamer Examples of atomic: modeset-atomic
1.3.2 LIBMALI
As mentioned before, GPU provides opengles, egl, and opencl APIs, so please add LIBMALI to rootfs to use them. The default binary is on SDK/external/libmali . Naming rules: GPU model-software version-hardware version (maybe for example, r1p0 is used to distinguish RK3288 and RK3288w)-building options. Pay attention to the following building options: Without suffix. It is x11-gbm. Note that GBM is the memory mechanism used to configure DRM. Do not use fbdev except 3.10 kernel. GBM is used for programs like QT EGLFS, and does not rely on X11, Wayland. Wayland or Wayland-gbm are used by Wayland.
1.3.3 ZERO-COPY
Displaying dmabuf data with Mali, such as from cameras or videos, can actually be optimized using the dmabuf ZERO-COPY mechanism. Otherwise, loading textures would require CPU copying. X11/Wayland has ZERO-COPY configurations, and you can search for related Wayland dmabuf information.
1.3.4 X11
Similar to general desktop platforms, X11, however, has an issue with GPU performance. The source code is located in the “SDK/external/xserver” directory. For more details about X11, you can refer to the following links:
https://en.wikipedia.org/wiki/X.Org_Server
https://www.comptechdoc.org/os/linux/howlinuxworks/linux_hlxwindows.html
https://dri.freedesktop.org/wiki/DDX/
https://www.freedesktop.org/wiki/Software/Glamor/
https://en.wikipedia.org/wiki/X.Org_Server
1.3.5 Wayland
It’s recommended to use Yocto/Buildroot SDK for Wayland development. In terms of efficiency, Wayland is somewhat better than X11, mainly due to compatibility issues. If you don’t need a desktop but require multiple windows, you might consider using Wayland. Reference materials:
https://en.wikipedia.org/wiki/Wayland
1.3.6 None
In addition to X11 and Wayland, there’s also ‘None,’ which is more common in embedded systems. For instance, LVGL and SDL work in this way.
1.3.7 Choosing a Display Architecture
EGL program + X11 X11 Wayland None For multi-window functionality needs, choose: X11 Wayland For desktop functionality needs, choose: X11 For 4K video playback + fullscreen: X11 Wayland For 4K video playback + multi-window: X11 Wayland
1.4 Introduction to Multi-Screen Display Features
Rockchip Linux on Debian/Buildroot platforms allows any combination of DP/HDMI/MIPI/eDP/LVDS and other display interfaces, supporting multi-screen same or different display functionalities. When operating in dual-screen independent display mode, one display interface acts as the primary screen and the other as the secondary. Below is an introduction to the dual-screen independent display features.
1.4.1 Debian Dual Screen Display Feature Introduction
In Debian using the X11 system, you can use xrandr to set up dual-screen same or different display functionalities. “xrandr” is an official RandR (Resize and Rotate) configuration tool for the Wikipedia:X Window System. It can set the size, orientation, and mirroring of the screen display. For multi-monitor situations, refer to the Multihead page.
1.4.1.1 Display Device and Device Name
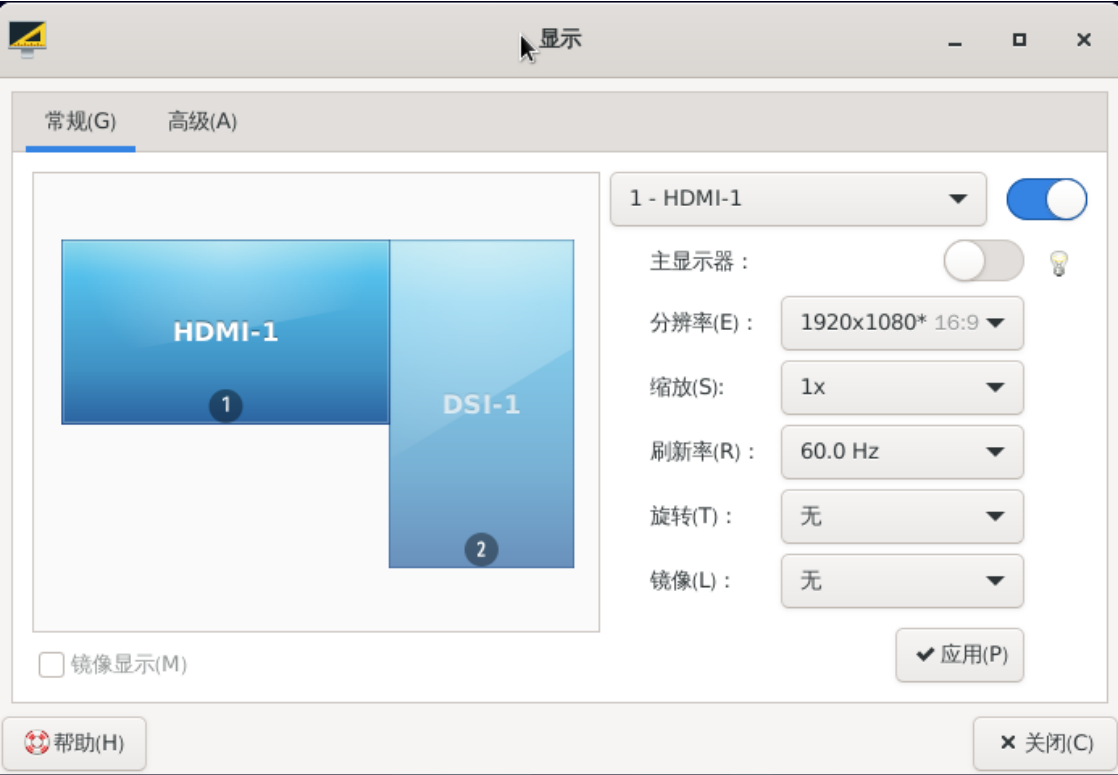
Both of command line and interface setting of dual-screen display mode are supported. Menu interface: Right-click with the mouse, then select Application->Settings->Display:
Command:
su linaro -c "DISPLAY=:0 xrandr"
Output:
root@linaro-alip:/# su linaro -c "DISPLAY=:0 xrandr"
Screen 0: minimum 320 x 200, current 3000 x 1920, maximum 16384 x 16384
HDMI-1 connected 1920x1080+0+0 (normal left inverted right x axis y axis) 0mm x
0mm
   1920x1080     60.00*+  60.00
   1600x900      60.00
   1280x1024     60.02
   1280x720      60.00    60.00
   720x480       59.94    59.94
HDMI-2 disconnected (normal left inverted right x axis y axis)
DSI-1 connected 1080x1920+1920+0 (normal left inverted right x axis y axis) 0mm x
0mm
   1080x1920     59.90*+
DP-1 disconnected (normal left inverted right x axis y axis)
DP-2 disconnected (normal left inverted right x axis y axis)
You will see that there are two display devices in the current system , the device names are HDMI- 1 and DSI-1.
1.4.1.2 Dual-screen Display Mode Setting
Both of dual-screen with the same display and dual-screen with different display mode are supported. In the different display mode, four modes are supported: On right, Above, On left, and Below. Menu interface: In the display settings, dragging the position of the screen with the mouse allows you to switch the dual-screen display mode. Command:
su linaro -c "DISPLAY=:0 xrandr --output HDMI-1 --above DSI-1"
The –above parameter can be set to right-of, left-of, below, same-as to switch the dual-screen display mode. Default/same-as mode is dual-screen with the same display.
1.4.2 Dual-screen Display Function Introduction
Weston in Buildroot SDK supports many functions such as multi-screen with the same and different display and hot-plugging. Different display screens are distinguished according to the drm name (obtained by Weston startup log or /sys/class/drm/card0-), and the related configurations are set by environment variables, such as:
    # /etc/profile.d/weston.sh
    export WESTON_DRM_PRIMARY=HDMI-A-1 # Specify HDMI-A-1 as primary monitor
    export WESTON_DRM_SINGLE_HEAD=1 # Force using single monitor
    export WESTON_DRM_MIRROR=1 # In mirror mode (multi-screen with the same display), without setting this environment variable will be with different display
    export WESTON_DRM_KEEP_RATIO=1 # In mirror mode, scaling maintains the aspect ratio, without setting this variable will be full screen by force
    export WESTON_DRM_HEAD_MODE=primary # Only enable primary monitor
    export WESTON_DRM_HEAD_MODE=internal # Only enable internal monitors
    export WESTON_DRM_HEAD_MODE=external # Only enable external monitors
    export WESTON_DRM_HEAD_MODE=external-dual # Enable all monitors, and prefer the external ones
    export WESTON_DRM_HEAD_FALLBACK=1 # Fallback to any available monitor when none matched
    export WESTON_DRM_MASTER=1 # Allow disabling unused monitors

    export WESTON_OUTPUT_FLOW=horizontal # Laying outputs horizontally by default
    export WESTON_OUTPUT_FLOW=vertical # Laying outputs vertically by default
    export WESTON_OUTPUT_FLOW=same-as # Laying outputs at (0,0) by default
It is necessary to depend on RGA acceleration when zooming the display content in mirror mode. At the same time, it is also supported to disable specific screens alone in the output section of weston.ini:
# /etc/xdg/weston/weston.ini

[output]
name=LVDS-1

mode=off
# off|current|preferred|<WIDTHxHEIGHT@RATE>
For more information, please refer to docs/en/Linux/Graphics/Rockchip_Developer_Guide_Buildroot_Weston_EN.pdf .
1.5 Screen Display Adjustment
On the Linux platform, screen parameters such as hue, saturation, contrast, and brightness can be adjusted using modetest. Use modetest and the modetest -w option to set properties using -w <obj_id>:<prop_name>:. For example, to set the hue of the eDP screen: modetest -M rockchip can get the Connectors id of the eDP screen is 92.
Connectors:
id      encoder status          name            size (mm)       modes   encoders
92      91      connected       eDP-1           129x171         1       91
  modes:
        name refresh (Hz) hdisp hss hse htot vdisp vss vse vtot)
  1536x2048 60 1536 1548 1564 1612 2048 2056 2060 2068 200000 flags: nhsync,
nvsync; type: preferred
...
Set the hue value of the eDP screen to 60, the default hue value is 50, the adjustable range is 0~100.
modetest -M rockchip -w 92:hue:60
Similarly, the hue, saturation, contrast, and brightness of other screens like LVDS/HDMI/MIPI can also be set. Additionally, on X11, gamma properties can be adjusted through xrandr. First, check if the board’s “etc/X11/xorg.conf.d/20-modesetting.conf” contains the configuration:
Option "UseGammaLUT" "true"
If not included, update the xserver deb package to gain support. Modify command (specify the screen, modify the gamma weight of RGB components):
xrandr --output HDMI-1 --gamma 1:1:0.9
Source reference links
http://opensource.rock-chips.com/wiki_Graphics
https://upload.wikimedia.org/wikipedia/commons/c/c2/Linux_Graphics_Stack_2013.svg

http://opensource.rock-chips.com/wiki_Libdrm
https://dri.freedesktop.org/docs/drm/gpu/drm-kms.html
https://gitlab.freedesktop.org/mesa/drm/-/blob/main/tests/modetest/modetest.c
https://github.com/rockchip-linux/gstreamer-rockchip-extra/blob/master/gst/kms/gstkmssink.c
https://github.com/dvdhrm/docs/blob/master/drm-howto/modeset-atomic.c