
ArmSoM applicability and source
This is a Rockchip platform reference, not an ArmSoM test report. Sources: RK-JC-YF-416, RKNN SDK V2.3.2, 27 Chinese and 29 English pages. Chinese follows its source; English follows its source and is fully translated into Russian and German. Chinese uses all 16 Chinese PDF figures; English/Russian/German use the 16 English PDF originals. The pictured Rockchip reference boards, connectors and power adapters are not ArmSoM board specifications; do not apply 12V-2A/12V-3A directly to ArmSoM hardware. The source lists RK3562, RK3566/3568/3576/3588 series and RV1126B, but does not specify an ArmSoM board SDK/BSP, firmware or kernel combination. Check power, OTG/adb, NPU driver and Toolkit2/Server/Runtime compatibility. Linux 5.10.160, driver 0.8.8, detections and logs are source examples. No installation/debug commands or hardware/performance tests were executed. V2.3.2 is the source snapshot, not a claim about the latest version.
Safety and editorial note: source commands include root, adb remount, setenforce 0, docker group membership and –privileged. These affect device/host security boundaries; they are preserved source references, not instructions validated for production use. See editorial notes for version, path and numbering differences and screenshot error logs. Risky command options have not been silently rewritten.
1 Introduction
This document provides a detailed introduction for beginners on how to quickly use RKNN-Toolkit2 on a computer to perform model conversion and deploy it to a Rockchip development board using RKNPU2. The examples used in this document are integrated into the RKNN Model Zoo.
Supported platforms: RK3562, RK3566 series, RK3568 series, RK3576 series, RK3588 series, RV1126B.
2 Prepare Development Board
This chapter will explain how to connect the development board to a computer, divided into two parts:
Introduction to Development Board and Connection Tools
Connect the Development Board to the Computer
2.1 Introduction to Development Board and Connection Tools
1. Development board
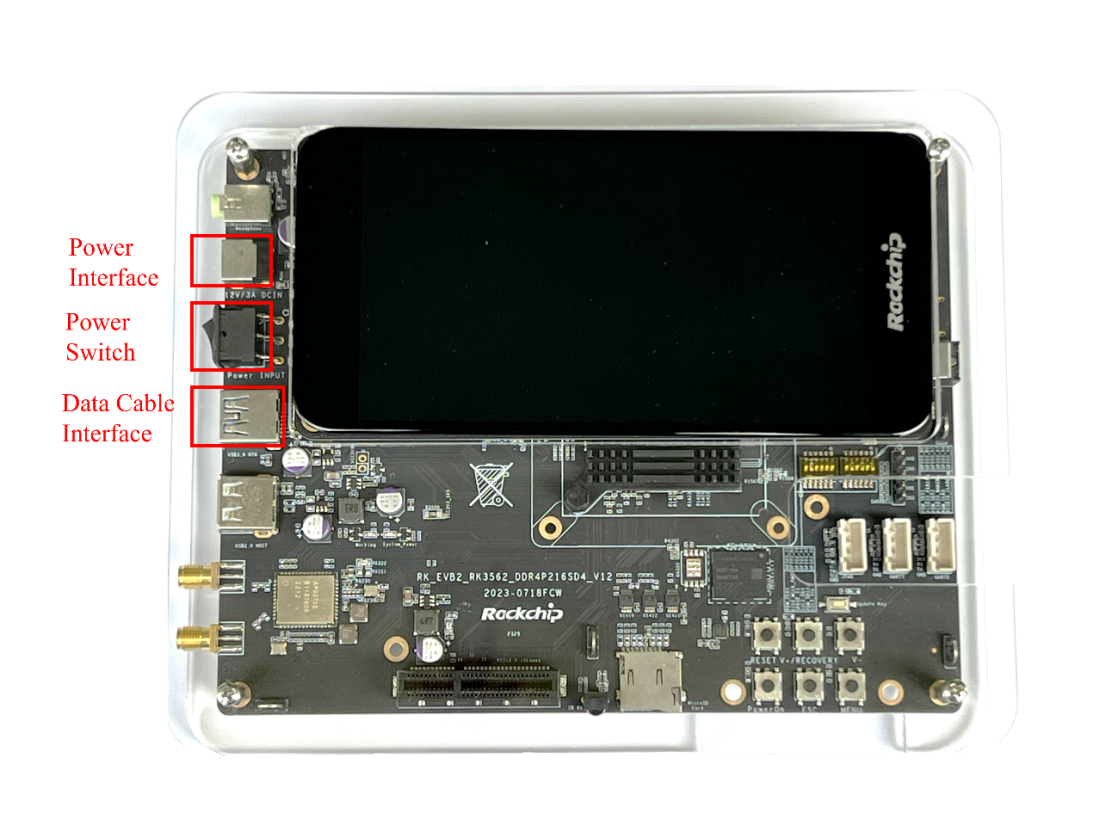
Figure 2-1 RK3562 development board
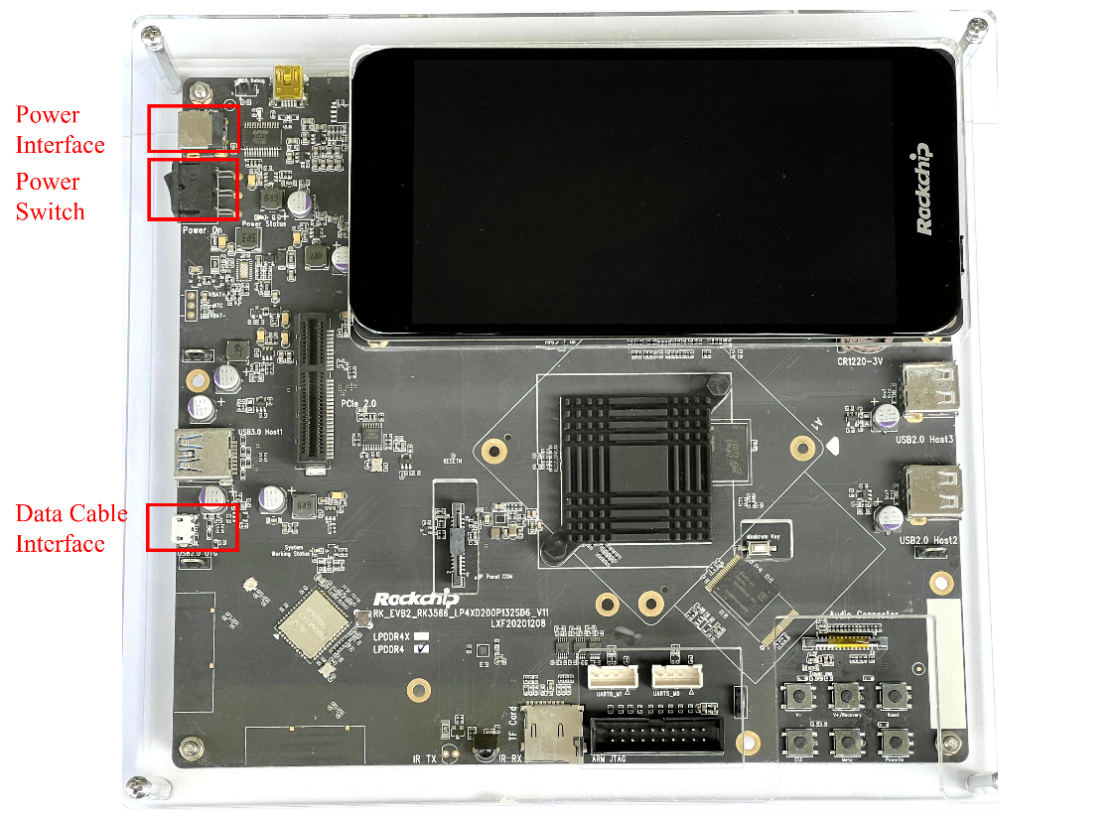
Figure 2-2 RK3566 development board
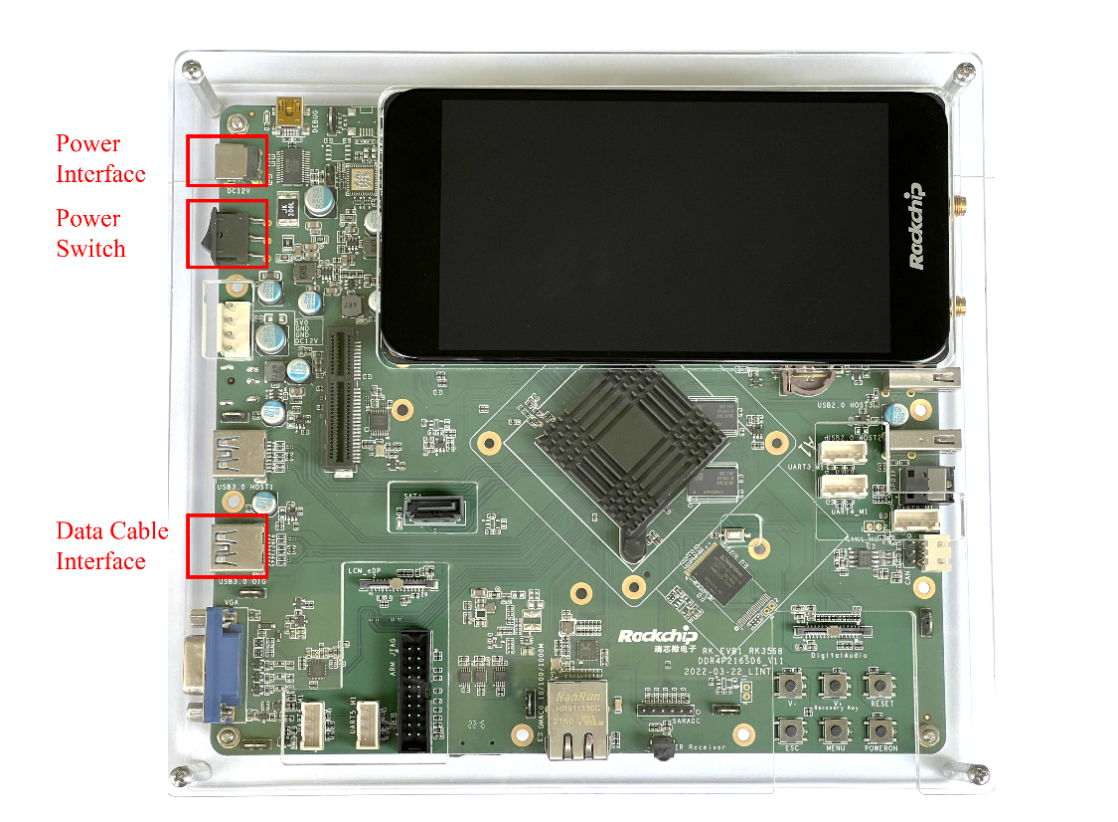
Figure 2-3 RK3568 development board
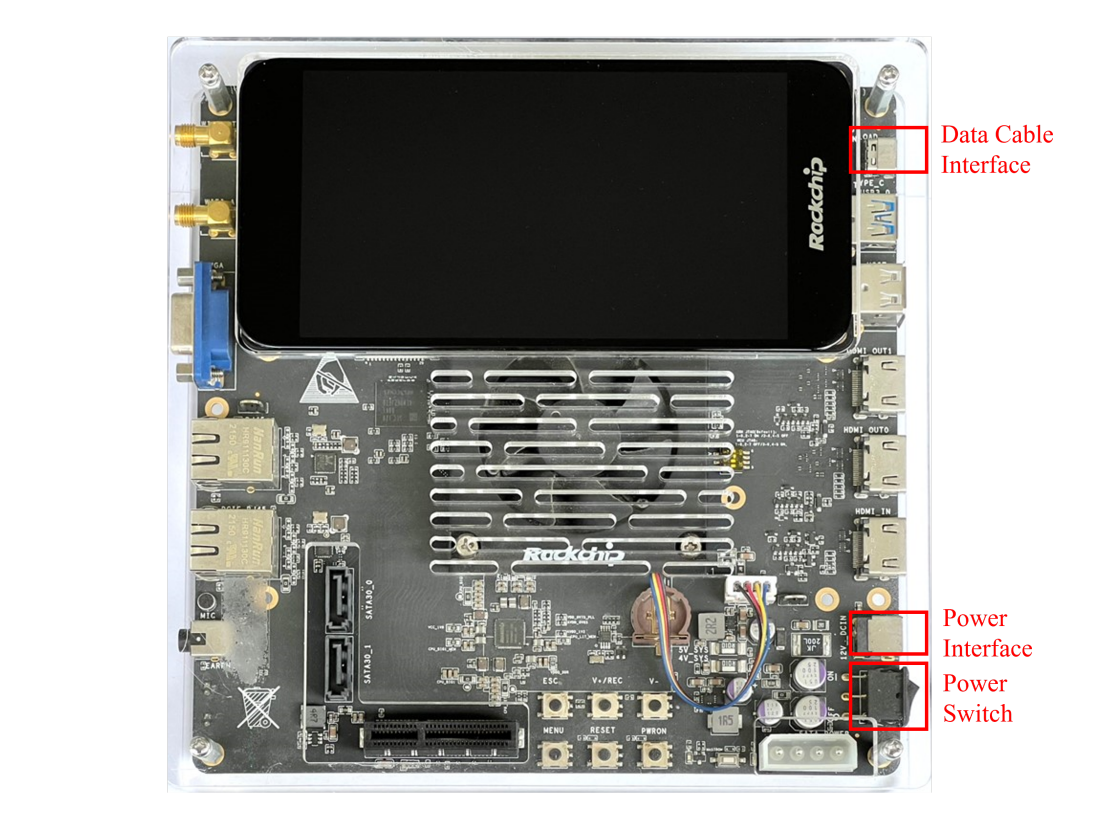
Figure 2-4 RK3588 development board
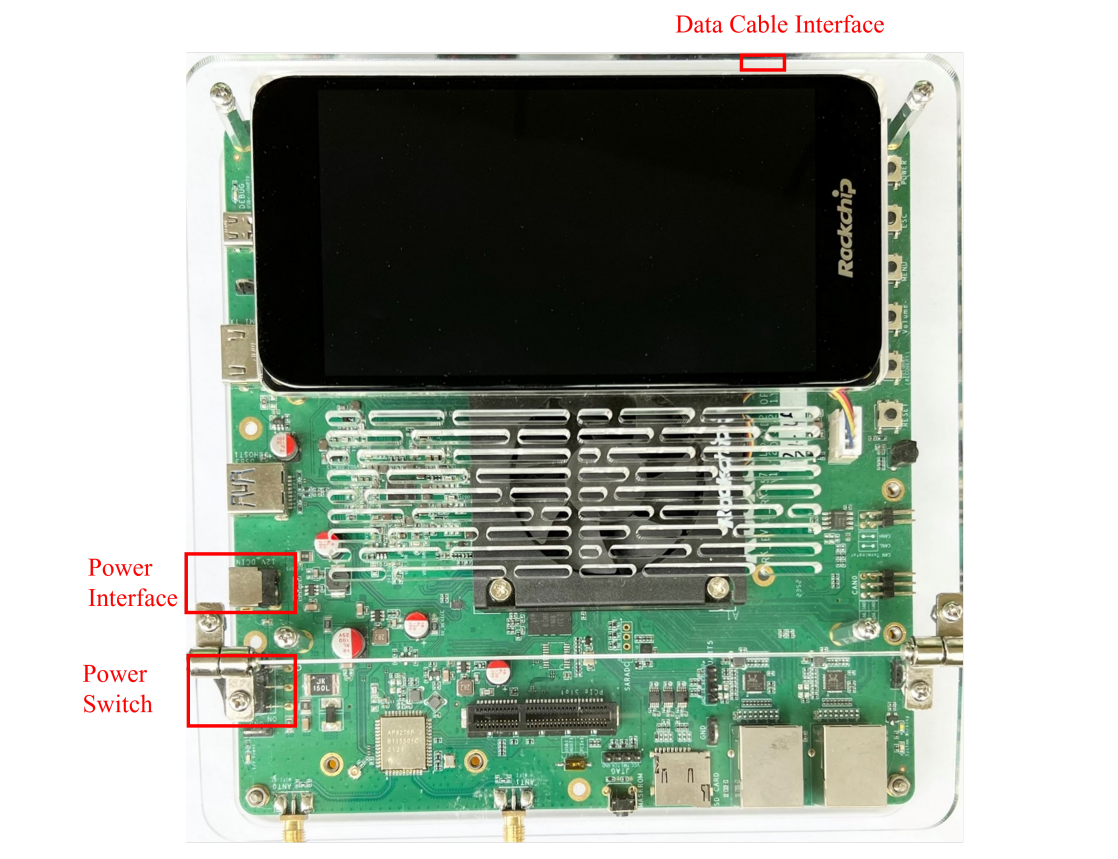
Figure 2-5 RK3576 development board
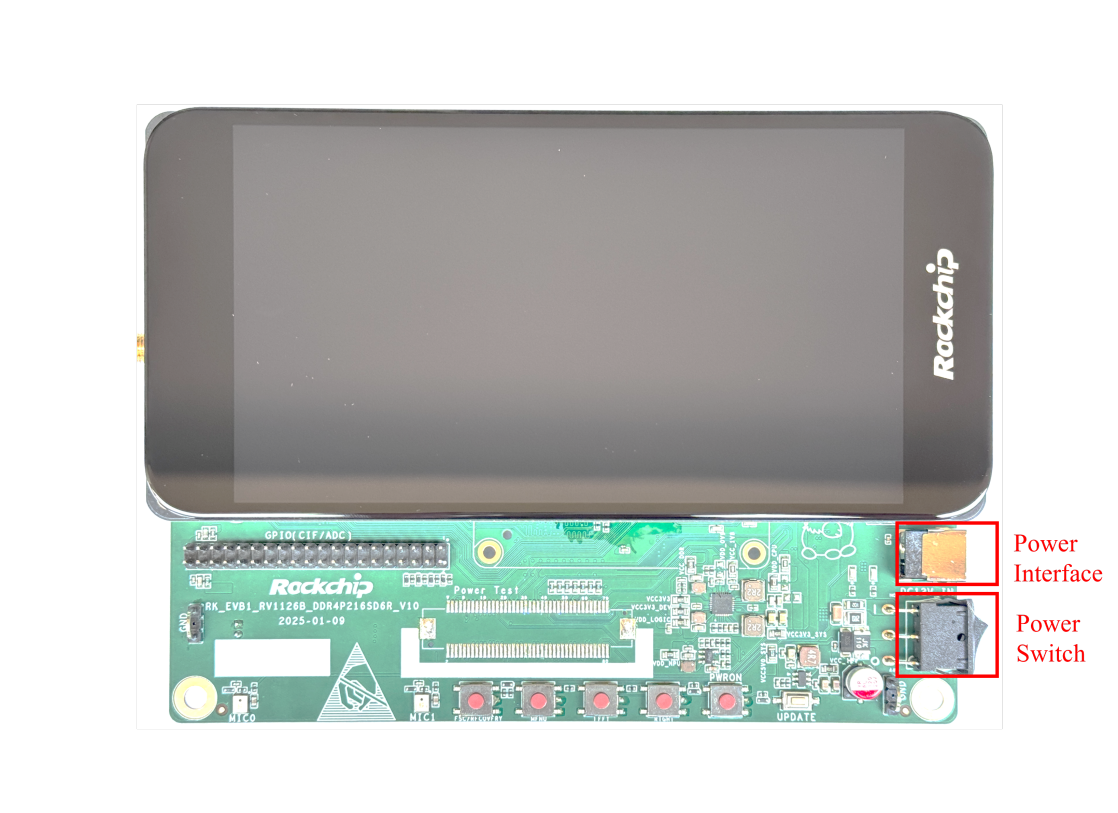
Figure 2-6 RV1126B development board
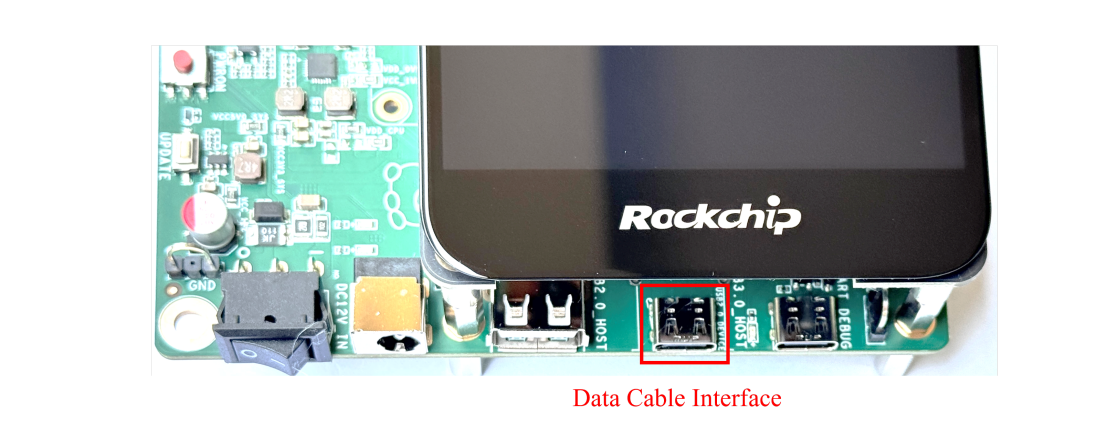
Figure 2-7 RV1126B development board (side view)
2. Data cable for connecting development board and computer
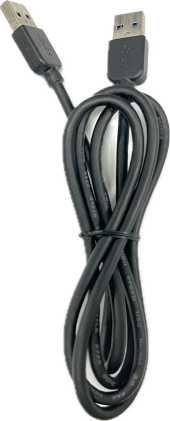
Figure 2-8 USB-A data cable (for RK3562/RK3568 development board)
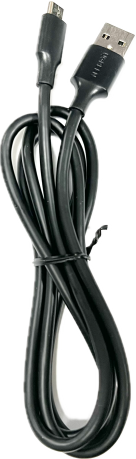
Figure 2-9 Micro USB data cable (for RK3566 development board))
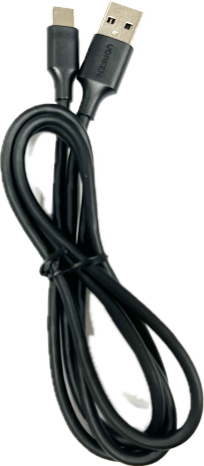
Figure 2-10 USB-C data cable (for RK3576/RK3588 development board)
3. Power adapter
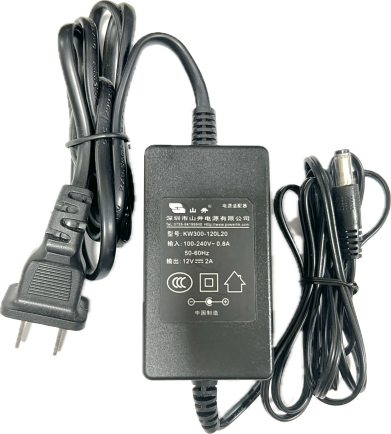
Figure 2-11 Power adapter with 12V-2A output (for RK3562/RK3566/RK3568 development board)

Figure 2-12 Power adapter with 12V-3A output (for RK3576/RK3588 development board)
2.2 Connect the Development Board to the Computer
Taking RK3568 as an example to illustrate how to connect the development board to the computer:
1. Prepare a computer with Ubuntu18.04 / Ubuntu20.04 / Ubuntu22.04 operating system.
2. Find the location of the power interface in the picture and connect the development board power adapter.
3. Use the data cable to connect the development board and computer. (Note that due to different production batches, the type and location of the data cable interface of the development board may change. Usually, the interface with the word OTG printed on it is the data cable interface.)
4. Turn on the power switch and wait for the development board system to start up.
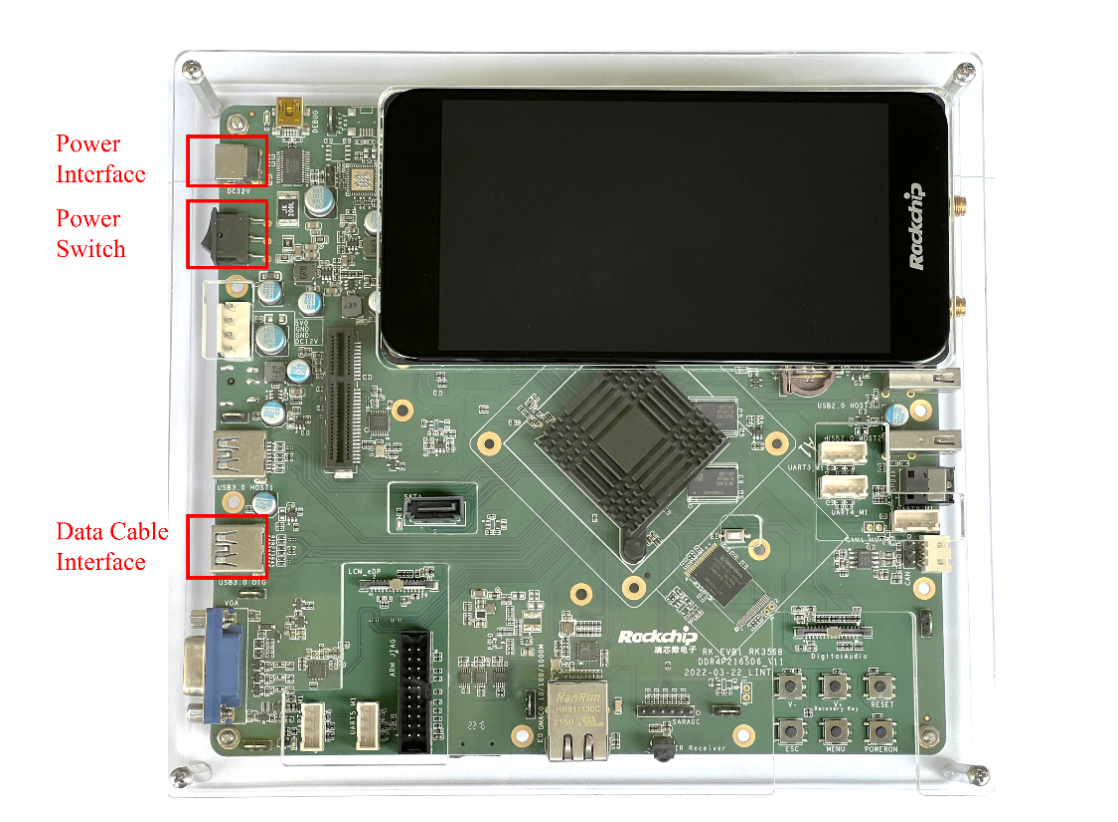
Figure 2-13 RK3568 development board
1. Check whether the development board is connected to the computer
In the terminal window (command line interface) of your computer, execute the following command:
# If adb has not been installed, please install it first using 'sudo apt install adb'
adb devices
The output information of a successful connection is as follows, where 13af7b28115662cd is the device ID of RK3568. If there is no device displayed, please refer to Chapter 6.1 for troubleshooting.
$ adb devices
List of devices attached
13af7b28115662cd device
3 Prepare Development Environment
This chapter introduces how to install the development environment directly on the computer. The subsequent sample program running process will also be explained using direct installation as an example. If you need to run the sample program in a Docker environment, you can refer to Chapter 5 to prepare the development environment.
This chapter is divided into four parts:
Download RKNN Related Repositories
Install the RKNN-Toolkit2 Environment on the Computer
Install Compilation Tools on the Computer
Install RKNPU2 Environment on the Board
3.1 Download RKNN Related Repositories
It is recommended to create a new directory to store the RKNN repositories. For example, create a folder named “Projects” and place the RKNN-Toolkit2 and RKNN Model Zoo repositories in that directory. Refer to the following commands:
# Create the 'Projects' folder
mkdir Projects

# Switch to this directory
cd Projects

# Download the RKNN-Toolkit2 repository
git clone https://github.com/airockchip/rknn-toolkit2.git --depth 1

# Download the RKNN Model Zoo repository
git clone https://github.com/airockchip/rknn_model_zoo.git --depth 1

# Notice:
# 1. Parameter --depth 1 means to clone only the latest commit
# 2. If the 'git clone' command fails, you can also download the compressed file directly from GitHub and unzip it locally in this directory.
Overall directory structure:
Projects
├── rknn-toolkit2
│ ├── doc
│ ├── rknn-toolkit2
│ │ ├── packages
│ │ ├── docker
│ │ └── ...
│ ├── rknpu2
│ │ ├── runtime
│ │ └── ...
│ └── ...
└── rknn_model_zoo
  ├── datasets
  ├── examples
  └── ...
3.2 Install the RKNN-Toolkit2 Environment on the Computer
3.2.1 Install Python
If the Python 3.8 environment is not installed on your system, or if there are multiple versions of Python installed, it is recommended to use Miniforge Conda to create a new Python 3.8 environment.
3.2.1.1 Install Miniforge Conda
In the terminal window on the computer, execute the following command to check whether Miniforge Conda is installed. If already installed, you can skip this step.
conda -V
# Reference output: conda 23.9.0, indicating that Miniforge Conda version is 23.9.0
# If it shows 'conda: command not found', it means Miniforge Conda is not installed.
If Miniforge Conda is not installed, you can download the Miniforge Conda installer from the following link:
wget -c https://github.com/conda-forge/miniforge/releases/latest/download/Miniforge3-Linux-x86_64.sh
Then, install Miniforge Conda using the following command:
chmod 777 Miniforge3-Linux-x86_64.sh
bash Miniforge3-Linux-x86_64.sh
3.2.1.2 Create Python Environment Using Miniforge Conda
In the terminal window on the computer, execute the following command to switch to the Miniforge conda base environment:
source ~/miniforge3/bin/activate
# Upon successful activation, the command prompt will change to the following form:
# (base) xxx@xxx:~$
Create a Python 3.8 environment named ‘toolkit2’ using the following command:
conda create -n toolkit2 python=3.8
Activate the ‘toolkit2’ environment. Subsequently, RKNN-Toolkit2 will be installed in this environment.
conda activate toolkit2
# Upon successful activation, the command prompt will change to the following form:
# (toolkit2) xxx@xxx:~$
3.2.2 Install RKNN-Toolkit2
After activating the ‘toolkit2’ environment, you can install RKNN-Toolkit2 using either the pip source or a local wheel package:
Install via pip source
pip install rknn-toolkit2 -i https://pypi.org/simple

# If RKNN-Toolkit2 is already installed, you can upgrade it with the following command:
pip install rknn-toolkit2 -i https://pypi.org/simple --upgrade
Install via local wheel package
# Switch to the rknn-toolkit2 directory
cd Projects/rknn-toolkit2/rknn-toolkit2

# Please choose the appropriate requirements file based on the Python version and processor architecture:
# where cpxx is the Python version
pip install -r packages/x86_64/requirements_cpxx.txt
# pip install -r packages/arm64/arm64_requirements_cpxx.txt

# Install RKNN-Toolkit2
# Please choose the appropriate wheel package file based on the Python version and processor architecture:
# where x.x.x is the RKNN-Toolkit2 version number, cpxx is the Python version
pip install packages/x86_64/rknn_toolkit2-x.x.x-cpxx-cpxx-manylinux_2_17_x86_64.manylinux2014_x86_64.whl
# pip install packages/arm64/rknn_toolkit2-x.x.x-cpxx-cpxx-manylinux_2_17_aarch64.manylinux2014_aarch64.whl
3.2.3 Check if the RKNN-Toolkit2 Environment is Installed Successfully
Execute the following command. if no errors are reported, it indicates that the RKNN-Toolkit2 environment has been successfully installed.
# Switch to Python interactive mode
python

# Import the RKNN class
from rknn.api import RKNN
If the installation fails, please refer to Chapter 10.2 ‘RKNN-Toolkit2 Installation Issue’ in the ‘Rockchip_RKNPU_User_Guide_RKNN_SDK_EN.pdf’ document. It provides detailed solutions for resolving RKNN-Toolkit2 environment installation failures.
3.3 Install Compilation Tools on the Computer
3.3.1 Install CMake
In the computer terminal, execute the following command:
# Update package list
sudo apt update

# Install cmake
sudo apt install cmake
3.3.2 Install Compiler
3.3.2.1 Confirm the System Type and Architecture of the Development Board
For convenience, the remainder of this document uses “board” to refer to the development board.
1. Confirm the system type of the board
In the computer terminal, execute the following command:
adb shell getprop ro.build.version.release
If the output is a number (Android system version), it indicates that the board is running on the Android system.
$ adb shell getprop ro.build.version.release
12
Otherwise, the board is running on the Linux system.
$ adb shell getprop ro.build.version.release
/bin/sh: getprop: not_found
1. Confirm the system architecture of the board
If the board is running on the Android system, you can execute the following command on the computer to query the system architecture:
adb shell getprop ro.product.cpu.abi
The reference output for this command is as follows, where arm64-v8a indicates ARM 64-bit architecture, ABI version 8:
$ adb shell getprop ro.product.cpu.abi
arm64-v8a
If the board is running on the Linux system, you can execute the following command on the computer to query the system architecture:
adb shell uname -a
The reference output for this command is as follows, where aarch64 indicates ARM 64-bit architecture:
$ adb shell uname -a
Linux Rockchip 5.10.160 #183 SMP Tue Oct 24 18:52:11 CST 2023 aarch64 GNU/Linux
3.3.2.2 Install NDK on Android System Development Board
Note: This section is applicable to development boards with the Android system. If the board is running on the Linux system, please skip this section.
NDK Download URL (it is recommended to download the r19c version): https://dl.google.com/android/repository/android-ndk-r19c-linux-x86_64.zip
Extract the software package
It is recommended to extract the NDK software package to the ‘Projects’ folder. The location is as follows:
Projects
├── rknn-toolkit2
├── rknn_model_zoo
└── android-ndk-r19c # This path will be used when compiling RKNN C Demo
At this point, the path to the NDK compiler is Projects/android-ndk-r19c.
3.3.2.3 Install GCC Cross-Compiler on Linux System Development Board
Note: This section is applicable to development boards with the Linux system. If the board is running on the Android system, please skip this section.
GCC Download URL
Board is a 64-bit system: https://releases.linaro.org/components/toolchain/binaries/6.3-2017.05/aarch64-linux-gnu/gcc-linaro-6.3.1-2017.05-x86_64_aarch64-linux-gnu.tar.xz
Board is a 32-bit system: https://releases.linaro.org/components/toolchain/binaries/6.3-2017.05/arm-linux-gnueabihf/gcc-linaro-6.3.1-2017.05-x86_64_arm-linux-gnueabihf.tar.xz
Extract the software package
It is recommended to extract the GCC software package to the ‘Projects’ folder. Taking the GCC package for a 64-bit system as an example, the location is as follows:
  Projects
  ├── rknn-toolkit2
  ├── rknn_model_zoo
  └── gcc-linaro-6.3.1-2017.05-x86_64_aarch64-linux-gnu # This path will be used when compiling the RKNN C Demo
At this point, the path to the GCC compiler is Projects/gcc-linaro-6.3.1-2017.05-x86_64_aarch64-linux-gnu/bin/aarch64-linux-gnu.
3.4 Install RKNPU2 Environment on the Board
3.4.1 Confirm the RKNPU2 Driver Version
You can execute the following command on the board to query the RKNPU2 driver version:
dmesg | grep -i rknpu
As shown in the following figure, the current RKNPU2 driver version is 0.8.8.
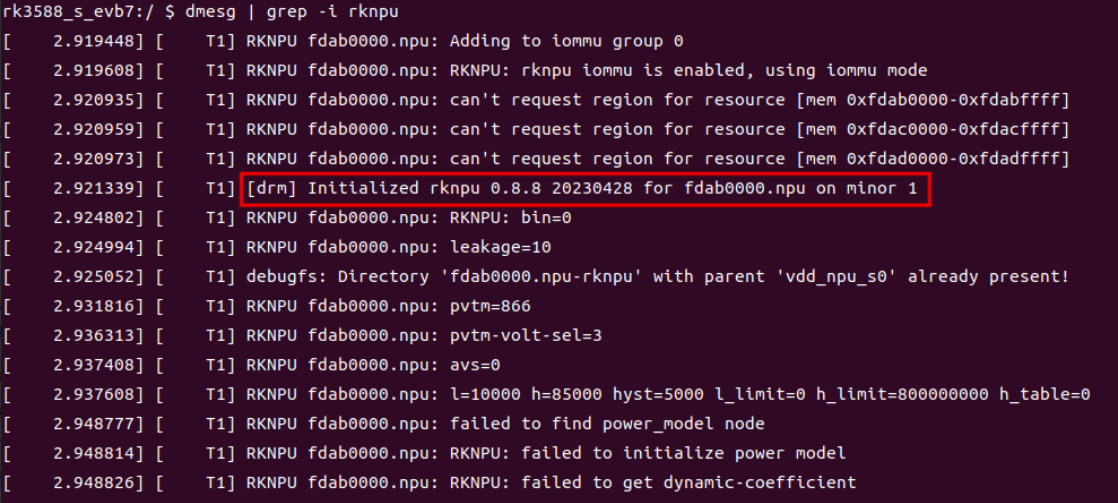
Copyable source log transcription (including source error messages; not an ArmSoM test):
rk3588_s_evb7:/ $ dmesg | grep -i rknpu
[    2.919448] [    T1] RKNPU fdab0000.npu: Adding to iommu group 0
[    2.919608] [    T1] RKNPU fdab0000.npu: RKNPU: rknpu iommu is enabled, using iommu mode
[    2.920935] [    T1] RKNPU fdab0000.npu: can't request region for resource [mem 0xfdab0000-0xfdabffff]
[    2.920959] [    T1] RKNPU fdab0000.npu: can't request region for resource [mem 0xfdac0000-0xfdacffff]
[    2.920973] [    T1] RKNPU fdab0000.npu: can't request region for resource [mem 0xfdad0000-0xfdadffff]
[    2.921339] [    T1] [drm] Initialized rknpu 0.8.8 20230428 for fdab0000.npu on minor 1
[    2.924082] [    T1] RKNPU fdab0000.npu: RKNPU: bin=0
[    2.924994] [    T1] RKNPU fdab0000.npu: leakage=10
[    2.925052] [    T1] debugfs: Directory 'fdab0000.npu-rknpu' with parent 'vdd_npu_s0' already present!
[    2.931816] [    T1] RKNPU fdab0000.npu: pvtm=866
[    2.936313] [    T1] RKNPU fdab0000.npu: pvtm-volt-sel=3
[    2.937408] [    T1] RKNPU fdab0000.npu: avs=0
[    2.937608] [    T1] RKNPU fdab0000.npu: l=10000 h=85000 hyst=5000 l_limit=0 h_limit=800000000 h_table=0
[    2.948777] [    T1] RKNPU fdab0000.npu: failed to find power_model node
[    2.948814] [    T1] RKNPU fdab0000.npu: RKNPU: failed to initialize power model
[    2.948826] [    T1] RKNPU fdab0000.npu: RKNPU: failed to get dynamic-coefficient
Figure 3-1 RKNPU2 driver version information
The official firmware of Rockchip development boards all installs the RKNPU2 driver. If the above command cannot query the NPU driver version, you may be using third-party firmware, which may not have the NPU driver installed. If you have the firmware source code, you can change the value of the CONFIG_ROCKCHIP_RKNPU option in the kernel config to ‘y’ to integrate the NPU driver, then recompile the kernel driver and flash it. It is recommended that RKNPU2 driver version >= 0.9.2.
3.4.2 Check if the RKNPU2 Environment is Installed
The on-board debugging feature of RKNN-Toolkit2 requires the installation of the RKNPU2 environment on the board and the initiation of the rknn_server service. Here are two basic concepts in the RKNPU2 environment:
RKNN Server: A background proxy service running on the development board. The main function of this service is to call the interface corresponding to the board Runtime to process the data transmitted by the computer through USB, and return the processing results to the computer.
RKNPU2 Runtime library (librknnrt.so): The main responsibility is to load the RKNN model in the system and perform inference operations of the RKNN model by calling a dedicated neural processing unit (NPU).
If the board does not have RKNN Server and Runtime libraries installed, or if the versions of RKNN Server and Runtime libraries are not consistent, you need to reinstall the RKNPU2 environment. (Note: 1. If using RKNN models with dynamic input dimensions, it requires RKNN Server and Runtime library versions >= 1.5.0. 2. Ensure that the versions of RKNN Server, Runtime libraries, and RKNN-Toolkit2 are consistent. It is recommended to install the latest versions.)
In most cases, the development board is already equipped with a consistent version of the RKNPU2 environment by default. You can confirm this with the following command. (If the RKNPU2 environment is not installed or the versions are inconsistent, please follow the steps in the next section to install/update the RKNPU2 environment):
1. Board is running on the Android system
Check if the RKNPU2 environment is installed
If you can start the rknn_server service, it means that the RKNPU2 environment is already installed on the board.
# Switch to the board
adb shell

# Start rknn_server
su
setenforce 0
/vendor/bin/rknn_server &
If the following output is displayed, it means that the rknn_server service has been successfully started, indicating that the RKNPU2 environment is installed:
start rknn server, version: x.x.x
Check if the versions are consistent
# Query rknn_server version
strings /vendor/bin/rknn_server | grep -i "rknn_server version"

# Query librknnrt.so library version
# For 64-bit systems
strings /vendor/lib64/librknnrt.so | grep -i "librknnrt version"

# For 32-bit systems
strings /vendor/lib/librknnrt.so | grep -i "librknnrt version"
If the following output is displayed, it means that the rknn_server version is x.x.x, and the version of librknnrt.so is x.x.x.
rknn_server version: x.x.x
librknnrt version: x.x.x
1. Board is running on the Linux system
Check if the RKNPU2 environment is installed
If you can start the rknn_server service, it means that the RKNPU2 environment is already installed on the board.
# Switch to the board
adb shell

# Start rknn_server
restart_rknn.sh
If the following output is displayed, it means that the rknn_server service has been successfully started, indicating that the RKNPU2 environment is installed:
start rknn server, version: x.x.x
Check if the versions are consistent
# Query rknn_server version
strings /usr/bin/rknn_server | grep -i "rknn_server version"

# Query librknnrt.so library version
strings /usr/lib/librknnrt.so | grep -i "librknnrt version"
If the following output is displayed, it means that the rknn_server version is x.x.x, and the version of librknnrt.so is x.x.x.
rknn_server version: x.x.x
librknnrt version: x.x.x
3.4.3 Install/Update the RKNPU2 Environment
Different board systems require the installation of different RKNPU2 environments. The following sections introduce the installation methods for each system.
Note: If you have already installed a version-consistent RKNPU2 environment, you can skip this section.
1. Board is running on the Android system
Switch to the rknpu2 directory, use the adb tool to push the corresponding rknn_server and librknnrt.so to the board, then start rknn_server. Refer to the following commands:
# Switch to the rknpu2 directory
cd Projects/rknn-toolkit2/rknpu2

# Switch to root user permissions
adb root
# Remount the file system as read-write
adb remount

# Push the rknn_server executable
# Note: In a 64-bit Android system, BOARD_ARCH corresponds to the arm64 directory; in 32-bit systems, it corresponds to the arm directory.
adb push runtime/Android/rknn_server/${BOARD_ARCH}/rknn_server /vendor/bin/

# Push the librknnrt.so library
# For 64-bit systems
adb push runtime/Android/librknn_api/arm64-v8a/librknnrt.so /vendor/lib64/

# For 32-bit systems
adb push runtime/Android/librknn_api/armeabi-v7a/librknnrt.so /vendor/lib/

# Switch to the board
adb shell

# Grant executable permissions
chmod +x /vendor/bin/rknn_server

# Restart the rknn_server service
su
setenforce 0
/vendor/bin/rknn_server &
1. Board is running on the Linux system
Switch to the rknpu2 directory, use the adb tool to push the corresponding rknn_server and librknnrt.so to the board, then start rknn_server. Refer to the following commands:
# Switch to the rknpu2 directory
cd Projects/rknn-toolkit2/rknpu2

# Push rknn_server to the board
# Note: In 64-bit Linux systems, BOARD_ARCH corresponds to the aarch64 directory. in 32-bit systems, it corresponds to the armhf directory.
adb push runtime/Linux/rknn_server/${BOARD_ARCH}/usr/bin/* /usr/bin

# Push librknnrt.so
adb push runtime/Linux/librknn_api/${BOARD_ARCH}/librknnrt.so /usr/lib

# Switch to the board
adb shell

# Grant executable permissions
chmod +x /usr/bin/rknn_server
chmod +x /usr/bin/start_rknn.sh
chmod +x /usr/bin/restart_rknn.sh

# Restart the rknn_server service
restart_rknn.sh
4 Run Example Programs
This chapter will introduce how to quickly run example programs on the development board. It is divided into three parts:
Introduction to RKNN Model Zoo
How to Run RKNN Python Demo
How to Run RKNN C Demo
4.1 Introduction to RKNN Model Zoo
The RKNN Model Zoo provides example code designed to help users quickly run various common models on Rockchip’s development board. The directory structure of the project is as follows:
rknn_model_zoo
├── 3rdparty # Third-party libraries
├── datasets # Datasets
├── examples # Example code
├── utils # Commonly used methods
├── build-android.sh # Compilation script for Android system board
├── build-linux.sh # Compilation script for Linux system board
└── ...
In the examples directory, there are some common model examples, such as MobileNet and YOLO, etc. Each model example provides both Python and C/C++ versions of the sample code (for convenience, we’ll refer to them as RKNN Python Demo and RKNN C Demo). Taking the YOLOv5 model as an example, its directory structure is as follows:
rknn_model_zoo
├── examples
│ └── yolov5
│ ├── cpp # C/C++ version of the sample code
│ ├── model # Models, test images, and other files
│ ├── python # Python version of the sample code
│ └── README.md
└── ...
4.2 How to Run RKNN Python Demo
Here, we take YOLOv5 as an example to introduce the usage of the RKNN Python Demo.
Note: Different RKNN Python Demos may have differences in usage. Please follow the steps in the README.md file in each respective directory.
4.2.1 Prepare Model
Switch to the rknn_model_zoo/examples/yolov5/model directory, and execute the download_model.sh script. This script will download an available YOLOv5 ONNX model and store it in the current model directory. Refer to the following commands:
# Switch to the rknn_model_zoo/examples/yolov5/model directory
cd Projects/rknn_model_zoo/examples/yolov5/model

# Run the download_model.sh script to download the yolov5 ONNX model
# For example, the downloaded ONNX model is stored at model/yolov5s_relu.onnx
./download_model.sh
4.2.2 Model Conversion
Switch to the rknn_model_zoo/examples/yolov5/python directory and run the convert.py script. This script converts the original ONNX model to the RKNN model. Refer to the following commands:
# Switch to the rknn_model_zoo/examples/yolov5/python directory
cd Projects/rknn_model_zoo/examples/yolov5/python

# Run the convert.py script to convert the original ONNX model to RKNN format
# Usage: python convert.py model_path [rk3566|rk3588|rk3562] [i8/fp] [output_path]
python convert.py ../model/yolov5s_relu.onnx rk3588 i8 ../model/yolov5s_relu.rknn
4.2.3 Run RKNN Python Demo
Switch to the rknn_model_zoo/examples/yolov5/python directory, execute the yolov5.py script, and you can run the YOLOv5 model on the development board using on-board debugging. Refer to the following command:
# Switch to the Projects/rknn_model_zoo/examples/yolov5/python directory
cd Projects/rknn_model_zoo/examples/yolov5/python

# Run the yolov5.py script to execute YOLOv5 model on the edge device
# Usage: python yolov5.py --model_path {rknn_model} --target {target_platform} --img_show

# If the --img_show parameter is included, the result image will be displayed
# Note: Here, the example is for the rk3588 platform. if using a different board, modify the platform type in the command accordingly
python yolov5.py --model_path ../model/yolov5s_relu.rknn --target rk3588 --img_show

# If you want to run the original onnx model on the computer first, you can use the following command
# Usage: python yolov5.py --model_path {onnx_model} --img_show
python yolov5.py --model_path ../model/yolov5s_relu.onnx --img_show
The default input image is model/bus.jpg and the output image is as shown below:
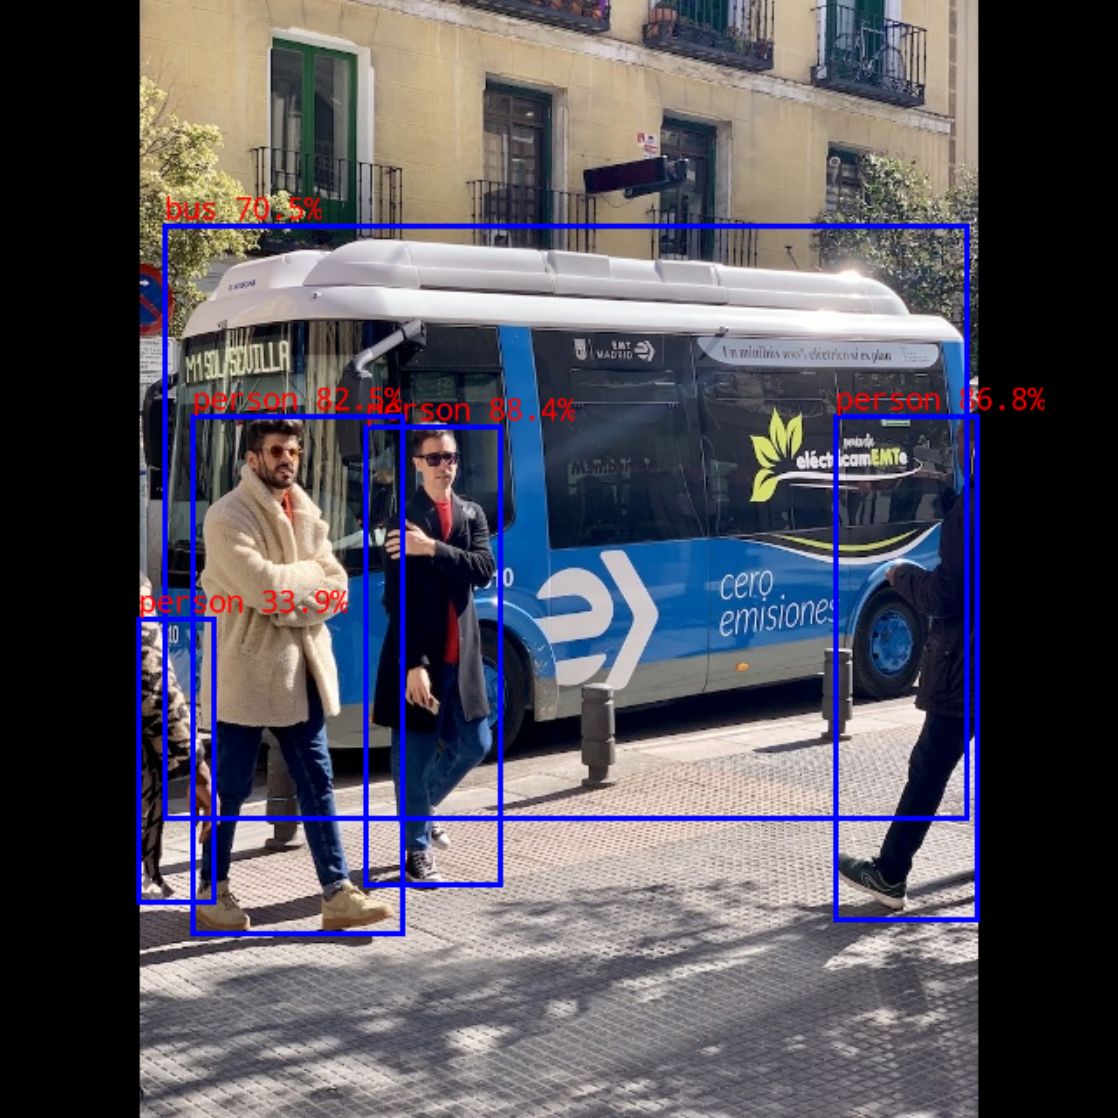
Figure 4-1 Output image of RKNN Python demo
4.2.4 Accuracy Evaluation (Optional)
The rknn_model_zoo/datasets directory stores data sets for accuracy evaluation. You need to download the evaluation data set first and save it to this directory. For example, for the YOLOv5 model, the COCO data set needs to be downloaded. Enter the rknn_model_zoo/datasets/COCO directory and run the download_eval_dataset.py script. This script will download the val2017 data set and store it in the current COCO directory. The reference command is as follows:
# Switch to the rknn_model_zoo/datasets/COCO directory
cd Projects/rknn_model_zoo/datasets/COCO

# Run the download_eval_dataset.py script to download the COCO dataset
python download_eval_dataset.py
When performing accuracy evaluation, you need to specify the –coco_map_test parameter and the data set path –img_folder. The reference command is as follows:
# Please install pycocotools first
pip install pycocotools

# Switch to the rknn_model_zoo/examples/yolov5/python directory
cd Projects/rknn_model_zoo/examples/yolov5/python

# Run the yolov5.py script
python yolov5.py \
  --model_path ../model/yolov5s_relu.rknn \
  --target rk3588 \
  --img_folder ../../../datasets/COCO/val2017 \
  --coco_map_test
4.3 How to Run RKNN C Demo
We take the YOLOv5 model as an example to introduce the usage of the RKNN C Demo.
Note: There may be differences in the usage of different RKNN C Demos. Please follow the steps outlined in the README.md file in their respective directories for execution.
4.3.1 Prepare Model
Switch to the rknn_model_zoo/examples/yolov5/model directory, and execute the download_model.sh script. This script will download an available YOLOv5 ONNX model and store it in the current model directory. Refer to the following commands:
# Switch to the rknn_model_zoo/examples/yolov5/model directory
cd Projects/rknn_model_zoo/examples/yolov5/model

# Run the download_model.sh script to download the yolov5 ONNX model
# For example, the downloaded ONNX model is stored at model/yolov5s_relu.onnx
./download_model.sh
4.3.2 Model Conversion
Switch to the rknn_model_zoo/examples/yolov5/python directory and run the convert.py script. This script converts the original ONNX model to the RKNN model. Refer to the following commands:
# Switch to the rknn_model_zoo/examples/yolov5/python directory
cd Projects/rknn_model_zoo/examples/yolov5/python

# Run the convert.py script to convert the original ONNX model to RKNN format
# Usage: python convert.py model_path [rk3566|rk3588|rk3562] [i8/fp] [output_path]
python convert.py ../model/yolov5s_relu.onnx rk3588 i8 ../model/yolov5s_relu.rknn
4.3.3 Run RKNN C Demo
To run a RKNN C Demo, you need to first compile the C/C++ source code into an executable file. After that, push the executable file, model files, input images, and other related files to the development board. Finally, execute the executable file on the development board.
Different board systems have different execution processes. Here we take the RK3588 platform of Android system and the RK356x platform of Linux system as examples to briefly introduce the process of running RKNN C Demo.
4.3.3.1 Compilation
Board is running on the Android system
Taking the RK3588 platform with Android system (arm64-v8a architecture) as an example, you need to use the ‘build-android.sh’ script in the ‘rknn_model_zoo’ directory for compilation. Before running the ‘build-android.sh’ script, you need to specify the path to the compiler, ‘ANDROID_NDK_PATH,’ as the local NDK compiler path. In the ‘build-android.sh’ script, add the following command:
# Add the following line to the beginning of the 'build-android.sh' script
ANDROID_NDK_PATH=Projects/android-ndk-r19c
Then, in the ‘rknn_model_zoo’ directory, execute the ‘build-android.sh’ script, referring to the following command:
# Switch to the rknn_model_zoo directory
cd Projects/rknn_model_zoo

# Run the build-android.sh script
# Usage: ./build-android.sh -t <target> -a <arch> -d <build_demo_name> [-b <build_type>] [-m]
# -t : target (rk356x/rk3588) # Platform type
# -a : arch (arm64-v8a/armeabi-v7a) # Edge device system architecture
# -d : demo name # Corresponding to the name of the subfolders under the examples directory, such as yolov5, MobileNet
# -b : build_type (Debug/Release)
# -m : enable address sanitizer, build_type needs to be set to Debug
./build-android.sh -t rk3588 -a arm64-v8a -d yolov5
Board is running on the Linux system
Taking the RK356x platform with Linux system (aarch64 architecture) as an example, you need to use the ‘build-linux.sh’ script in the ‘rknn_model_zoo’ directory for compilation. Before running the ‘build-linux.sh’ script, you need to specify the path to the compiler, ‘GCC_COMPILER,’ as the local GCC compiler path. In the ‘build-linux.sh’ script, add the following command:
# Add the following line to the beginning of the 'build-linux.sh' script
GCC_COMPILER=Projects/gcc-linaro-6.3.1-2017.05-x86_64_aarch64-linux-gnu/bin/aarch64-linux-gnu
Then, in the ‘rknn_model_zoo’ directory, execute the ‘build-linux.sh’ script, referring to the following command:
# Switch to the rknn_model_zoo directory
cd Projects/rknn_model_zoo

# Run the build-linux.sh script
# Usage: ./build-linux.sh -t <target> -a <arch> -d <build_demo_name> [-b <build_type>] [-m]
# -t : target (rk356x/rk3588) # Platform type, rk3568/rk3566 are both unified as rk356x
# -a : arch (aarch64/armhf) # Edge device system architecture
# -d : demo name # Corresponding to the name of the subfolders under the examples directory, such as yolov5, MobileNet
# -b : build_type(Debug/Release)
# -m : enable address sanitizer, build_type needs to be set to Debug
./build-linux.sh -t rk356x -a aarch64 -d yolov5
4.3.3.2 Push Files to the Board
After compilation, an ‘install’ folder will be generated in the ‘rknn_model_zoo’ directory. It contains the compiled executable file and related files such as input images. The directory structure is as follows:
install
├── rk356x_linux_aarch64 # rk356x platform
└── rk3588_android_arm64-v8a # rk3588 platform
 └── rknn_yolov5_demo
   ├── lib # Dependency library
   ├── model # Store models, test images and other files
   └── rknn_yolov5_demo # Executable file
Pushing files to the board involves different processes depending on the type of board system.
Board is running on the Android system
For the Android system on the RK3588 platform:
# Switch to the rknn_model_zoo directory
cd Projects/rknn_model_zoo

# Switch to root user permissions
adb root

# Push the entire rknn_yolov5_demo folder to the board
# Note: The rknn_yolov5_demo folder contains an executable file with the same name, rknn_yolov5_demo
# Note: When using different models and platforms, it is recommended to find the corresponding path directly under the 'install' directory
adb push install/rk3588_android_arm64-v8a/rknn_yolov5_demo/ /data/
Board is running on the Linux system
For the Linux system on the RK356x platform:
# Switch to the rknn_model_zoo directory
cd Projects/rknn_model_zoo

# Push the entire rknn_yolov5_demo folder to the board
# Note: The rknn_yolov5_demo folder contains an executable file with the same name, rknn_yolov5_demo
# Note: When using different models and platforms, it is recommended to find the corresponding path directly under the 'install' directory
adb push install/rk356x_linux_aarch64/rknn_yolov5_demo /data/
4.3.3.3 Run the Demo on Development Board
Execute the following command to run the executable file on the development board:
# Switch to the board
adb shell

# Switch to the rknn_yolov5_demo directory
cd /data/rknn_yolov5_demo/

# Set the library dependency environment
export LD_LIBRARY_PATH=./lib

# Run the executable file
# Usage: ./rknn_yolov5_demo <model_path> <input_path>
./rknn_yolov5_demo model/yolov5s_relu.rknn model/bus.jpg
4.3.3.4 View Results
By default, the output image is saved at the path rknn_yolov5_demo/out.png. You can use the adb tool to pull it from the board to the local machine. In the local computer terminal, execute the following command:
# Pull to the local current directory
adb pull /data/rknn_yolov5_demo/out.png .
The output image is as follows:
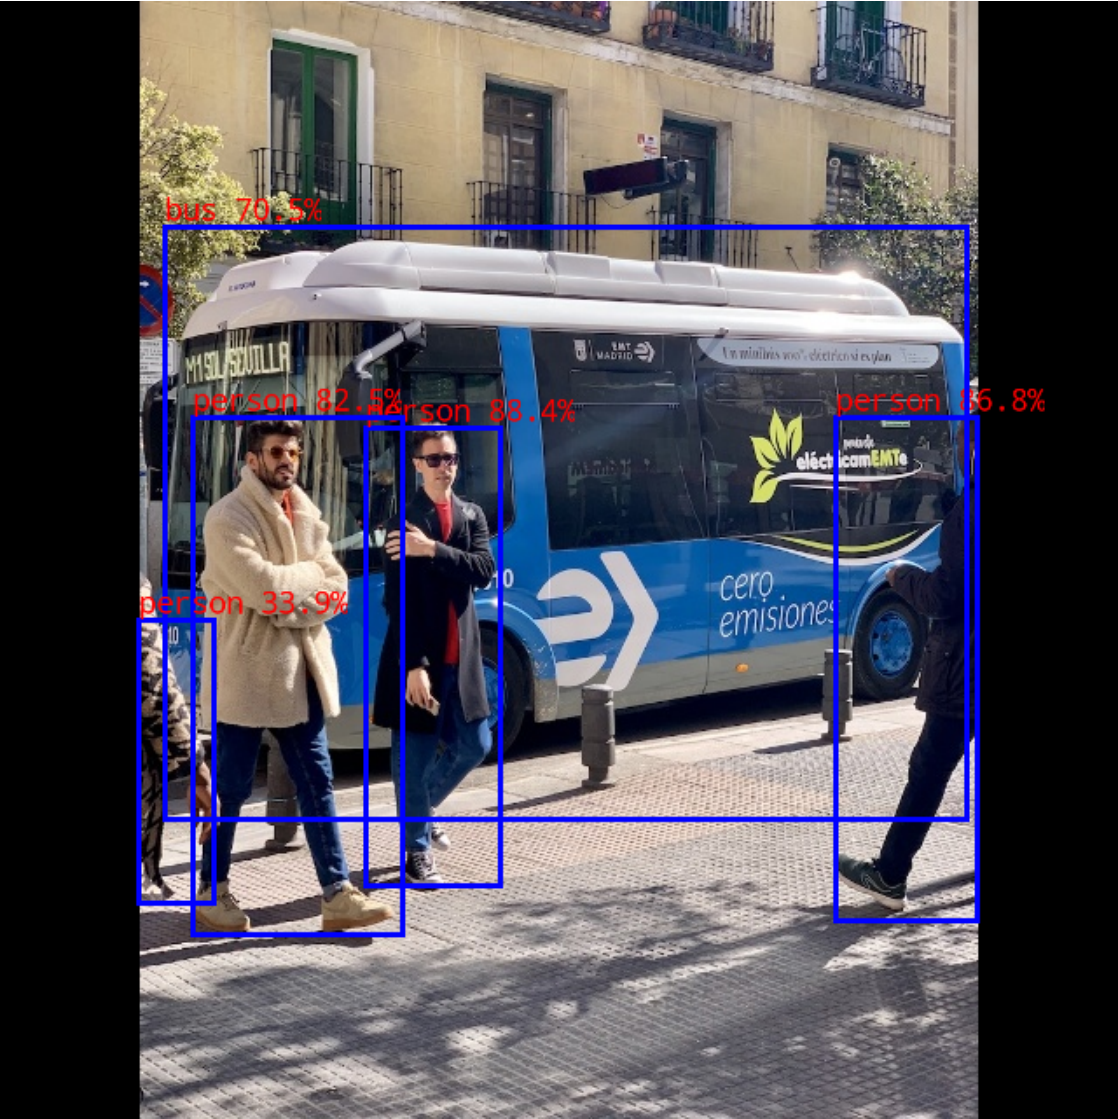
Figure 4-2 Output image of RKNN C demo
5 Run RKNN Python Demo in Docker (Optional)
If you need to run the RKNN Python Demo in a Docker environment, please refer to the content in this chapter to prepare the development environment.
Please note that here we provide a Docker image containing the RKNN-Toolkit2 environment, allowing users to directly run RKNN Python Demo without worrying about environment installation issues. However, this Docker image only includes a clean RKNN-Toolkit2 environment and is specifically designed for running RKNN Python Demo.
This chapter is divided into three parts:
Install Docker
Install the RKNN-Toolkit2 Environment in Docker
How to Run RKNN Python Demo
5.1 Install Docker
If Docker is already installed, you can skip this step. If it is not installed, please follow the official documentation for installation.
Docker installation official documentation link: https://docs.docker.com/install/linux/docker-ce/ubuntu/
Note: It is necessary to add the user to the ‘docker’ group.
# Create the docker group
sudo groupadd docker

# Add the current user to the docker group
sudo usermod -aG docker $USER

# Update to activate the docker group
newgrp docker

# Verify that docker commands can be executed without sudo
docker run hello-world
The reference output for successful installation is as follows:
Unable to find image 'hello-world:latest' locally
latest: Pulling from library/hello-world
719385e32844: Pull complete
Digest: sha256:88ec0acaa3ec199d3b7eaf73588f4518c25f9d34f58ce9a0df68429c5af48e8d
Status: Downloaded newer image for hello-world:latest

Hello from Docker!
5.2 Install the RKNN-Toolkit2 Environment in Docker
5.2.1 Prepare the RKNN-Toolkit2 Image
This section introduces two methods for creating the RKNN-Toolkit2 image environment. You can choose either method.
1. Create the RKNN Toolkit2 image using a Dockerfile
In the RKNN-Toolkit2 project, the docker/docker_file folder provides a Dockerfile for building the RKNN- Toolkit2 development environment. Users can create an image using the ‘docker build’ command, as shown below:
# Note: Replace 'xx' and 'x.x.x' with the actual version numbers
cd Projects/rknn-toolkit2/rknn-toolkit2/docker/docker_file/ubuntu_xx_xx_cpxx

docker build -f Dockerfile_ubuntu_xx_xx_for_cpxx -t rknn-toolkit2:x.x.x-cpxx .
2. Create the RKNN Toolkit2 image by loading a pre-packaged Docker image file
Download the RKNN-Toolkit2 project files for the corresponding version from the following link. After extracting the files, the docker/docker_image folder provides a pre-packaged Docker image with all the development environments.
Download link from the cloud drive: https://console.zbox.filez.com/l/I00fc3 (Extraction code: rknn)
Execute the following command to load the corresponding Python version of the image file.
# Note: Replace 'x.x.x' with the actual version number of RKNN-Toolkit2, and 'cpxx' with the Python version

docker load --input rknn-toolkit2-x.x.x-cpxx-docker.tar.gz
5.2.2 Query Image Information
After successfully creating or loading an image, you can view Docker image information using the following command:
docker images
The corresponding RKNN-Toolkit2 image information is displayed as follows.
REPOSITORY TAG IMAGE ID CREATED SIZE
rknn-toolkit2 x.x.x-cpxx xxxxxxxxxxxx 1 hours ago 5.89GB
5.3 How to Run RKNN Python Demo
Note: Please ensure that the board has the RKNPU2 environment installed. If not, refer to the content in Chapter 3.4 for installation instructions.
Map the files and run the container
Please refer to Chapter 3.1 for downloading the RKNN Model Zoo project locally. Then, map it into the container and run the container using the ‘docker run’ command. After running, it will switch to the container’s bash environment. Refer to the following commands:
# Use the docker run command to create and run the RKNN Toolkit2 container
# Map local files into the container by attaching the -v <host src folder>:<image dst folder> parameter
docker run -t -i --privileged \
  -v /dev/bus/usb:/dev/bus/usb \
  -v /Projects/rknn_model_zoo:/rknn_model_zoo \
  rknn-toolkit2:x.x.x-cpxx \
  /bin/bash
Prepare Model
Switch to the rknn_model_zoo/examples/yolov5/model directory, and execute the download_model.sh script. This script will download an available YOLOv5 ONNX model and store it in the current model directory. Refer to the following commands:
# Switch to the rknn_model_zoo/examples/yolov5/model directory
cd rknn_model_zoo/examples/yolov5/model

# Run the download_model.sh script to download the yolov5 onnx model
./download_model.sh

# For example, the downloaded onnx model will be stored at model/yolov5s_relu.onnx
Model Conversion
Switch to the rknn_model_zoo/examples/yolov5/python directory and run the convert.py script. This script converts the original ONNX model to the RKNN model. Refer to the following commands:
# Switch to the rknn_model_zoo/examples/yolov5/python directory
cd Projects/rknn_model_zoo/examples/yolov5/python

# Run the convert.py script to convert the original ONNX model to RKNN format
# Usage: python convert.py model_path [rk3566|rk3588|rk3562] [i8/fp] [output_path]

python convert.py ../model/yolov5s_relu.onnx rk3588 i8 ../model/yolov5s_relu.rknn
Run RKNN Python Demo
Switch to the rknn_model_zoo/examples/yolov5/python directory, execute the yolov5.py script, and you can run the YOLOv5 model on the development board using on-board debugging. Refer to the following command:
# Switch to the rknn_model_zoo/examples/yolov5/python directory
cd rknn_model_zoo/examples/yolov5/python

# Run the yolov5.py script to run the yolov5 model on the board
# Usage: python yolov5.py --model_path {rknn_model} --target {target_platform}
# Note: Here, we use rk3588 as an example platform. If using a different board, modify the platform type in the command accordingly.
python yolov5.py --model_path ../model/yolov5s_relu.rknn --target rk3588
After the successful execution of the script, the output information will be as follows. In this context, the “class” field represents the predicted category, “score” is the confidence score, “(xmin, ymin)” are the coordinates of the top-left corner of the detection box, and “(xmax, ymax)” are the coordinates of the bottom-right corner of the detection box.
# class @ (xmin, ymin, xmax, ymax)score
person @ (209 244 286 506) 0.884
person @ (478 238 559 526) 0.868
person @ (110 238 230 534) 0.825
bus @ (94 129 553 468) 0.705
person @ (79 354 122 516) 0.339
6 Frequently Asked Questions
6.1 Command ‘adb devices’ Does Not Show the Device
You can try the following methods to resolve this issue:
1. Check if the connection is correct, reconnect the data cable, try using a different USB port on the computer, or replace the data cable.
2. When using USB to connect the development board, please ensure that only one adb server service can be running on the local computer and the Docker container at the same time. For example, if you need to connect the development board in a Docker container, execute the command adb kill-server in the computer’s terminal to terminate the adb server service on the local computer.
3. If you encounter the following error, it indicates that adb is not installed. You need to execute the installation command sudo apt install adb to install adb.
command 'adb' not found, but can be installed with:
sudo apt install adb
6.2 Manually Start the rknn_server Service
The functionality of on-board debugging in RKNN-Toolkit2 requires the board to have the RKNPU2 environment installed, and the rknn_server service to be running.
However, some development boards may not have the rknn_server service started by default after power on or reboot. This can result in errors such as E init_runtime: The rknn_server on the connected device is abnormal when running RKNN Python Demo. In such cases, you need to switch to the board and manually start the rknn_server service. Please refer to section 3.4.2, “Check if the RKNPU2 environment is installed,” for details on starting the rknn_server service.
7 Reference Documentation
For more detailed usage and interface instructions of RKNN-Toolkit2 and RKNPU2, please refer to the “Rockchip_RKNPU_User_Guide_RKNN_SDK_EN.pdf” manual.