
This full technical article follows RKLLM SDK 1.2.3. Chinese follows the Chinese PDF; English follows the English PDF; Russian and German fully translate the English body. Chinese uses Chinese original figures; the other three languages use English original figures. Both PDFs are version 1.2.3, but example layout, comments and some descriptions differ; they have not been silently mixed. The source lists RK3576, RK3588, RK3562 and RV1126B, requires checking RKNPU 0.9.8, and discusses Linux 5.10.209/6.1.84, GCC 10.2 and Android NDK. This is an ArmSoM platform-adaptation reference only: the exact board, SDK/BSP, kernel and model combination remains unverified. No hardware tests or measurements were performed. “Latest” in the source refers to its version context, not the current latest release.
Source-example caution: original Python indentation, a full-width parenthesis, mixed JSON/Python constants, interface types and cross-references have unresolved issues documented in the editorial notes; examples are not guaranteed runnable. verify=False disables certificate verification; trust_remote_code=True allows external code; chmod 777 broadens permissions. Driver replacement, kernel flashing, listening on 0.0.0.0 and public sharing with share=True require separate review. Original logs show Runtime 1.0.2b9 / driver 0.9.7, differing from the body requirement; they are not ArmSoM measurements.
ArmSoM Docs · RKLLM · EDITORIAL-NOTES
1 Introduction to RKLLM
1.1 Introduction to RKLLM Toolchain
1.1.1 Introduction to RKLLM-Toolkit
RKLLM-Toolkit is a development kit that provides users with the ability to quantify and convert large language models on the PC. Through the Python interface provided by the tool, the following functions can be conveniently accomplished:
1) Model Conversion: It supports the conversion of Large Language Model (LLM) in Hugging Face or GGUF format to RKLLM model, and the supported models include LLaMA, Qwen, Qwen2, Qwen3, Qwen2-VL, Qwen3-VL, Phi-2, Phi-3, ChatGLM3, Gemma, Gemma2, Gemma3, Gemma3n, InternLM2, TeleChat2, MiniCPM-S, MiniCPM, MiniCPM3, MiniCPM4, DeepSeekOCR, InternVL3. The converted RKLLM models can be loaded and used on Rockchip NPU platform.
2) Quantization Function: Supports quantization of floating-point models into fixed-point models. Currently supported quantization types include: a. w4a16; b. w4a16 grouped quantization (supported group sizes: 32, 64, 128); c. w8a8; d. w8a8 grouped quantization (supported group sizes: 128, 256, 512);
1.1.2 Introduction to RKLLM Runtime
The RKLLM Runtime is primarily responsible for loading the RKLLM models obtained from the RKLLM-Toolkit conversion and executing inference via the Rockchip NPU. Throughout the RKLLM model inference process, users retain the autonomy to specify inference parameter configurations, define various text generation methodologies, and seamlessly retrieve inference results from the model via pre- defined callback functions.
1.2 Introduction to the RKLLM Development Process
The overall development process of RKLLM primarily comprises two phases: model conversion in PC and deployment and execution in board-side:
1) Model Conversion in PC: During this phase, the provided Hugging Face formatted LLM is converted into RKLLM format for efficient inference on the Rockchip NPU platform. This step includes: a. Model Acquisition: Obtain the large language model from: a) Open-source large language models in Hugging Face format. b) Self-trained large language models, with the requirement that the saved model structure is consistent with models on the Hugging Face platform. c) GGUF models, currently supporting only q4_0 and fp16 types. b. Model Loading: Load the model in huggingface format with the rkllm.load_huggingface() function and load the gguf format model with rkllm.load_gguf() function; c. Model Quantization Configuration: Utilize the rkllm.build() function to construct the RKLLM model, with the option to perform model quantization for enhanced hardware deployment performance. Additionally, choose different optimization levels and quantization types during the construction process. d. Model Export: Export the RKLLM model as a .rkllm format file using the rkllm.export_rkllm() function for subsequent deployment.
2) Deployment and Execution in Board-side: This phase encompasses the actual deployment and execution of the model, typically involving the following steps: a. Model Initialization: Load the RKLLM model onto the Rockchip NPU platform, configure model parameters accordingly to define the desired text generation methods, and pre-define callback functions to receive real-time inference results, preparing for inference. b. Model Inference: Execute the inference operation by passing input data to the model and
running model inference. Users can continuously retrieve inference results through pre-defined callback functions. c. Model Release: After completing the inference process, release the model resources to allow other tasks to utilize the computational resources of the NPU. These two steps constitute the complete RKLLM development process, ensuring successful conversion, debugging, and ultimately efficient deployment of the LLMs on the Rockchip NPU.
1.3 Applicable Hardware Platforms
The hardware platforms to which this document applies mainly include: RK3576, RK3588,RK3562,RV1126B. .
2 Development Environment Preparation
The RKLLM toolchain zip file contains the whl installer for the RKLLM-Toolkit, the associated files of the RKLLM Runtime library and reference sample code. The specific folder structure is shown below:
doc
└──Rockchip_RKLLM_SDK_CN.pdf   # RKLLM SDK Documentation(Chinese)
└──Rockchip_RKLLM_SDK_EN.pdf   # RKLLM SDK Documentation(English)

examples
├──multimodal_model_demo    # Multimodal Inference Example
├──rkllm_api_demo           # Board-side Inference Example
└──rkllm_server_demo        # RKLLM-Server Deployment Example

rkllm-runtime
│   └── Android
│        └── librkllm_api
│             └──arm64-v8a
│                  └── librkllmrt.so  # 64位 Runtime库
│             └──armeabi-v7a
│                  └── librkllmrt.so   # 32 位Runtime库
│             └──include
│                  └── rkllm.h
│   └── Linux
│        └── librkllm_api
│             └──aarch64
│                  └── librkllmrt.so  # 64位Runtime库
│             └──armhf
│                  └── librkllmrt.so  # 32位Runtime库
│             └──include
│                  └── rkllm.h

rkllm-toolkit
│   └── packages
│        └──rkllm_toolkit-x.x.x-cp3xx-cp3xx-linux_x86_64.whl
│   └── examples

rknpu-driver
└──rknpu_driver_x.x.x_xxxxxxx.tar.bz2

scripts
├──fix_freq_rk3576.sh   # Fixed-frequency Script for RK3576
└──fix_freq_rk3588.sh   # Fixed-frequency Script for RK3588
└──fix_freq_rk3562.sh   # Fixed-frequency Script for RK3562
└──fix_freq_rv1126b.sh  # Fixed-frequency Script for RV1126B
This chapter provides detailed instructions for installing the RKLLM-Toolkit and RKLLM Runtime. For specific usage instructions, please refer to the instructions in Chapter 3.
2.1 Installation of RKLLM-Toolkit
This section mainly describes how to install the RKLLM-Toolkit with pip install command. Users can refer to the following detailed instructions to complete the installation of the RKLLM-Toolkit toolchain.
2.1.1 Installation via Pip
2.1.1.1 Installation of Miniforge3
To avoid the need for multiple versions of Python environments, it is recommended to use miniforge3 to manage your Python environments. Check if miniforge3 is installed and the version information of conda. If it is already installed, you can skip this section.
conda -V
# If "conda: command not found" is displayed, it indicates that conda is not installed.
# For example, version information could be displayed as conda 23.9.0
Download the miniforge3 installation package.
wget -c https://mirrors.bfsu.edu.cn/github-release/conda-forge/miniforge/LatestRelease/Miniforge3-Linux-x86_64.sh
Install miniforge3.
chmod 777 Miniforge3-Linux-x86_64.sh
bash Miniforge3-Linux-x86_64.sh
2.1.1.2 Create RKLLM-Toolkit Conda Environment
Activate the Conda base environment.
source ~/miniforge3/bin/activate # directory of miniforge3
# (base) xxx@xxx-pc:~$
Create a Conda environment named RKLLM-Toolkit with Python version 3.8 (recommended).
conda create -n RKLLM-Toolkit python=3.8
Activate the RKLLM-Toolkit Conda environment.
conda activate RKLLM-Toolkit
# (RKLLM-Toolkit) xxx@xxx-pc:~$
2.1.1.3 Installing RKLLM-Toolkit
In the RKLLM-Toolkit Conda environment, use the pip command to install the provided
toolchain .whl package directly. During the installation process, the installer will automatically download the necessary dependencies for the RKLLM-Toolkit tools.
pip3 install rkllm_toolkit-x.x.x-cp3xx-cp3xx-linux_x86_64.whl
If executing the following command does not result in any errors, the installation is successful.
python
from rkllm.api import RKLLM
2.2 Introduction for RKLLM Runtime Usage
Within the RKLLM toolchain files provided, the following components are included for the RKLLM runtime:
1) librkllmrt.so: RKLLM Runtime library suitable.
2) include/rkllm.h: Corresponding header file to librkllmrt.so, containing descriptions of related structures and function definitions. When constructing deployment inference code using the RKLLM toolchain, it is critical to ensure proper linkage to the above header file and function library to ensure compilation correctness. During the actual runtime of the code, it is equally important to ensure successful transfer of the above function library files to the board and complete library declaration through the following environment variable settings:
export LD_LIBRARY_PATH=/path/to/your/lib
2.3 Compilation Requirements for RKLLM Runtime
When utilizing RKLLM Runtime, it’s essential to pay attention to the version of the gcc compilation tool. We recommend the cross-compilation tool gcc-arm-10.2-2020.11-x86_64-aarch64-none-linux-gnu. Please note that cross-compilation tools often have backward compatibility but not upward compatibility, so refrain from using versions below 10.2. If you choose to use the Android platform, and you need to compile Android executable files, we recommend using the Android NDK tool for cross-compilation. You can download it from the following link: Android NDK Cross-Compilation Tool Download Link. We recommend using version r21e. You can also refer to the specific compilation methods in the compilation scripts located in the
examples/rkllm_api_demo/deploy directory.
2.4 Kernel Update
Due to the requirement of a higher version of the NPU kernel for the provided RKLLM, users need to verify that the NPU kernel on the board is version v0.9.8 before using RKLLM Runtime for model inference. The specific query command is as follows:
# Execute the following command to query the NPU kernel version.
cat /sys/kernel/debug/rknpu/version

# Confirm that the command output is as follows:
# RKNPU driver: v0.9.8
If the queried NPU kernel version is lower than v0.9.8, please proceed to the official firmware address to download the latest firmware for updating. For users using non-official firmware, it’s necessary to update the kernel. The RKNPU driver package supports two main kernel versions: kernel-5.10 and kernel-6.1. For kernel-5.10, it is recommended to use a specific version at GitHub-rockchip-linux/kernelatdevelop-5.10, and 5.10.209 is recommended. For kernel 6.1, it is recommended to use a specific version such as 6.1.84. Users can confirm the specific version number in the Makefile in the kernel’s root directory. The specific steps to upgrade the kernel are as follows:
1) Download the rknpu_driver_0.9.8_20241009.tar.bz2.
2) Unzip the compressed file and overwrite the RKNPU driver into the current kernel code directory(kernel/drivers/rknpu).
3) Recompile the kernel.
4) Flash the newly compiled kernel to the device. If an error log, as shown in Figure 2-1, is encountered during the kernel compilation process:
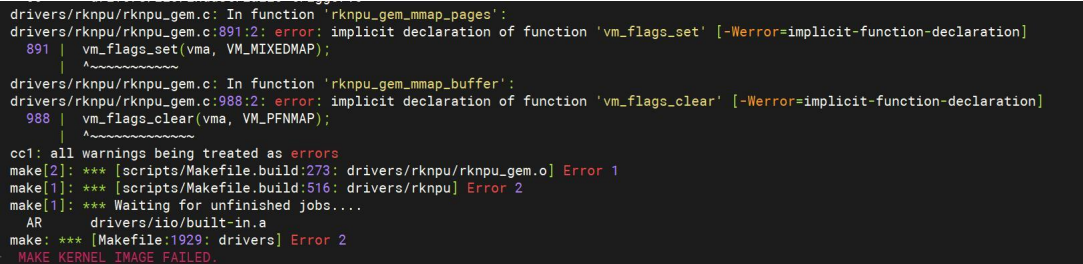
Copyable transcription of the original log (not an ArmSoM measurement; blurred account not reconstructed):
drivers/rknpu/rknpu_gem.c: In function 'rknpu_gem_mmap_pages':
drivers/rknpu/rknpu_gem.c:891:2: error: implicit declaration of function 'vm_flags_set' [-Werror=implicit-function-declaration]
  891 |  vm_flags_set(vma, VM_MIXEDMAP);
      |  ^~~~~~~~~~~~
drivers/rknpu/rknpu_gem.c: In function 'rknpu_gem_mmap_buffer':
drivers/rknpu/rknpu_gem.c:988:2: error: implicit declaration of function 'vm_flags_clear' [-Werror=implicit-function-declaration]
  988 |  vm_flags_clear(vma, VM_PFNMAP);
      |  ^~~~~~~~~~~~~~
cc1: all warnings being treated as errors
make[2]: *** [scripts/Makefile.build:273: drivers/rknpu/rknpu_gem.o] Error 1
make[1]: *** [scripts/Makefile.build:516: drivers/rknpu] Error 2
make[1]: *** Waiting for unfinished jobs....
  AR      drivers/iio/built-in.a
make: *** [Makefile:1929: drivers] Error 2
MAKE KERNEL IMAGE FAILED.
Figure 2-1: Example of Kernel Compilation Error Then need to modify the kernel header file kernel/include/linux/mm.h by adding the following code:
static inline void vm_flags_set(struct vm_area_struct *vma,
                          vm_flags_t flags){
      vma->vm_flags |= flags;
}

static inline void vm_flags_clear(struct vm_area_struct *vma,
                            vm_flags_t flags){
      vma->vm_flags &= ~flags;
}
3 RKLLM Instruction Guide
3.1 Model Conversion
RKLLM-Toolkit provides model conversion and quantization functionalities. As one of the core features of RKLLM-Toolkit, it allows users to convert LLMs in Hugging Face format or GGUF format into RKLLM models, enabling the deployment and execution of RKLLM models on Rockchip NPU. This section will focus on the specific implementation of model conversion by RKLLM-Toolkit for LLMs, serving as a reference for users.
3.1.1 RKLLM Initialization
In this section, users need to initialize the RKLLM object, which is the first step in the entire workflow. In the example code, use the RKLLM() constructor function to initialize the RKLLM object.
3.1.2 Loading Models
After initializing RKLLM, users need to call the rkllm.load_huggingface() function to pass the specific path of the model. RKLLM-Toolkit will then successfully load the large language model in Hugging Face format or GGUF format based on the corresponding path, enabling subsequent conversion and quantization operations. The specific function definition is as follows:
Table 3-1 Interface Specification for the load_huggingface Function
| Function | load_huggingface |
|---|---|
| Introduction | Used to load open-source LLMs in Hugging Face format. |
| Parameters | model: The path where the LLM files are stored, used for loading the model for subsequent conversion and quantization. model_lora: The file path of the LoRA weights. when converting, the model must point to the corresponding base model path. device: Specifies the device to be used for model conversion, supporting two options: cuda and cpu. dtype: The data type of the weights. Available options include float32, float16, and bfloat16. Using float16 or bfloat16 can reduce memory consumption but may affect quantization accuracy. custom_config: Custom configuration file for the model. For details, refer to the Custom Model Conversion section. load_weight: Whether to load the weights. If set to False, the actual weights will not be loaded. |
| Returns | 0 indicates successful model loading; -1 indicates model loading failure. |
The example code is as follows:
ret = rkllm.load_huggingface(
   model = './huggingface_model_dir',
   model_lora = './huggingface_lora_model_dir')
if ret != 0:
   print('Load model failed!')
Table 3-2 Interface Specification for the load_gguf Function
| Function | load_gguf |
|---|---|
| Introduction | Used to load open-source large language models in GGUF format, supporting the numerical types q4_0 and fp16. GGUF-format LoRA models can also be loaded and converted to RKLLM models through this interface. |
| Parameters | model: The path where the LLM files are stored, used for loading the model for subsequent conversion and quantization. |
| Returns | 0 indicates successful model loading; -1 indicates model loading failure. |
The example code is as follows:
ret = rkllm.load_gguf(model = './model-Q4_0.gguf')
if ret != 0:
   print('Load model failed!')
3.1.3 Construction for RKLLM Model
After loading the original model through the rkllm.load_huggingface() function, the next step is to build the RKLLM model using the rkllm.build() function. During model conversation, users can choose whether to perform quantization, which helps reduce the model size and improve inference performance on Rockchip NPU. The specific definition of the rkllm.build() function is as follows:
Table 3-3 Interface Specification for the build Function
| Function | build |
|---|---|
| Introduction | Used to construct the RKLLM model and define specific quantization operations during the conversion process. |
| Parameters | do_quantization: This parameter controls whether to perform quantization operations on the model, and it is recommended to set it to True. optimization_level: This parameter is used to set whether to perform quantization precision optimization. The available settings are {0, 1}, where 0 means no optimization and 1 means precision optimization. Precision optimization may cause a decrease in model inference performance. quantized_dtype: This parameter is used to set the specific type of quantization. Currently supported types include “w4a16”, “w4a16_g32”, “w4a16_g64”, “w4a16_g128”, “w8a8”, “w8a8_g128”, “w8a8_g256”, “w8a8_g512”. “w4a16” means 4-bit quantization for weights and no quantization for activations. “w4a16_g64” means 4-bit grouped quantization for weights (group size=64) and no quantization for activations. “w8a8” means 8-bit quantization for both weights and activations. “w8a8_g128” means 8-bit grouped quantization for both weights and activations (group size=128). The RK3576 and RV1126B platforms support five quantization types: “w4a16”, “w4a16_g32”, “w4a16_g64”, “w4a16_g128”, and “w8a8”. The RK3588 platform supports four quantization types: “w8a8”, “w8a8_g128”, “w8a8_g256”, and “w8a8_g512”. The RK3562 platform supports those quantization types:”w8a8”, “w4a16_g32”, “w4a16_g64”, “w4a16_g128”, “w4a8_g32”. For GGUF models, the quantization type corresponding to q4_0 is “w4a16_g32”. Note: The group size must divide the output dimension of the linear layer; otherwise, quantization will fail! quantized_algorithm: Quantization accuracy optimization algorithm, with selectable options being “normal” “grq” or “gdq”. All quantization types can choose “normal”, but the “gdq” and “grq” algorithm only support “w4a16” and grouped “w4a16” quantization, and it requires high computational power, with GPU acceleration being necessary.The grq algorithm is faster and consumes less memory compared to the gdq algorithm. For 4-bit quantization, the grq algorithm should be preferred. It supports improving quantization accuracy using LoRA modules. In the absence of any other imported LoRA models, you can use algorithms such as “normal_r[164]”, or “gdq_r[1~64]” — for example, “normal_r8”, “grq_r8”, or “gdq_r8”. In the end, both the quantized model and the LoRA model will be exported, and the runtime will load both models to perform inference. num_npu_core: The number of NPU cores to be used for model inference. For “RK3576”, the options are [1, 2], for “RK3562”, the options are [1] ,for “RK3588”, the options are [1, 2, 3] and for “RV1126B, the options are[1]. extra_qparams: Using the “gdq” and “grq” algorithm generate a *.qparams quantized weight cache file. This parameter can be set to the *.qparams path to rebegin the model export. dataset: The dataset used for quantization calibration, formatted as JSON. An example of the content is as follows, where input is the question (with a prompt), and target is the answer. Multiple data entries are saved as dictionaries in a list; hybrid_rate: The hybrid quantization rate ( ∈ [0,1)). When the quantization type is “w4a16”/”w8a8”, the model will mix “w4a16_g”/”w8a8_g” types at the specified rate to improve accuracy. When the quantization type is grouped “w4a16_g”/”w8a8_g”, the model will mix “w4a16”/”w8a8” types at the specified rate to improve inference performance. When the hybrid_rate value is 0, no hybrid quantization will be performed. target_platform: The hardware platform for running the model, with selectable options including “RK3576” ,”RK3588”,”RK3562” and “RV1126B”. max_context: The maximum context length, supported up to 16,384 and must be aligned to 32. |
| Returns | 0 indicates successful model conversion and quantization; -1 indicates model conversion failure. |
The example code is as follows:
ret = rkllm.build(
       do_quantization=True,
       optimization_level=1,
       quantized_dtype='w8a8',
       quantized_algorithm="normal",
       num_npu_core=3,
       extra_qparams=None,
       dataset="quant_data.json",
       hybrid_rate=0,
       target_platform='rk3588')
3.1.4 Exporting Model
After constructing the RKLLM model using the rkllm.build() function, users can save the RKNN model as a .rkllm file for subsequent model deployment using the rkllm.export_rkllm() function. The specific parameter definition of the rkllm.export_rkllm() function is as follows:
Table 3-4 Interface Specification for the export_rkllm Function
| Function | export_rkllm |
|---|---|
| Introduction | Used to save the converted and quantized RKLLM model for subsequent inference. |
| Parameters | export_path: The save path for exporting the RKLLM model file. LoRA models will automatically be saved with an _lora suffix in the RKLLM model filename. |
| Returns | 0 indicates successful export and saving of the model; -1 indicates model export failure. |
The example code is as follows:
ret = rkllm.export_rkllm(export_path = './model.rkllm')
if ret != 0:
   print('Export model failed!')
3.1.5 GPTQ Model Conversion
The user can convert a floating-point model to a 4-bit/8-bit model using the AutoGPTQ open-source quantization tool before converting it to an RKLLM model, in addition to using the quantization algorithms provided in the tools above. When using AutoGPTQ to quantize the floating-point model, the following parameters must be configured:
bits=4
sym=true
group_size=32/64/128
desc_act=false
bits=8
sym=true
group_size=128/256/512
desc_act=false
Here’s an example code for converting a GPTQ model in HuggingFace format to an RKLLM model:
modelpath = '/path/to/Model-Instruct-GPTQ-Int4'
llm = RKLLM()
ret = llm.load_huggingface(model=modelpath, model_lora = None,
device='cuda')
if ret != 0:
   print('Load model failed!')
   exit(ret)
# Build model
dataset = None
qparams = None
target_platform = "RK3576"
optimization_level = 1
quantized_dtype = "w4a16_g32" #w4a16_g64 or w4a16_g128
quantized_algorithm = "normal"
num_npu_core = 2
ret = llm.build(do_quantization=True,
optimization_level=optimization_level, quantized_dtype=quantized_dtype,
             quantized_algorithm=quantized_algorithm,
target_platform=target_platform, num_npu_core=num_npu_core,
extra_qparams=qparams, dataset=dataset)
if ret != 0:
   print('Build model failed!')
   exit(ret)
# Export rkllm model
ret = llm.export_rkllm(f"./{os.path.basename(modelpath)}_{quantized_dtype}_{target_platform}.rkllm")
if ret != 0:
   print('Export model failed!')
   exit(ret)
3.1.6 Custom Model Conversion
If the user has modified the model structure or name, and the modified overall architecture is as follows, they can use the custom function to convert the model.
           TOKEN_EMBD
             ↓
        embd_scale(optional)
             ↓
         ┌─ x
         │  ↓
         │  ATTN_NORM
         │  ↓
         │  attn
         │  ↓
         │  ATTN_POST_NORM(optional)
         │  ↓
         │  hidden_state_scale(optional)
         │  ↓
         │  cross attn(optional)
         │  ↓
   ┌─   └► +
   │
   │        ↓
   │     FFN_NORM
   │        ↓
   │        MLP
   │        ↓
   │   FFN_POST_NORM(optional)
   │        ↓
   │   hidden_state_scale(optional)
   │        ↓
   └───►   +

             ...
             ↓
         OUTPUT_NORM
             ↓
        lm_head_scale(optional)
             ↓
           OUTPUT
Taking the Qwen model as an example, the corresponding variable names in the modeling_qwen.py file should be filled into the custom configuration file as follows.
{
   "BLOCKNAME": "QWenBlock",
   "TOKEN_EMBD": "wte",
   "ATTN_NORM": "ln_1",
   "ATTN_Q_NORM": "",
   "ATTN_K_NORM": "",
   "CROSS_ATTN_NORM": "",
   "CROSS_ATTN_Q": "",
   "ATTN_Q": "",
   "ATTN_K": "",
   "ATTN_V": "",
   "ATTN_QKV": "attn.c_attn",
   "ATTN_KV": "",
   "KV_CONTINUOUS": "true",
   "ATTN_OUT": "attn.c_proj",
   "CROSS_ATTN_OUT": "",
   "ATTN_POST_NORM": "",
   "FFN_NORM": "ln_2",
   "FFN_UP": "mlp.w1",
   "FFN_GATE": "mlp.w2",
   "ACT_TYPE": "silu",
   "FFN_DOWN": "mlp.c_proj",
   "FFN_POST_NORM": "",
   "OUTPUT_NORM": "ln_f",
   "OUTPUT": "lm_head"
}
The available options for ACT_TYPE are [“silu”, “gelu”, “relu”, “fatrelu”, “squarerelu”, “swiglu”]. ATTN_NORM and FFN_NORM only support RMSNorm.
If ATTN_QKV or ATTN_KV is used, it must be confirmed whether the weights can be split into contiguous K|V. If they are contiguous, set KV_CONTINUOUS to true. For example, the c_attn weights in the Qwen model are stored contiguously and can be sequentially split into Q, K, and V by size. In contrast, the wqkv weights in the InternLM2 model are stored non-contiguously, with Q, K, and V interleaved by head_dim.
The modeling_qwen.py file definition for the Qwen 1.8B model is as follows:
class QWenLMHeadModel(QWenPreTrainedModel):
     def __init__(self, config):
       super().__init__(config)
         self.transformer = QWenModel(config)
         self.lm_head = nn.Linear(config.hidden_size,
config.vocab_size, bias=False)
class QWenModel(QWenPreTrainedModel):
   _keys_to_ignore_on_load_missing = ["attn.masked_bias"]

   def __init__(self, config):
       super().__init__(config)
       self.wte = nn.Embedding(self.vocab_size, self.embed_dim)
       self.ln_f = RMSNorm(
          self.embed_dim,
          eps=config.layer_norm_epsilon,
       )
class QWenBlock(nn.Module):
   def __init__(self, config):
       super().__init__()
       hidden_size = config.hidden_size
       self.bf16 = config.bf16

       self.ln_1 = RMSNorm(
          hidden_size,
          eps=config.layer_norm_epsilon,
       )
       self.attn = QWenAttention(config)
       self.ln_2 = RMSNorm(
          hidden_size,
          eps=config.layer_norm_epsilon,
       )
       self.mlp = QWenMLP(config)
class QWenAttention(nn.Module):
   def __init__(self, config):
       super().__init__()

       self.c_attn = nn.Linear(config.hidden_size, 3 *
self.projection_size)

       self.c_proj = nn.Linear(
          config.hidden_size, self.projection_size, bias=not
config.no_bias
       )

class QWenMLP(nn.Module):
   def __init__(self, config):
       super().__init__()
       self.w1 = nn.Linear(
          config.hidden_size, config.intermediate_size // 2, bias=not
config.no_bias
       )
       self.w2 = nn.Linear(
          config.hidden_size, config.intermediate_size // 2, bias=not
config.no_bias
       )
       ff_dim_in = config.intermediate_size // 2
       self.c_proj = nn.Linear(ff_dim_in, config.hidden_size, bias=not
config.no_bias)
For custom model conversion, including models with cross-attention support, we provide a reference Hugging Face model structure. The configuration file for customization is as follows:
{
   "BLOCKNAME": "CustomDecoderLayer",
   "TOKEN_EMBD": "embed_tokens",
   "ATTN_NORM": "input_layernorm",
   "ATTN_Q_NORM": "",
   "ATTN_K_NORM": "",
   "CROSS_ATTN_NORM": "cross_layernorm",
   "CROSS_ATTN_Q": "cross_attn.cross_q_proj",
   "ATTN_Q": "",
   "ATTN_K": "",
   "ATTN_V": "",
   "ATTN_QKV": "self_attn.qkv_proj",
   "ATTN_KV": "",
   "KV_CONTINUOUS": "true",
   "ATTN_OUT": "self_attn.o_proj",
   "CROSS_ATTN_OUT": "cross_attn.cross_o_proj",
   "ATTN_POST_NORM": "",
   "FFN_NORM": "post_attention_layernorm",
   "FFN_UP": "mlp.up_proj",
   "FFN_GATE": "mlp.gate_proj",
   "ACT_TYPE": "silu",
   "FFN_DOWN": "mlp.down_proj",
   "FFN_POST_NORM": "",
   "OUTPUT_NORM": "norm",
   "OUTPUT": "lm_head"
}
3.1.7 Update For Old Version Model
Since version 1.0.2 differs significantly from version 1.1 and later versions, the rkllm.update_rkllm() function is provided to update the 1.0.2 model to the latest version.. When updating the model, there is no need to perform the model loading and building steps mentioned earlier. Instead, the update can be done directly via this interface, and after the update, parameters such as model quantization type remain unchanged. Here is a description of the function and its parameters:
Table 3-5 Interface Specification for the update_rkllm Function
| Function | update_rkllm |
|---|---|
| Introduction | Update the model from version 1.0.2 to latest version |
| Parameters | model: The path to the RKLLM model of version 1.0.2. |
| Returns | 0 indicates that the model update was successful; -1 indicates that the model update failed. |
The example code is as follows:
ret = llm.update_rkllm(model = "./model_1.0.2version.rkllm")
if ret != 0:
   print('Load model failed!')
   exit(ret)
3.1.8 Simulation Accuracy Evaluation
After the user builds the RKLLM model through the rkllm.build() function, they can perform simulation accuracy evaluation on the PC using the rkllm.get_logits() function. The specific parameter definitions for the rkllm.get_logits() function are as follows:
Table 3-6 Interface Specification for the get_logits Function
| Function | get_logits |
|---|---|
| Introduction | Used for simulation accuracy evaluation on the PC. |
| Parameters | inputs: The simulation input format is the same as Hugging Face model inference. An example is as follows: {“input_ids”: “”, “top_k”: 1, …} |
| Returns | The logits values inferred by the model. |
Example code for using this function to perform PPL (perplexity) testing on the Wikitext dataset is as follows:
def eval_wikitext(llm):
   seqlen = 512
   tokenizer = AutoTokenizer.from_pretrained(
       modelpath,
       trust_remote_code=True
       )
   #Dataset download link:
   #https://huggingface.co/datasets/Salesforce/wikitext/tree/main/wikitext-2-raw-v1
   testenc = load_dataset("parquet", data_files='./wikitext/wikitext-2-raw-1/test-00000-of-00001.parquet', split='train')
   testenc = tokenizer(
       "\n\n".join(testenc['text']),
       return_tensors="pt").input_ids
   nsamples = testenc.numel() // seqlen
   nlls = []
   for i in tqdm(range(nsamples), desc="eval_wikitext: "):
       batch = testenc[:, (i * seqlen): ((i + 1) * seqlen)]
       inputs = {"input_ids": batch}
       lm_logits = llm.get_logits(inputs)
       if lm_logits is None:
          print("get logits failed!")
          return
       shift_logits = lm_logits[:, :-1, :]
       shift_labels = batch[:, 1:].to(lm_logits.device)
       loss_fct = nn.CrossEntropyLoss().to(lm_logits.device)
       loss = loss_fct(shift_logits.view(-1, shift_logits.size(-1)),
shift_labels.view(-1))
       neg_log_likelihood = loss.float() * seqlen
       nlls.append(neg_log_likelihood)
   ppl = torch.exp(torch.stack(nlls).sum() / (nsamples * seqlen))
   print(f'wikitext-2-raw-1-test ppl: {round(ppl.item(), 2)}')
3.1.9 Simulated Model Inference
After the user builds the RKLLM model using the rkllm.build() function, they can perform simulated inference on the PC using the rkllm.chat_model() function. The specific parameter definitions for the rkllm.chat_model() function are as follows:
Table 3-7 Interface Specification for the chat_model Function
| Function | chat_model |
|---|---|
| Introduction | Used for simulate model inference on the PC. |
| Parameters | messages: The text input, which needs to include the appropriate prompts. args: Inference configuration parameters, such as sampling parameters like top_k. |
| Returns | The logits values inferred by the model. |
The example code is as follows:
args ={
   "max_length":128,
   "top_k":1,
   "temperature":0.8,
   "do_sample":True,
   "repetition_penalty":1.1
   }

mesg = "Human: How’s the weather today?\nAssistant:"
print(llm.chat_model(mesg, args))
The above operations cover all steps of model conversion and quantization in the RKLLM-Toolkit. Depending on different requirements and application scenarios, users can choose different configuration options and quantization methods for customised settings, which facilitates subsequent deployment.
3.2 Inference Implementation in Board-side
This chapter introduces the usage of the general API interface functions. Users can refer to the content of this chapter to construct C++ code and implement inference of RKLLM models on the board to obtain inference results. The RKLLM board-side inference implementation is as follows:
1) Define the callback function callback().
2) Define the RKLLM model parameter structure RKLLMParam.
3) Initialize the RKLLM model with rkllm_init().
4) Perform model inference with rkllm_run().
5) Process the real-time inference results returned by the callback function callback().
6) Destroy the RKLLM model and release resources with rkllm_destroy(). In the subsequent parts of this chapter, the document will provide detailed explanations of each step in the process and provide detailed explanations of the functions involved.
3.2.1 Define Callback Function
The callback function is used to receive real-time output results from the RKLLM model. It is bound during the initialization of RKLLM and continuously outputs results to the callback function during the RKLLM model inference process, returning only one token each time. Here is an example that callback function prints the output results in real-time to the terminal:
int callback(RKLLMResult* result, void* userdata, LLMCallState state)
{
   if(state == LLM_RUN_NORMAL){
       printf("%s", result->text);
   }
   if (state == LLM_RUN_FINISH) {
       printf("finish\n");
   } else if (state == LLM_RUN_ERROR){
       printf("\run error\n");
   }
   return 0;
}
1) LLMCallState is a status flag, and its specific definition is as follows:
Table 3-8 Explanation of LLMCallState Status Flags
| Definition | LLMCallState |
|---|---|
| Introduction | Used to indicate the current running state of RKLLM. |
| Enumeration Values |
LLM_RUN_NORMAL: indicates that the RKLLM model is currently inferencing; LLM_RUN_FINISH: indicates that the RKLLM model has completed inference; LLM_RUN_WAITING: indicates that the currently decoded character from RKLLM is not a complete UTF-8 encoding and needs to be concatenated with the next decoding result; LLM_RUN_ERROR: indicates that an error has occurred during inference; |
During the design process of the callback function, users can set different post-processing behaviors based on the different states of LLMCallState.
2) RKLLMResult is a return value structure, and its specific definition is as follows:
Table 3-9 Explanation of RKLLMResult Structure
| Definition | RKLLMResult |
|---|---|
| Introduction | Used to return the current inference-generated result. |
| Struct Fields | const char* text: indicates the text content generated by the current inference; int32_t token_id: indicates the token_id generated by the current inference; RKLLMResultLogits logits: Represents the logits information generated during the current inference, only returned when RKLLMInferMode is set to RKLLM_INFER_GET_LOGITS; RKLLMPerfStat perf: Indicates the performance statistics at the end of the current inference; data is only returned when in the RKLLM_RUN_FINISH state. |
3) RKLLMResultLogits is a return value structure, and its specific definition is as follows:
Table 3-9 Explanation of RKLLMResultLogitsStructure
| Definition | RKLLMResultLogits |
|---|---|
| Introduction | Used to return the current inference-generated logits. |
| Struct Fields | const float* logits: indicates the logits generated by the current inference; int vocab_size:indicates the token_id generated by the current inference; int num_tokens: Indicates the number of tokens returned; users can calculate the size of the logits based on vocab_size and num_tokens; |
During the design process of the callback function, users can set different post-processing behaviors based on the values in RKLLMResult.
3.2.2 Define RKLLMParam
The RKLLMParam structure is used to describe and define the detailed information of RKLLM. The specific definition is as follows:
Table 3-10 Explanation of RKLLMParam Structure
| Definition | RKLLMParam |
|---|---|
| Introduction | Used to define the detailed parameters of the RKLLM model. |
| Struct Fields | const char* model_path: the path to the RKLLM model file; int32_t num_npu_core: the number of NPU cores used during model inference; The “RK3576” platform has configurable range [1, 2]; while the “RK3588” is [1, 3]; bool use_gpu: whether to use GPU for prefill acceleration, default option is false; int32_t max_context_len: the maximum context length during inference; int32_t max_new_tokens: the maximum number of generated tokens in inferencing; int32_t top_k: top-k sampling is a text generation method that selects the next token only from the top-k tokens with the highest probabilities predicted by the model. This method helps reduce the risk of generating low-probability or meaningless tokens. A higher top-k value (e.g., 100) will consider more token choices, resulting in more diverse text generation, while a lower value (e.g., 10) will focus on the most probable tokens, generating more conservative text. The default value is 40; float top_p: top-p sampling, also known as nucleus sampling, is another text generation method that selects the next token from a group of tokens with cumulative probabilities of at least p. This method balances diversity and quality by considering the probabilities of tokens and the number of sampled tokens. A higher top-p value (e.g., 0.95) results in more diverse text generation, while a lower value (e.g., 0.5) generates more focused and conservative text. The default value is 0.9; float temperature: a hyperparameter that controls the randomness of generated text by adjusting the probability distribution of output tokens. A higher temperature (e.g., 1.5) makes the output more random and creative. When the temperature is high, the model considers more options with lower probabilities when selecting the next token, resulting in more diverse and unexpected outputs. A lower temperature (e.g., 0.5) makes the output more focused and conservative. Lower temperatures mean that the model is more likely to choose high-probability tokens, resulting in more consistent and predictable outputs. In the extreme case of a temperature of 0, the model always chooses the most probable next token, resulting in identical outputs every time. To balance randomness and determinism and ensure that the output is neither overly uniform and predictable nor overly random and chaotic, the default value is 0.8; float repeat_penalty: controls the occurrence of token sequence repetitions in the generated text, helping to prevent the model from generating repetitive or monotonous text. A higher value (e.g., 1.5) imposes a stronger penalty on repetitions, while a lower value (e.g., 0.9) is more lenient. The default value is 1.1; float frequency_penalty: a factor for penalizing word/phrase repetition, reducing the probability of using words/phrases with higher frequencies overall and increasing the likelihood of using those with lower frequencies. This may lead to more diversified generated text, but could also result in text that is difficult to understand or not as expected. The range is [-2.0, 2.0], with a default value of 0; int32_t mirostat: an algorithm actively maintaining the quality of generated text within the expected range during the text generation process. It aims to find a balance between coherence and diversity, avoiding low-quality output caused by excessive repetition (boredom trap) or incoherence (confusion trap). The values space is {0, 1, 2}, where 0 indicates not activating the algorithm, 1 indicates using the mirostat algorithm, and 2 indicates using the mirostat 2.0 algorithm; float mirostat_tau: an option setting the target entropy for mirostat, representing the expected perplexity value of the generated text. Adjusting the target entropy allows to control the balance between coherence and diversity in the generated text. Lower values will result in more concentrated and coherent text, while higher values will lead to more diversified text, possibly with lower coherence. The default value is 5.0; float mirostat_eta: an option setting the learning rate for mirostat, which influences the algorithm’s responsiveness to feedback on generated text. A lower learning rate will result in slower adjustment, while a higher learning rate will make the algorithm more sensitive. The default value is 0.1; bool skip_special_token: whether to skip special tokens and not output them, such as the end-of-sequence token <EOS>. bool is_async: whether to use asynchronous mode. const char img_start: option to set the start marker for multimodal input image encoding, which needs to be configured in multimodal input mode. const char img_end: option to set the end marker for multimodal input image encoding, which needs to be configured in multimodal input mode. const char img_content*: option to set the content marker for multimodal input image encoding, which needs to be configured in multimodal input mode. n_keep: The number of cache entries to retain at the beginning when clearing the KV cache. In multi-turn conversations, the n_keep value must be at least as long as the system_prompt length. RKLLMExtendParam extend_param: the special parameters for controlling inference. |
Table 3-11 Explanation of RKLLMExtendParam Structure
| Definition | RKLLMExtendParam |
|---|---|
| Introduction | The special parameters for controlling inference. |
| Struct Fields | int32_t base_domain_id: controls from which domain the RKLLM model starts initialization, default is 0. int8_t embed_flash: Controls whether to store the model’s vocabulary in flash memory to save memory. Set to 0 to disable and 1 to enable. int8_t enabled_cpus_num: Sets the number of CPUs to use for inference. The range varies depending on the chip model. For RK3588/3576, the range is 1-8; for RK3562, the range is 1-4, with the default set to 4. uint32_t enabled_cpus_mask: Uses a binary mask to configure which specific CPU cores are used for inference. In rkllm.h, macros are predefined to represent CPU numbers, and you can configure them using the format CPU4 | CPU5 | CPU6 | CPU7. uint8_t n_batch: Sets the level of parallel inference; the default value is 1. int8_t use_cross_attn: Sets whether to enable cross-attention. |
In actual code construction, RKLLMParam needs to call the rkllm_createDefaultParam() function to initialize its definition, and set the corresponding model parameters according to requirements. Sample code is as follows:
RKLLMParam param = rkllm_createDefaultParam();
param.model_path = "model.rkllm";
param.top_k = 1;
param.max_new_tokens = 256;
param.max_context_len = 512;
3.2.3 Define Input Struct
To accommodate different input data types, the RKLLMInput input struct is defined, which currently accepts four types of input: text, image and text, token IDs, and encoded vectors. The specific definition is as follows:
Table 3-12 Explanation of RKLLMInput Structure
| Definition | RKLLMInput |
|---|---|
| Introduction | Used to receive different forms of input data. |
| Struct Fields | RKLLMInputType input_type: Input mode; const char* role: Input type, optional values: [“user”, “tool”]; bool enable_thinking: whether to enable the thinking mode of Qwen3; union: Used to store different input data types, specifically including the following forms: const char prompt_input*: Text prompt input, used to pass natural language text; RKLLMEmbedInput embed_input: Embedding vector input, representing processed feature vectors; RKLLMTokenInput token_input: Token input, used to pass the tokenized token sequence; RKLLMMultiModalInput multimodal_input: Multimodal input, which can pass multimodal data, such as combined input of images and text; |
Table 3-13 Explanation of RKLLMInputType Structure
| Definition | RKLLMInputType |
|---|---|
| Introduction | Used to represent the type of input data. |
| Enumeration Values |
RKLLM_INPUT_PROMPT: Indicates that the input data is plain text. RKLLM_INPUT_TOKEN: Indicates that the input data is token IDs. RKLLM_INPUT_EMBED: Indicates that the input data is encoded vectors. RKLLM_INPUT_MULTIMODAL: Indicates that the input data consists of images and text. |
When the input data is plain text, it can be directly input using input_data. When the input data consists of token IDs, encoded vectors, or images and text, the RKLLMInput must be used in conjunction with the RKLLMTokenInput, RKLLMEmbedInput, and RKLLMMultiModalInput structures. The specific introduction is as follows:
1) RKLLMTokenInput is the input struct that receives token IDs. The specific definition is as follows:
Table 3-14 Explanation of RKLLMTokenInput Structure
| Definition | RKLLMTokenInput |
|---|---|
| Introduction | Used to receive token_id data. |
| Struct Fields | int32_t input_ids*: Memory pointer for the input token IDs. size_t n_tokens: The number of tokens in the input data. |
2) RKLLMEmbedInput is the input struct that receives encoded vectors. The specific definition is as follows:
Table 3-15 Explanation of RKLLMEmbedInput Structure
| Definition | RKLLMEmbedInput |
|---|---|
| Introduction | Used to receive embedding data. |
| Struct Fields | float embed*: Memory pointer for the input token embeddings. size_t n_tokens: The number of tokens in the input data. |
3) RKLLMMultiModalInput is the input struct that receives images and text. The specific definition is as follows:
Table 3-16 Explanation of RKLLMMultiModalInput Structure
| Definition | RKLLMMultiModalInput |
|---|---|
| Introduction | Used to receive images and text data. |
| Struct Fields | char prompt: Memory pointer for the input text. float image_embed: Memory pointer for the input image embeddings. size_t n_image_tokens: The number of tokens for the input image embeddings. size_t n_image: number of input images; supports inputting multiple consecutive frames. size_t image_width: width of the input image used when computing embeddings, used for mrope calculation parameters. size_t image_height: height of the input image used when computing embeddings, used for mrope calculation parameters. |
RKLLM supports different inference modes and defines the RKLLMInferParam structure. It currently supports joint inference with preloaded LoRA models during the inference process, or saving a Prompt Cache for subsequent inference acceleration. The specific definition is as follows:
Table 3-17 Explanation of RKLLMInferParam Structure
| Definition | RKLLMInferParam |
|---|---|
| Introduction | Used to define different inference modes. |
| Struct Fields | RKLLMInferMode mode: Inference mode, supporting RKLLM_INFER_GENERATE normal inference mode and RKLLM_INFER_GET_LOGITS additional logits retrieval inference mode. RKLLMLoraParam lora_params: Parameter configuration for the LoRA used during inference, used to select which LoRA to infer when multiple LoRAs are loaded. Set to NULL if LoRA is not needed. RKLLMPromptCacheParam prompt_cache_params: Parameter configuration for using the Prompt Cache during inference. Set to NULL if Prompt Cache generation is not needed. keep_history: Indicates whether to retain the historical context during inference. Set to 1 for multi-turn conversations. |
Table 3-18 Explanation of RKLLMLoraParam Structure
| Definition | RKLLMLoraParam |
|---|---|
| Introduction | Used to define the parameters for using LoRA during inference. |
| Struct Fields | const char lora_adapter_name*: The name of the LoRA used during inference. |
Table 3-19 Explanation of RKLLMPromptCacheParam Structure
| Definition | RKLLMPromptCacheParam |
|---|---|
| Introduction | Used to define the parameters for using Prompt Cache during inference. |
| Struct Fields | int save_prompt_cache: Indicates whether to save the Prompt Cache during inference. 1 means it is required, and 0 means it is not. const char prompt_cache_path*: Path to save the Prompt Cache. If not set, it defaults to “./prompt_cache.bin”. |
Here is an example of using RKLLMPromptCacheParam for inference:
// Initialize and Set Prompt Cache Parameters(if needed)
RKLLMPromptCacheParam prompt_cache_params;
// Enable saving Prompt Cache
prompt_cache_params.save_prompt_cache = true;
// Specify cache file path
prompt_cache_params.prompt_cache_path = "./prompt_cache.bin";
rkllm_infer_params.prompt_cache_params = &prompt_cache_params;
3.2.4 Initialize Model
Before initializing the model, it is necessary to define the LLMHandle handle in advance. This handle is used for the initialization, inference, and resource release processes of the model. It’s important to note that only by unifying the LLMHandle handle object across these three processes can the inference process of the model be completed correctly. Prior to model inference, users need to complete the model initialization through the rkllm_init() function. The specific function definition is as follows:
Table 3-20 Interface Specification for the rkllm_init Function
| Function | rkllm_init |
|---|---|
| Introduction | Used to initialize the specific parameters and inference settings for RKLLM model. |
| Parameters | LLMHandle* handle: register model to the corresponding handle for subsequent inference and release calls; RKLLMParam* param: the parameter structure defined for the model; LLMResultCallback callback: callback function used to receive and process real-time outputs from the model; |
| Returns | 0 indicates that the initialization process is normal; -1 indicates initialization failure; |
The example code is as follows:
LLMHandle llmHandle = nullptr;
rkllm_init(&llmHandle, ¶m, callback);
3.2.5 Inference Model
After completing the initialization process of the RKLLM model, users can perform model inference using the rkllm_run() function. Real-time inference results can be processed using the callback function predefined during initialization. The specific function definition of rkllm_run() is as follows:
Table 3-21 Interface Specification for the rkllm_run Function
| Function | rkllm_run |
|---|---|
| Introduction | Used to performing result inference using the initialized RKLLM model. |
| Parameters | LLMHandle handle: the target handle registered during model initialization. RKLLMInput rkllm_input: Input data for model inference. For details, see section 3.2.3 on input structure definition. RKLLMInferParam rkllm_infer_params: Parameter passing during the model inference process. For details, see section 3.2.3 on input structure definition. void* userdata: the user-defined function pointer, typically set to NULL by default. |
| Returns | 0 indicates that the model inference runs normally; -1 indicates a failure in calling the model inference; |
3.2.6 Interrupt Model Inference
During model inference, users can call the rkllm_abort() function to interrupt the inference process. The specific function definition is as follows:
Table 3-22 Interface Specification for the rkllm_abort Function
| Function | rkllm_ abort |
|---|---|
| Introduction | Used to interrupt the RKLLM model inference process. |
| Parameters | LLMHandle handle: the target handle registered during model initialization; |
| Returns | 0 indicates successful interruption of the model; -1 indicates a failure to interrupt the model. |
3.2.7 Release Model
After completing all model inference calls, users need to call the rkllm_destroy() function to destroy the RKLLM model and release the CPU, GPU, and NPU computing resources allocated, for use by other processes or models. The specific function definition is as follows:
Table 3-23 Interface Specification for the rkllm_destroy Function
| Function | rkllm_ destroy |
|---|---|
| Introduction | Used to destroy the RKLLM model and release all computing resources. |
| Parameters | LLMHandle handle: the target handle registered during model initialization; |
| Returns | 0 indicates successful destruction and release of the RKLLM model; -1 indicates a failure in releasing the model. |
The example code is as follows:
// llmHandle is the the target handle registered
rkllm_destroy(llmHandle);
3.2.8 Load LoRA Model
RKLLM supports running LoRA models simultaneously with the base model during inference. Before invoking the rkllm_run interface, you can load a LoRA model via the rkllm_load_lora interface. RKLLM allows loading multiple LoRA models; each call to rkllm_load_lora loads one LoRA model. The specific function definition is as follows:
Table 3-24 Interface Specification for the rkllm_load_lora Function
| Function | rkllm_load_lora |
|---|---|
| Introduction | Used to load LoRA model for the base model. |
| Parameters | LLMHandle handle: The target handle registered during model initialization. See section 3.2.4 on initializing the model. RKLLMLoraAdapter lora_adapter*: Parameter for loading the LoRA model. |
| Returns | 0 indicates the LoRA model was successfully loaded. -1 indicates the model loading failed. |
Table 3-25 Explanation of RKLLMLoraAdapter Structure
| Definition | RKLLMLoraAdapter |
|---|---|
| Introduction | Used to configure parameters when loading a LoRA model. |
| Struct Fields | const char* lora_adapter_path: The path to the LoRA model to be loaded. const char* lora_adapter_name: The name of the LoRA model to be loaded, defined by the user, used to select the specified LoRA during inference. float scale: The degree to which the LoRA model adjusts the base model parameters during inference. |
Here is an example Code for Loading LoRA:
RKLLMLoraAdapter lora_adapter;
memset(&lora_adapter, 0, sizeof(RKLLMLoraAdapter));
lora_adapter.lora_adapter_path = "lora.rkllm";
lora_adapter.lora_adapter_name = "lora_name";
lora_adapter.scale = 1.0;
ret = rkllm_load_lora(llmHandle, &lora_adapter);
if (ret != 0) {
   printf("\nload lora failed\n");
}
3.2.9 Load Prompt Cache
During the model inference process, the Prefill stage typically consumes a significant amount of computational resources and time, especially when the Prompt is long. To accelerate this process, RKLLM supports loading Prompt Cache from files. By reusing cached content, you can significantly reduce the time spent in the Prefill stage, thereby improving overall inference efficiency. Before invoking the rkllm_run interface for inference, ensure that the prompt_cache_params parameters are correctly configured. This step allows the model to generate the corresponding Prompt Cache file after inference. When running inference for the first time, the system will automatically generate a Prompt Cache file. This file contains the intermediate results required for the Prefill stage, which can be reused in subsequent tasks. In subsequent inference tasks, you can load previously generated Prompt Cache files by calling the rkllm_load_prompt_cache interface. The specific function definitions are as follows:
Table 3-26 Interface Specification for the rkllm_load_prompt_cache Function
| Function | rkllm_load_prompt_cache |
|---|---|
| Introduction | Used to load Prompt Cache file. |
| Parameters | LLMHandle handle: The target handle registered during model initialization (refer to section 3.2.4 Initialization Model). const char* prompt_cache_path: The path to the Prompt Cache file to be loaded. |
| Returns | 0 indicates the Prompt Cache file was successfully loaded. -1 indicates loading failed. |
Table 3-27 Interface Specification for the rkllm_release_prompt_cache Function
| Function | rkllm_release_prompt_cache |
|---|---|
| Introduction | Used to release the Prompt Cache. |
| Parameters | LLMHandle handle: The target handle registered during model initialization (refer to section 3.2.4 Initialization Model). |
| Returns | 0 indicates that the Prompt Cache model was successfully released. -1 indicates that the model release failed. |
Note: RKLLM will detect the parts of the input that are the same as those in the prompt_cache from the beginning. If your input format is fixed as PROMPT_PREFIX + text + PROMPT_POSTFIX, you can generate the Prompt Cache for just the PROMPT_PREFIX part. After loading, you can reuse this part of the result in subsequent inferences. RKLLM supports generating multiple Prompt Cache files. When different Prompt Cache files are needed, you can simply load the corresponding file. If you need to switch to another Prompt Cache file or no longer need the loaded Prompt Cache, please explicitly call the rkllm_release_prompt_cache interface to release it.
Here is an example Code for Loading Prompt Cache:
// Initialize and set the Prompt Cache parameters, then call the run interface to generate the Prompt Cache file.

RKLLMPromptCacheParam prompt_cache_params;
// Whether to save the prompt cache
prompt_cache_params.save_prompt_cache = true;
// If you need to save the prompt cache, specify the absolute path of the cache file.
prompt_cache_params.prompt_cache_path = "/data/prompt_cache.bin";
rkllm_infer_params.prompt_cache_params = &prompt_cache_params;
rkllm_infer_params.mode = RKLLM_INFER_GENERATE;
rkllm_input.input_type = RKLLM_INPUT_PROMPT;
rkllm_input.prompt_input = (char *)prompt.c_str();
rkllm_run(llmHandle, &rkllm_input, &rkllm_infer_params, NULL);
// Load the prompt cache file to reduce prefill time.
rkllm_load_prompt_cache(llmHandle, "./prompt_cache.bin");
if (ret != 0) {
   printf("\nload Prompt Cache failed\n");
}
rkllm_run(llmHandle, &rkllm_input, &rkllm_infer_params, NULL);
3.2.10 KV Cache Management
RKLLM supports manual clearing of the KV cache, which can be used for both single-turn and multi-turn dialogues. When invoking the cache clearing function, if keep_system_prompt is set to 1, the system prompt (if present) will be retained; otherwise, the entire cache will be cleared. The function definition is as follows:
Table 3-28 Interface Specification for the rkllm_clear_kv_cache Function
| Function | rkllm_clear_kv_cache |
|---|---|
| Introduction | Used to clear the KV cache. |
| Parameters | LLMHandle handle: The target handle registered during model initialization (refer to section 3.2.4 Initialization Model). keep_system_prompt: whether to retain the system prompt (1 to retain, 0 to clear). start_pos: The starting position ID of the KV cache to be deleted, inclusive of the start_pos position, If you don’t need to use it, please manually set it to nullptr. end_pos: The ending position ID of the KV cache to be deleted, exclusive of the end_pos position, If you don’t need to use it, please manually set it to nullptr. Note: deleting KV cache at specified positions is only supported when using the pause inference feature in single-turn mode. If a specific range [start_pos, end_pos) is provided, keep_system_prompt will be ignored, and the kv cache within this range will be cleared instead. |
| Returns | 0: Indicates successful clearing of the KV cache. -1: Indicates failure to clear the KV cache. |
3.2.11 Chat Template Settings
when users input text, RKLLM preprocesses the text. During preprocessing, it automatically parses and applies the prompt template based on the chat_template field in the HuggingFace model ’ s tokenizer_config.json file. If customization is needed, you can reset it using the following function. Here, system_prompt acts as the system prompt to guide the model’s behavior, prompt_prefix is the prefix added before the user input, and prompt_postfix is the suffix added after the user input. The specific function definition is as follows. After the user resets the template, the enable_thinking option becomes ineffective, and users need to configure it within their custom prompt.
Table 3-29 Interface Specification for the rkllm_set_chat_template Function
| Function | rkllm_set_chat_template |
|---|---|
| Introduction | Used to set the prompt template. |
| Parameters | LLMHandle handle: The target handle registered during model initialization (refer to section 3.2.4 Initialization Model). system_prompt: The system prompt guiding the model behavior. prompt_prefix: The prefix before user input. prompt_postfix: The suffix after user input. |
| Returns | 0: Indicates the success of the chat template. -1: Indicates failure to set the chat template. |
3.2.12 Function Calling Settings
RKLLM supports structured interaction between the model and external systems through Function Calling, extending the capabilities of large language models and improving their performance in tasks such as knowledge augmentation and accurate data retrieval. when Function Calling mode is enabled, the application can pass function definitions to the model. Based on the user’s query, the model determines whether a function call is needed and outputs a call request in the specified format. The application then calls the corresponding function based on the model’s intent and returns the result. The model continues the conversation based on the returned result. the function used to configure Function Calling in RKLLM is defined as follows:
Table 3-30 Interface Specification for the rkllm_set_chat_template Function
| Function | rkllm_set_function_tools |
|---|---|
| Introduction | Function Calling configuration, including system prompt, tool function definitions, and tool response identifier. |
| Parameters | LLMHandle handle: The target handle registered during model initialization (refer to section 3.2.4 Initialization Model). system_prompt: The system prompt guiding the model behavior. tools: json-formatted function definition string that describes the available functions, including their names, purposes, and parameter formats. tool_response_str: Identifier tag for tool function call results, used to distinguish them from regular conversation content. |
| Returns | 0: indicates successful configuration; -1: indicates configuration failure. |
Example: first configure the tools.
std::string system_prompt = "You are Qwen, created by Alibaba Cloud. You are a helpful assistant.\n\nCurrent Date: 2024-09-30";
std::string tools = R"([
   {
       "type": "function",
       "function": {
          "name": "get_current_temperature",
          "description": "Get current temperature at a location.",
          "parameters": {
             "type": "object",
             "properties": {
                 "location": {
                    "type": "string",
                    "description": "The location to get the temperature for, in the format \"City, State, Country\"."
                 },
                 "unit": {
                    "type": "string",
                    "enum": ["celsius", "fahrenheit"],
                    "description": "The unit to return the temperature in. Defaults to \"celsius\"."
                 }
             },
             "required": ["location"]
          }
       }
   },
   {
       "type": "function",
       "function": {
          "name": "get_temperature_date",
          "description": "Get temperature at a location and date.",
          "parameters": {
             "type": "object",
             "properties": {
                 "location": {
                    "type": "string",
                    "description": "The location to get the temperature for, in the format \"City, State, Country\"."
                 },
                 "date": {
                    "type": "string",
                    "description": "The date to get the temperature for, in the format \"Year-Month-Day\"."
                 },
                 "unit": {
                    "type": "string",
                    "enum": ["celsius", "fahrenheit"],
                    "description": "The unit to return the temperature in. Defaults to \"celsius\"."
                 }
             },
             "required": ["location", "date"]
          }
       }
   }
])";

rkllm_set_function_tools(llmHandle, system_prompt.c_str(),
tools.c_str(), "tool_response");
Next, during the inference process, integrate with rkllm_run to implement the function calling chain:
// User's question
RKLLMInferParam rkllm_infer_params;
memset(&rkllm_infer_params, 0, sizeof(RKLLMInferParam));
rkllm_infer_params.mode = RKLLM_INFER_GENERATE;
rkllm_infer_params.keep_history = 0;

RKLLMInput rkllm_input;
rkllm_input.input_type = RKLLM_INPUT_PROMPT;
rkllm_input.enable_thinking = false;

rkllm_input.role = "user";
rkllm_input.prompt_input = "What's the temperature in San Francisco now? How about tomorrow?";

rkllm_run(llmHandle, &rkllm_input, &rkllm_infer_params, NULL);

// the first call to rkllm_run will return the name of the tool function that needs to be called;

<tool_call>
{"name": "get_current_temperature", "arguments": {"location": "San Francisco"}}
</tool_call>
<tool_call>
{"name": "get_temperature_date", "arguments": {"location": "San Francisco", "date": "2024-10-01"}}
</tool_call>

// return the tool call result to llm, and the role must be set to "tool"

rkllm_input.role = "tool";
rkllm_input.prompt_input = R"([
   {
       "temperature": 26.1,
       "location": "San Francisco",
       "unit": "celsius"
   },
   {
       "temperature": 25.9,
       "location": "San Francisco",
       "date": "2024-09-30",
       "unit": "celsius"
   }
])";

rkllm_run(llmHandle, &rkllm_input, &rkllm_infer_params, NULL);

// final result
"The current temperature in San Francisco is 26.1°C. Tomorrow, the temperature is expected to be 25.9°C."
3.2.13 Cross Attention Settings
RKLLM supports cross-attention inference. Users can input the K/V cache, mask, and positional information generated by the encoder into the decoder for cross-attention computation through the following function. Cross-attention is only supported for custom model inference. The model conversion method is detailed in Section 3.1.6.
Table 3-31 Interface Specification for the rkllm_set_cross_attn_params Function
| Function | rkllm_set_cross_attn_params |
|---|---|
| Introduction | Used to configure cross-attention parameters. |
| Parameters | LLMHandle handle: The target handle registered during model initialization (refer to section 3.2.4 Initialization Model). RKLLMCrossAttnParam* cross_attn_params: Cross-attention parameters. |
| Returns | 0: indicates successful configuration; -1: indicates configuration failure. |
Table 3-32 Explanation of RKLLMCrossAttnParam Structure
| Function | RKLLMCrossAttnParam |
|---|---|
| Introduction | Cross-attention parameters |
| Struct Fields | - float* encoder_k_cache: pointer to the encoder output key cache - float* encoder_v_cache: pointer to the encoder output value cache - float* encoder mask: attention mask for the encoder - int32_t* encoder_pos: positional information of the input tokens to the encoder - int* num_tokens: number of input tokens to the encoder |
3.2.14 Multi-batch Parallel Inference
RKLLM supports simultaneous inference of multiple batches (it is recommended that the number of batches does not exceed 8). Below is an example code for inference using two batches:
When initializing the model, the param.extend_param.n_batch parameter needs to be set to 2. When using multiple batches for inference, both RKLLMInput and RKLLMResult in the callback are arrays of size n_batch. The inference results for all batches are returned synchronously in the callback. When the token ID of a particular batch is negative, it indicates that the inference for that batch is complete. Inference will only stop once all batches have finished. When handling the returned text in the callback, it is necessary to first check whether the returned text is a null pointer before performing assignment operations.
#include <string.h>
#include <unistd.h>
#include <string>
#include "rkllm.h"
#include <fstream>
#include <iostream>
#include <csignal>
#include <vector>
using namespace std;
LLMHandle llmHandle = nullptr;
std::string output_texts[10];
int callback(RKLLMResult *result, void *userdata, LLMCallState state)
{
if (state == RKLLM_RUN_FINISH)
{
printf("\nrkllm run finish\n");
} else if (state == RKLLM_RUN_ERROR) {
printf("\nrkllm run error\n");
} else if (state == RKLLM_RUN_NORMAL) {
RKLLMResult batch1 = result[0];
RKLLMResult batch2 = result[1];
if (batch1.text) {
output_texts[0] += batch1.text;
printf("batch 0 %s\n", output_texts[0].c_str());
}
if (batch2.text) {
output_texts[1] += batch2.text;;
printf("batch 1 %s\n", output_texts[1].c_str());
}
}
return 0;
}
int main(int argc, char **argv)
{
if (argc < 4) {
std::cerr << "Usage: " << argv[0] << " model_path max_new_tokens max_context_len\n";
return 1;
}
RKLLMParam param = rkllm_createDefaultParam();
param.model_path = argv[1];
param.top_k = 1;
param.top_p = 0.95;
param.temperature = 0.8;
param.repeat_penalty = 1.1;
param.frequency_penalty = 0.0;
param.presence_penalty = 0.0;
param.max_new_tokens = std::atoi(argv[2]);
param.max_context_len = std::atoi(argv[3]);
param.skip_special_token = true;
param.extend_param.base_domain_id = 0;
param.extend_param.embed_flash = 1;
param.extend_param.n_batch = 2;
int ret = rkllm_init(&llmHandle, ¶m, callback);
if (ret == 0){
printf("rkllm init success\n");
} else {
printf("rkllm init failed\n");
exit_handler(-1);
}
RKLLMInput rkllm_input[2];
memset(&rkllm_input, 0, sizeof(RKLLMInput)*2);
RKLLMInferParam rkllm_infer_params;
memset(&rkllm_infer_params, 0, sizeof(RKLLMInferParam));
output_texts[0].clear();
output_texts[1].clear();
rkllm_infer_params.mode = RKLLM_INFER_GENERATE;
rkllm_infer_params.keep_history = 0;
rkllm_input[0].input_type = RKLLM_INPUT_PROMPT;
rkllm_input[0].role = "user";
rkllm_input[0].enable_thinking = false;
rkllm_input[0].prompt_input = "上联: 江边惯看千帆过";
rkllm_input[1].input_type = RKLLM_INPUT_PROMPT;
rkllm_input[1].role = "user";
rkllm_input[1].enable_thinking = false;
rkllm_input[1].prompt_input = "以咏梅为题目,帮我写一首古诗,要求包含梅花、白雪等元素。";
printf("robot: ");
rkllm_run(llmHandle, &rkllm_input[0], &rkllm_infer_params, NULL);
rkllm_destroy(llmHandle);
return 0;
}
3.2.15 Model Inference Pause
RKLLM supports pausing inference in single-turn mode by returning 1 in the callback. When inference is paused, the KV cache will not be cleared, allowing the user to modify the input and then call rkllm_run to resume inference.
3.2.16 Model Performance Data Callback
RKLLM supports returning performance data for a single inference at the end of the inference process. This includes the total time spent on prefill and decoding inference, the number of tokens, and memory usage. The structure of the returned data is defined as follows:
Table 3-33 Explanation of RKLLMPerStat Structure
| Definition | RKLLMPerfStat |
|---|---|
| Introduction | return model inference performance data |
| Struct Fields | - float prefill_time_ms: total time spent in the prefill stage, in milliseconds - int prefill_tokens: total number of tokens in the prefill stage - float generate_time_ms: total time spent in the generate stage, in milliseconds - int generate_tokens: total number of tokens in the generate stage - float memory_usage_mb: Memory usage during inference process,measured by VmHWM, in megabytes |
3.3 Board-side Inference Example
The directory, examples/rkllm_api_demo, is include the C++ project for the inference on the board- site, and which is synchronously updated with this documentation. Furthermore, compilation scripts are provided for users to facilitate the compilation of the project and the completion of the board-side inference of the RKLLM model.
3.3.1 Complete Code of Example Project
The complete C++ code example for inference calls is located in the example/rkllm_api_demo/deploy/src directory of the toolchain. The llm_demo.cpp file serves as an example of large language model inference. These examples include the full process, including model initialization, inference, handling outputs with callback functions, and releasing model resources. Users can refer to the relevant code to implement custom functionality.
3.3.2 Instructions for Example Project
Under the directory of examples/rkllm_api_demo/deploy, not only does it contain sample code for invoking the RKLLM model inference, but also includes compilation scripts build-android.sh and build- linux.sh. This section will provide a brief explanation of how to use the sample code, taking compiling
executable files for Linux systems as an example using the build-linux.sh script: Firstly, users need to prepare cross-compilation tools on their own, noting that the recommended version of the compilation tools in section 2.3 is 10.2 or above. Subsequently, before the compilation process, users should replace the path to the cross-compilation tools in build-linux.sh themselves:
# Set the path of the cross-compiler GCC_COMPILER_PATH=~/gcc-arm-10.2-2020.11-x86_64-aarch64-none-linux-gnu/bin/aarch64-none-linux-gnu
Subsequently, users can use build-linux.sh to initiate the compilation process. Upon completion of the compilation, users will obtain the corresponding llm_demo program, which will installed in the install/demo_linux_aarch64/llm_demo directory directory. Following this, the executable file, library folder, and the RKLLM model (previously converted and quantized using the RKLLM-Toolkit tool) should be pushed to the board-side.
adb push install/demo_Linux_aarch64  /data
adb push /PC/path/to/your/rkllm/model /data/demo_Linux_aarch64
After completing the above steps, users can enter the terminal interface of the board using adb, and navigate to the corresponding /data/demo_linux_aarch64 directory. Then, the inference of RKLLM model on the board can be invoked using the following command:
adb shell
cd /data/demo_linux_aarch64
export LD_LIBRARY_PATH=./lib
./llm_demo /path/to/your/rkllm/model 1024 2048
With the above operations, users can enter the example inference interface, interact with the board- side model for inference, and obtain real-time inference results from the RKLLM model.
3.3.3 Monitor inference performance and Log Viewing
If you need to view RKLLM’s performance or logs during inference on the board, you can use the following commands:
# View only TTFT, TPS, and memory usage data
export RKLLM_LOG_LEVEL=1
# In addition to performance data, also prints cache length and more details
export RKLLM_LOG_LEVEL=2
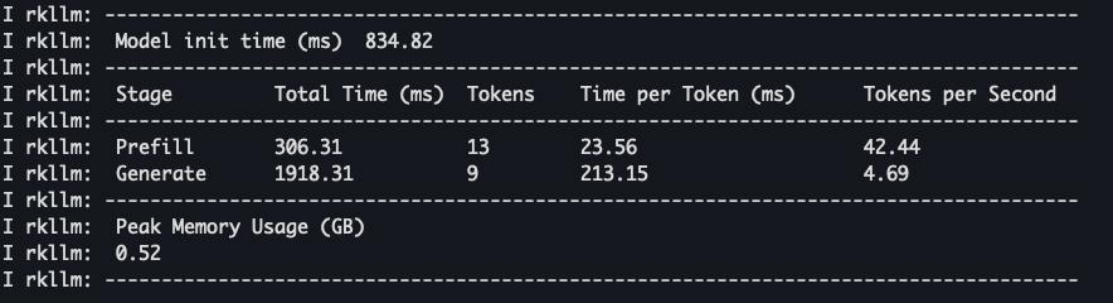
Copyable transcription of the original log (not an ArmSoM measurement; blurred account not reconstructed):
Model initialization: 834.82 ms
Stage       Total Time (ms)  Tokens  Time per Token (ms)  Tokens per Second
Prefill     306.31           13      23.56                42.44
Generate    1918.31          9       213.15               4.69
Peak Memory Usage (GB): 0.52
Figure 3-1 RKLLM inference performance logs on the hardware platform
3.4 Implementation of Board-side Server
After using RKLLM-Toolkit to convert the model and obtain the RKLLM model, users can deploy server-side services on Linux development boards. This involves setting up a server on a Linux device and exposing network interfaces to everyone in the local area network. Subsequently, the RKLLM model can be accessed by other users via the specified address, thus facilitating efficient and concise interaction. This section will introduce two different server deployment implementations.
1) RLM-Server-Flask based on Flask: Users can achieve API access between the client and server using request requests. The provided RKLLM-Server-Flask example includes a common conversation example and a single-round conversation example that supports the Function Calling function.
2) RKLLM-Server-Gradio based on Gradio: By reference to the provided example, users can rapidly construct a web server for visual interaction. Furthermore, the example illustrates the utilisation of the Gradio API interface, which enables users to undertake secondary development. Both examples of server implementations mentioned above are located in the examples/rkllm_server_demo directory. This directory contains specific code for both implementations, one-click deployment scripts, and API interface calling examples. Users can choose different examples for reference and further development. The directory structure is as follows:
examples/rkllm_server_demo
├──rkllm_server          # Board-side Deployment Required Files
│   └── lib                    # RKLLM Runtime
│   └── flask_server.py            # RKLLM-Server-Flask Example
│   └── gradio_server.py           # RKLLM-Server-Gradio Example
├──build_rkllm_server_flask.sh # One-click Deployment Script -Flask
├──build_rkllm_server_gradio.sh# One-click Deployment Script -Gradio
├──chat_api_flask.py           # API Interface Example -Flask
├──chat_api_gradio.py          # API Interface Example -Gradio
└──Readme.md
3.4.1 Deployment Example of RKLLM-Server-Flask
In the deployment example of RKLLM-Server-Flask, the main focus is on using the Flask framework to set up the server-side. On the client-side, data is transmitted using the request-response structure to achieve API access. Users send specific data structures to the server during the API call process. The main contents are as follows:
{
   "model": "No models available",
   "messages": [
     {"role": "system",
       "content": "You are a helpful assistant."
     },
     {
       "role": "user",
       "content": "Hello!"
     }
   ],
   "stream": false,
   "enable_thinking": False,
   "tools": None

}
Among them, “model” and “stream” specify the specific model to be called and whether to initiate streaming inference transmission, while the “content” data in “messages” is the crucial user input. “enable_thinking” indicates whether the model performs deep thinking when answering (users need to set this option based on whether the model supports this function). “tools” is the functional description of the user-defined function in the Function Calling function (refer to Section 3.4.1.3.2 for specific definition rules). Users also need to set this parameter based on whether the model supports the Function Calling function. If it is not supported or not used, it should be set to “None”.
As for the data returned by the server, the structure of the data output varies depending on whether streaming inference transmission is selected. The data content returned under non-streaming inference settings is as follows:
{
  "id": "chatcmpl-123",
  "object": "chat.completion",
  "created": 1677652288,
  "model": "gpt-3.5-turbo-0125",
  "system_fingerprint": "fp_44709d6fcb",
  "choices": [{
   "index": 0,
   "message": {
     "role": "assistant",
     "content": "\n\nHello there, how may I assist you today?",},
   "logprobs": null,
   "finish_reason": "stop"
  }],
  "usage": {
   "prompt_tokens": 9,
   "completion_tokens": 12,
   "total_tokens": 21
  }
}
When streaming inference transmission is not selected, the most important part is the “messages” content under the “choices” section, which represents the inference results provided by the model. In contrast, when streaming inference transmission is enabled, the server returns a Response object, which includes the output results of the model at different points in time during the streaming inference process. The data content at each moment is as follows:
{
"id": "chatcmpl-123",
  "object": "chat.completion.chunk",
  "created": 1677652288,
  "model": "gpt-3.5-turbo-0125",
  "system_fingerprint": "fp_44709d6fcb",
  "choices": [{
   "index": 0,
   "delta": {
     "role": "assistant",
     "content": "\n\nHello there, how may I assist you today?",},
   "logprobs": null,
   "finish_reason": "stop"
  }]
}
After receiving the data from streaming transmission, users need to focus on the “delta” data section within the “choices” part. Additionally, when “finish_reason” is empty (None), it indicates that the model is still in the inference state, and the data has not been fully generated yet. It’s only when “finish_reason”
returns “stop” that the streaming inference is considered finished. In the provided deployment example code and API access examples for RKLLM-Server-Flask, you can see identical definitions of the transmission data structure, ensuring the generality of the deployed RKLLM-Server-Flask. In the subsequent sections of this chapter, we will separately introduce the one- click deployment script for the server, important settings for server deployment implementation, and the script design for client-side API access.
3.4.1.1 Server-side: One-click Deployment Script for RKLLM-Server-Flask
The one-click deployment script for RKLLM-Server-Flask is named build_rkllm_server_flask.sh and is located in the rkllm_server_demo directory. This script helps users quickly set up the RKLLM- Server-Flask server on a Linux development board. Before using this script, users should note the following:
1) Ensure that the development board is connected to the network via an Ethernet cable. Use the “ifconfig” command in the adb shell to determine the specific IP address of the development board. The RKLLM-Server-Flask will then set up the server with this IP address within the local area network and accept client access.
2) Users should have successfully converted the RKLLM model beforehand. Before executing the one-click deployment script, ensure that the RKLLM model has been pushed to the Linux board. Users can directly invoke the build_rkllm_server_flask.sh script from their PC (not on a development board) to quickly deploy the RKLLM-Server-Flask server on a Linux development board. The specific usage of the one-click deployment script build_rkllm_server_flask.sh is as follows:
./build_rkllm_server_flask.sh
   --workshop [RKLLM-Server Working Path]
   --model_path [Absolute Path of Converted RKLLM Model on Board] --platform [Target Platform: RK3588/RK3576/RK3562/RV1126B]
   [--lora_model_path [LoRA Model Path]]
   [--prompt_cache_path [Prompt Cache File Path]]
The workshop parameter specifies the subsequent working directory of RKLLM-Server-Flask on the board. The model_path parameter indicates the absolute path of the RKLLM model on the board, which was converted using RKLLM-Toolkit, and RKLLM-Server-Flask will read the model from this
path during operation. The platform parameter specifies the current platform type, either RK3588, RK3576, RK3562 or RV1126B. The lora_model_path and prompt_cache_path parameters are optional and can be used to specify file paths when the user needs to load a LoRA model or use the prompt feature. The following is a simple example of how to use the one-click deployment script build_rkllm_server_flask.sh:
./build_rkllm_server_flask.sh
   --workshop /path/to/workshop
   --model_path /path/to/model.rkllm
   --platform rk3588
After executing the above command, the one-click deployment script will perform the following steps:
1) Check the Linux environment on the board.
2) Automatically install the Flask library if not already installed.
3) Push the necessary files under rkllm_server_demo/rkllm_server to the board.
4) Index the RKLLM model in the preset working directory for RKLLM-Server-Flask. Once you see the message “RKLLM Model has been initialized successfully!” in the terminal, it indicates that the RKLLM-Server-Flask example has been successfully launched.
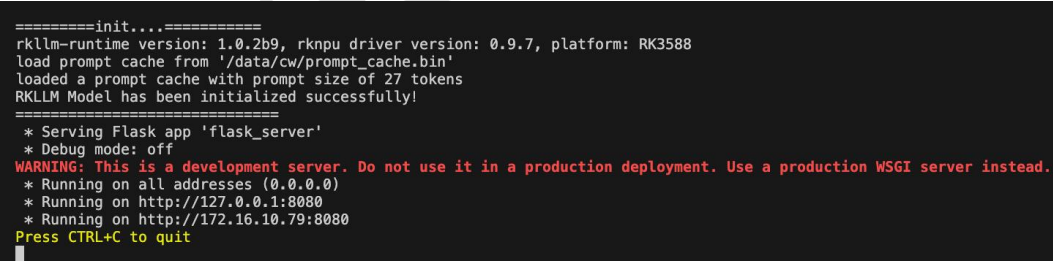
Copyable transcription of the original log (not an ArmSoM measurement; blurred account not reconstructed):
=========init....===========
rkllm-runtime version: 1.0.2b9, rknpu driver version: 0.9.7, platform: RK3588
load prompt cache from '/data/cw/prompt_cache.bin'
loaded a prompt cache with prompt size of 27 tokens
RKLLM Model has been initialized successfully!
===========================
 * Serving Flask app 'flask_server'
 * Debug mode: off
WARNING: This is a development server. Do not use it in a production deployment. Use a production WSGI server instead.
 * Running on all addresses (0.0.0.0)
 * Running on http://127.0.0.1:8080
 * Running on http://172.16.10.79:8080
Press CTRL+C to quit
Figure 3-2 Successful deployment of RKLLM-Server-Flask in terminal By referring to the specific code logic in build_rkllm_server_flask.sh, users can understand the detailed deployment process of the RKLLM-Server-Flask example. This enables users to customize the deployment implementation of their server more flexibly. It is important to emphasize that in step 3 of the one-click deployment script, the script automatically synchronizes the current version of RKLLM Runtime to rkllm_server/lib/librkllmrt.so. This ensures that flask_server.py calls the current version of librkllmrt.so during runtime.
3.4.1.2 Server-side: Introductions for RKLLM-Server-Flask Example
In this section, we will outline and introduce the implementation approach of the deployment example for RKLLM-Server-Flask, helping users understand the construction logic of the example code for potential secondary development. The deployment example of RKLLM-Server-Flask primarily relies on the Flask library to achieve the basic implementation of the server. Additionally, for RKLLM model inference, the ctypes library in Python is chosen to directly call the RKLLM Runtime library. In the overall implementation of rkllm_server/flask_server.py, in order to call librkllmrt.so via ctypes, it’s necessary to define relevant structures in Python based on the header file rkllm.h corresponding to librkllmrt.so beforehand. After the Flask server receives the struct data sent by users, it calls relevant functions to perform inference with the RKLLM model. The specific code implementation of flask_server.py mainly consists of the following steps:
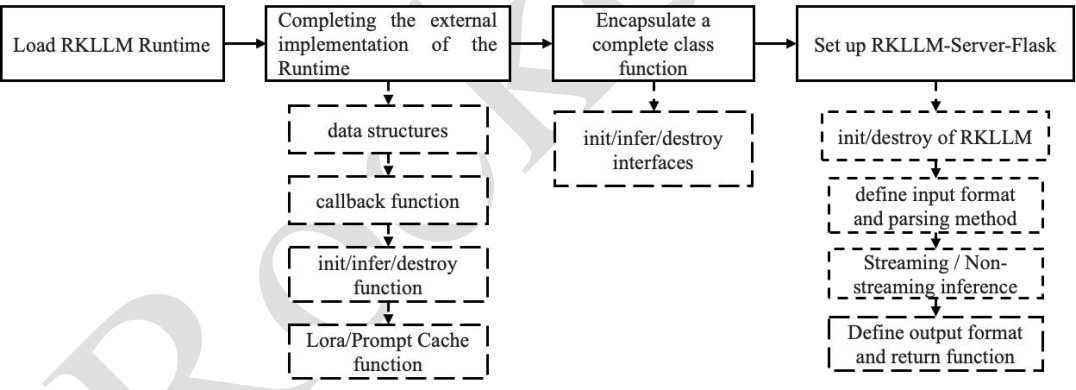
Figure 3-3 Overview of the RKLLM-Server-Flask Deployment Implementation Process
1) Load RKLLM Runtime: Set the path for the dynamic library and load the dynamic library librkllmrt.so using ctypes to achieve the analysis of the RKLLM Runtime.
2) Completing the external implementation of the Runtime: In the Python code, use ctypes to complete the external definitions of relevant implementations from the RKLLM Runtime header files, including definitions of data structures, callback functions, initialization functions, inference functions, destroy functions, and loading functions for LoRA/Prompt Cache.
3) Encapsulate a complete class function: Based on the various Runtime data types and function
interfaces implemented in step 2), encapsulate complete class functions that integrate RKLLM’s initialization, inference, destroy, and other operations for easier subsequent calls.
4) Set up RKLLM-Server-Flask: Using the complete class functions encapsulated in step 3, build the Flask server, including loading the RKLLM model based on user-specified parameters at Flask startup, defining the format of user input and the method for parsing the input, differentiating between streaming/non-streaming inference call methods, defining the return format for inference output and the specific implementation of callback functions, and handling RKLLM release. The specific implementations of the above modules form the main body of the code in rkllm_server/flask_server.py, thereby completing the deployment of the RKLLM-Server-Flask example. Users can modify the initialization definitions for the RKLLM model to implement different custom models. Additionally, users can refer to the RKLLM-Server-Flask deployment example for implementing their own custom server deployment.
3.4.1.3 Client-side: API Access Example
The file rkllm_server_demo/chat_api_flask.py contains a basic conversation demo (with the main code in main_demo1) as well as a single-round conversation demo that supports Function Calling (with the main code in main_demo2).
3.4.1.3.1 Example 1 - normal conversation
The example is a common question-and-answer conversation. This section describes the general conversation example in detail:
1) Define the network address of RKLLM-Server-Flask. Users need to set the target address based on the specific IP of the Linux development board, the port number set by the Flask framework, and the function name for access.
server_url = 'http://172.16.10.xx:8080/rkllm_chat'
2) Define the form of API access, with options for non-streaming transmission and streaming transmission, defaulting to non-streaming transmission.
main_demo1(is_streaming=True)
3) Define the session object, using requests.Session() to configure the communication process between the API access interface and the server. Users can customize modifications according to their actual development needs.
session = requests.Session()
session.keep_alive = False  # Close the connection pool
adapter = requests.adapters.HTTPAdapter(max_retries=5)
session.mount('https://', adapter)
session.mount('http://', adapter)
4) Define the structure used to wrap the data sent during API calls. User access to RKLLM-Server- Flask will be encapsulated within this structure.
# Prepare the data to be sent
# model: the model defined by the user when setting up RKLLM-Server, which has no effect here
# messages: the questions input by the user; supports adding multiple questions to messages
# stream: whether to enable streaming dialogue, same as the OpenAI interface
# enable_thinking: whether to enable deep thinking
# tools: user's description of custom functions
data = {
   "model": 'your_model_deploy_with_RKLLM_Server',
   "messages": [{"role": "user", "content": user_message}],
   "stream": is_streaming,
   "enable_thinking": False,
   "tools": None
}
5) Send a request to the RKLLM-Server-Flask server and retrieve the returned data.
responses = session.post(server_url, json=data, headers=headers,
stream=is_streaming, verify=False)
6) Define the parsing method for the returned data structure.
# Parse the response
# Non-streaming transmission
if not is_streaming:
       if responses.status_code == 200:
       print("Q:", data["messages"][-1]["content"])
       print("A:", json.loads(responses.text)["choices"][-1]["message"]["content"])
   else:
       print("Error:", responses.text)

# Streaming transmission
else:
   if responses.status_code == 200:
       print("Q:", data["messages"][-1]["content"])
       print("A:", end="")
       for line in responses.iter_lines():
if line:
             line = json.loads(line.decode('utf-8'))
             if line["choices"][-1]["finish_reason"] != "stop":
                 print(line["choices"][-1]["delta"]["content"], end="")

                 sys.stdout.flush()
   else:
       print('Error:', responses.text)
The overall process from steps 1 to 6 represents the API access method for the RKLLM-Server-Flask server. Users can develop custom functionalities based on the example code provided above. It is important for users to verify the specific address of the RKLLM-Server-Flask, namely the IP address, port number, and the function interface that the server accepts input from. Additionally, when encountering specific requirements for send-receive structures, users can customize the required data structures on both the server and client sides to ensure the implementation of custom functionalities.
3.4.1.3.2 Example 2 - single-turn conversation with Function Calling
LLMs do not have knowledge of information that was not included in their training data, including events that occurred after the training was completed. Moreover, they learn through probabilistic methods, which means they may not be precise enough for tasks governed by fixed rule sets, such as mathematical calculations. To address this limitation, Function Calling allows the model to automatically invoke predefined functions based on user requests, in order to retrieve more accurate and real-time information. In this section, we illustrate the Function Calling feature using a weather query task as an example. Scenario: Suppose a user wants to ask the LLM for the current temperature and tomorrow’s temperature in San Francisco. Normally, the model would be unable to answer such real-time questions. However, the
user has two functions: one that retrieves the current temperature of a city, and another that retrieves the temperature for a specific date. The goal is for the model to utilize these two functions to generate an accurate answer.
1) Define the network address of RKLLM-Server-Flask. Users need to set the target address based on the specific IP of the Linux development board, the port number set by the Flask framework, and the function name for access.
server_url = 'http://172.16.10.166:8080/rkllm_chat'
2) Define the form of API access, with options for non-streaming transmission and streaming transmission, defaulting to non-streaming transmission.
main_demo2(is_streaming=True)
3) Define the session object, using requests.Session() to configure the communication process between the API access interface and the server. Users can customize modifications according to their actual development needs.
session = requests.Session()
session.keep_alive = False
adapter = requests.adapters.HTTPAdapter(max_retries=5)
session.mount('https://', adapter)
session.mount('http://', adapter)
4) Define the functions required for the LLM to call:The get_current_temperature function returns the current temperature of a specified city, and the get_temperature_date function returns the temperature of a specified city on a specified date.
def get_current_temperature(location: str, unit: str = "celsius"):
       """
       Get current temperature at a location.

       Args:
          location: The location to get the temperature for, in the
format "City, State, Country".
          unit: The unit to return the temperature in. Defaults to
"celsius". (choices: ["celsius", "fahrenheit"])

       Returns:
          the temperature, the location, and the unit in a dict
       """
       return {
          "temperature": 26.1,
          "location": location,
          "unit": unit,
       }

def get_temperature_date(location: str, date: str, unit: str =
"celsius"):
       """
       Get temperature at a location and date.

       Args:
          location: The location to get the temperature for, in the
format "City, State, Country".
          date: The date to get the temperature for, in the format
"Year-Month-Day".
          unit: The unit to return the temperature in. Defaults to
"celsius". (choices: ["celsius", "fahrenheit"])

       Returns:
          the temperature, the location, the date and the unit in a
dict
       """
       return {
          "temperature": 25.9,
          "location": location,
          "date": date,
          "unit": unit}
5) Define the description of the custom function In this example, TOOLS contains descriptions of two functions. Each function description contains a JSON object with two fields: type: string, used to specify the tool type, currently only “function” is valid function: object, detailed description of how to use the function. For each function, it is a JSON object with three fields: name: string indicates the function name; description: string describes the function purpose; parameters: JSON Schema (https://json-schema.org/learn/getting-started-step-by-step), used to
specify the parameters accepted by the function. See the link to learn how to construct a JSON Schema. Notable fields include type, required, and enum.
TOOLS = [
       {
          "type": "function",
          "function": {
             "name": "get_current_temperature",
             "description": "Get current temperature at a location.",
             "parameters": {
                 "type": "object",
                 "properties": {
                    "location": {
                       "type": "string",
                       "description": 'The location to get the temperature for, in the format "City, State, Country".',
                    },
                    "unit": {
                       "type": "string",
                       "enum": ["celsius", "fahrenheit"],
                       "description": 'The unit to return the temperature in. Defaults to "celsius".',
                    },
                 },
                 "required": ["location"],
             },
          },
       },
       {
          "type": "function",
          "function": {
             "name": "get_temperature_date",
             "description": "Get temperature at a location and date.",
             "parameters": {
                 "type": "object",
                 "properties": {
                    "location": {
                       "type": "string",
                       "description": 'The location to get the temperature for, in the format "City, State, Country".',
                    },
                    "date": {
                       "type": "string",
                       "description": 'The date to get the temperature for, in the format "Year-Month-Day".',
                    },
                    "unit": {
                       "type": "string",
                       "enum": ["celsius", "fahrenheit"],
                       "description": 'The unit to return the temperature in. Defaults to "celsius".',
                    },
                 },
                 "required": ["location", "date"],
             },
          },
       },
   ]
6) Define the structure used to package the sent data during the API call process. The user’s access
to RKLLM-Server-Flask will be included in this structure, starting the first call to LLM.
# Prepare the data to be sent
# model: The model defined by the user when setting up RKLLM-Server, which has no effect here
# messages: Questions entered by the user; this example only supports one question, i.e., a single round of dialogue
# stream: Whether to enable streaming dialogue
# enable_thinking: Whether to enable deep thinking
# tools: User description of custom functions

messages = [
   {"role": "system", "content": "You are Qwen, created by Alibaba Cloud. You are a helpful assistant.\n\nCurrent Date: 2024-09-30"},
   {"role": "user",  "content": "What's the temperature in San Francisco now? How about tomorrow?"},
   ]

data = {
       "model": 'your_model_deploy_with_RKLLM_Server',
       "messages": messages,
       "stream": False,
       "enable_thinking": False,
       "tools": TOOLS
   }

# Send a POST request
responses = session.post(server_url, json=data, headers=headers,
stream=False, verify=False)
The first call to LLM returns the following: that is, it returns the input parameters of the user-defined function.
server_answer = json.loads(responses.text)["choices"][-1]["message"]["content"]
matches = re.findall(r"<tool_call>\s*(\{.*?\})\s*</tool_call>",
''.join(server_answer), re.DOTALL)
print("server_answer:", server_answer, '\n')

'''
The following is the output of print("server_answer:", server_answer,
'\n')

server_answer: <tool_call>
{"name": "get_current_temperature", "arguments": {"location": "San Francisco"}}
</tool_call>
<tool_call>
{"name": "get_temperature_date", "arguments": {"location": "San Francisco", "date": "2024-10-01"}}
</tool_call>
'''
7) Next, parse the LLM return, construct the input for the second call to LLM, and start the second call to LLM.
result = [json.loads(match) for match in matches]
for function_call in result:
   messages.append({'role': 'assistant', 'content': '',
'function_call':function_call})

tool_calls = [{'function': result[i]} for i in range(len(result))]
function_call = []
for tool_call in tool_calls:
   if fn_call := tool_call.get("function"):
       fn_name: str = fn_call["name"]
       fn_args: dict = fn_call["arguments"]
       fn_res: str = json.dumps(get_function_by_name(fn_name)(**fn_args))
       messages.append({'role': 'tool', 'name': fn_name,
'content':fn_res})

print("messages:", messages, '\n')

'''
The following is the output of print("messages:", messages, '\n')

messages: [{'role': 'system', 'content': 'You are Qwen, created by
Alibaba Cloud. You are a helpful assistant.\n\nCurrent Date: 2024-09-30'}, {'role': 'user', 'content': "What's the temperature in San Francisco now? How about tomorrow?"}, {'role': 'assistant', 'content':
'', 'function_call': {'name': 'get_current_temperature', 'arguments':
{'location': 'San Francisco'}}}, {'role': 'assistant', 'content': '',
'function_call': {'name': 'get_temperature_date', 'arguments':
{'location': 'San Francisco', 'date': '2024-10-01'}}}, {'role': 'tool',
'name': 'get_current_temperature', 'content': '{"temperature": 26.1,
"location": "San Francisco", "unit": "celsius"}'}, {'role': 'tool',
'name': 'get_temperature_date', 'content': '{"temperature": 25.9,
"location": "San Francisco", "date": "2024-10-01", "unit":
"celsius"}'}]
'''

data = {
"model": 'your_model_deploy_with_RKLLM_Server',
"messages": messages,
"stream": is_streaming,
"enable_thinking": False,
"tools": TOOLS
}

# Send a POST request
responses = session.post(server_url, json=data, headers=headers,
stream=is_streaming, verify=False)
8) Parse the returned data structure from the second call to LLM to get the model’s final answer about San Francisco’s current temperature and tomorrow’s temperature.
if not is_streaming:
       # Parse the response
       if responses.status_code == 200:
          print("A:", json.loads(responses.text)["choices"][-1]["message"]["content"])
       else:
          print("Error:", responses.text)
else:
   if responses.status_code == 200:
       print("A:", end="")
       for line in responses.iter_lines():
       if line:
          line = json.loads(line.decode('utf-8'))
          if line["choices"][-1]["finish_reason"] != "stop":
             print(line["choices"][-1]["delta"]["content"], end="")
             sys.stdout.flush()
   else:
       print('Error:', responses.text)

'''
The following is the output of print()

A:The current temperature in San Francisco is 26.1°C. Tomorrow, the temperature is expected to be 25.9°C.
'''
The overall process described in steps 1–8 serves as an example of how to use Function Calling with the RKLLM-Server-Flask backend. Users can develop custom functionalities based on the sample code provided above. It is important to note that users must ensure the selected LLM supports the Function Calling feature. Additionally, for models with relatively limited capabilities—such as Qwen3-0.6B— Function Calling may fail because the model cannot accurately return the input parameters for user- defined functions after the first call.
3.4.2 Deployment Example of RKLLM-Server-Gradio
Gradio is a simple and easy-to-use Python library used for quickly building interactive interfaces for machine learning models. In this section, we will specifically introduce how to quickly deploy RKLLM- Server-Gradio on a Linux device using Gradio, and directly access the server within the local network to perform RKLLM model inference. The following Figure shows an example of the web interface after successfully deploying RKLLM-Server-Gradio:
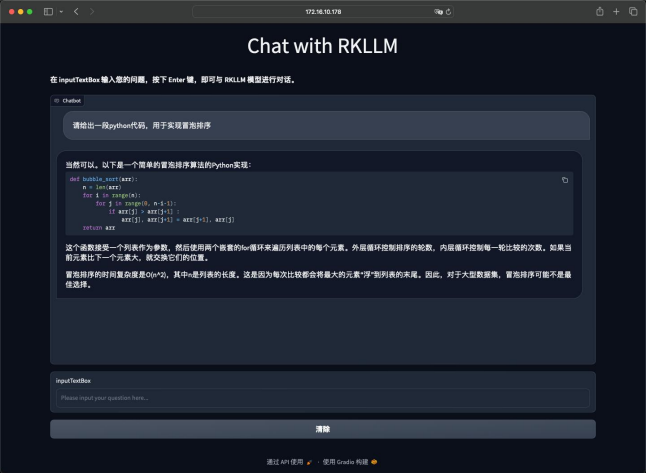
Figure 3-4 External access page for RKLLM-Server deployment example In the current rkllm_server_demo directory, the specific implementation code for the RKLLM- Server-Gradio deployment example shown in Figure 3-3 is included. Users can also directly use the one- click deployment script build_rkllm_server_gradio.sh to quickly set up RKLLM-Server-Gradio. After successful deployment, users can choose to access the RKLLM model for inference either through the web interface or via API access.
3.4.2.1 Server-side: Introductions for RKLLM-Server-Gradio Example
The one-click deployment script build_rkllm_server_gradio.sh is designed to facilitate the quick setup of RKLLM-Server-Gradio on a Linux development board. Similar to the setup process for RKLLM-Server-Flask, users should pay attention to the following points before using the one-click deployment script:
1) Ensure that the development board is connected to the network via an Ethernet cable. Use the ifconfig command in the adb shell to query the specific IP address of the development board. RKLLM- Server-Gradio will be set up as a server within the local network using this IP address to accept client access.
2) Users need to complete the smooth conversion of the RKLLM model and have pushed the RKLLM model to the Linux board before executing the one-click deployment script.
The usage of the one-click deployment script build_rkllm_server_gradio.sh is similar to that of build_rkllm_server_flask.sh:
./build_rkllm_server_gradio.sh
   --workshop [RKLLM-Server Working Path]
   --model_path [Absolute Path of Converted RKLLM Model on Board] --platform [Target Platform: RK3588/RK3576/RK3562/RV1126B]
   [--lora_model_path [LoRA Model Path]]
   [--prompt_cache_path [Prompt Cache File Path]]
Similarly, the workshop parameter specifies the working directory for RKLLM-Server-Gradio on the device; the model_path parameter indicates the absolute path of the RKLLM model on the device, which was converted using RKLLM-Toolkit, and RKLLM-Server-Gradio will read the model from this path during operation; the platform parameter specifies the platform type being used, such as RK3588, RK3576, RK3562 or RV1126B; lora_model_path and prompt_cache_path are optional parameters, allowing the user to specify the file paths for loading a LoRA model or utilizing the Prompt feature if needed. Users can directly call the build_rkllm_server_gradio.sh script on the PC side (not on the development board) using the following command to quickly deploy the RKLLM-Server-Gradio example:
./build_rkllm_server_gradio.sh
   --workshop /user/data
   --model_path /user/data/model.rkllm
   --platform rk3588
After executing the above command, the one-click deployment script will perform the following steps:
1) Check the Linux environment on the board.
2) Automatically install the Gradio library if not already installed.
3) Push the necessary files under rkllm_server_demo/rkllm_server to the board.
4) Index the RKLLM model in the preset working directory for RKLLM-Server-Gradio. Once you see the message “RKLLM Model has been initialized successfully!” in the terminal, it indicates that the RKLLM-Server-Gradio example has been successfully launched.
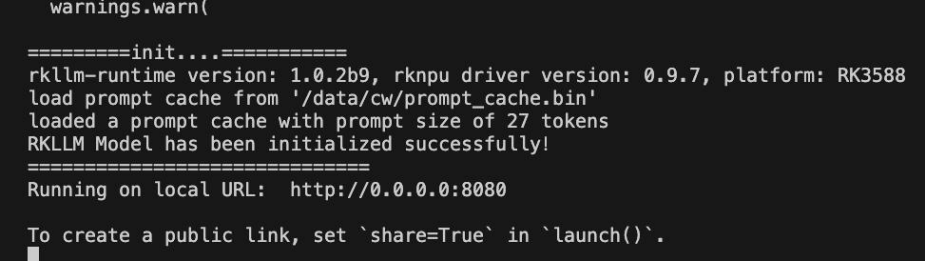
Copyable transcription of the original log (not an ArmSoM measurement; blurred account not reconstructed):
warnings.warn(
=========init....===========
rkllm-runtime version: 1.0.2b9, rknpu driver version: 0.9.7, platform: RK3588
load prompt cache from '/data/cw/prompt_cache.bin'
loaded a prompt cache with prompt size of 27 tokens
RKLLM Model has been initialized successfully!
===========================
Running on local URL:  http://0.0.0.0:8080
To create a public link, set `share=True` in `launch()`.
Figure 3-5 Successful deployment of RKLLM-Server-Gradio in terminal By referencing the specific code in build_rkllm_server_gradio.sh, users can understand the detailed deployment process of the RKLLM-Server-Gradio example. This can help users deploy custom servers more flexibly. It is important to emphasize that in step 3 of build_rkllm_server_gradio.sh, the one-click deployment script automatically synchronizes the current version of RKLLM Runtime to rkllm_server/lib/librkllmrt.so. This ensures that gradio_server.py indexes librkllmrt.so when running, and users need to pay attention to the invocation of librkllmrt.so when customizing the server.
3.4.2.2 Server-side: Introductions for RKLLM-Server-Gradio Example
The deployment implementation of RKLLM-Server-Gradio is similar to RKLLM-Server-Flask. It also uses the ctypes library to directly call the RKLLM Runtime library to perform RKLLM model inference. The specific deployment implementation process can be referenced in Figure below:
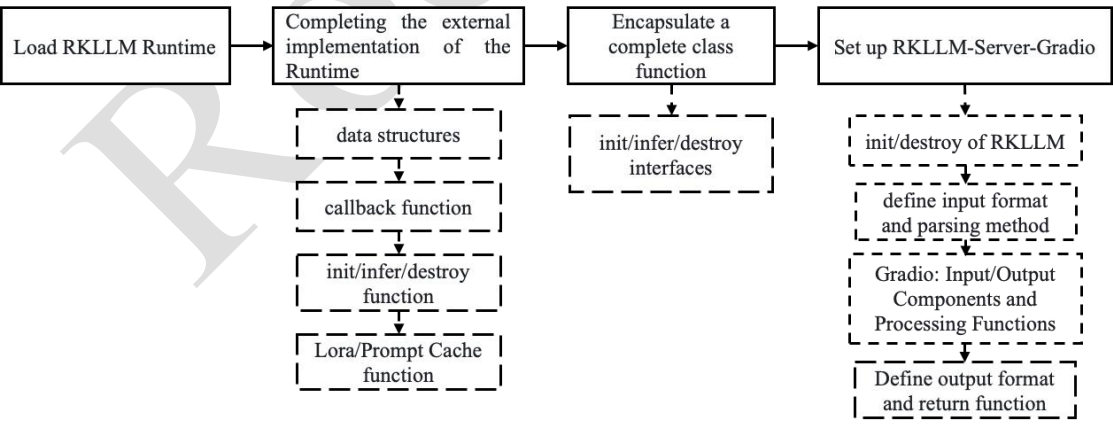
Figure 3-6 Overview of the RKLLM-Server-Flask Deployment Implementation Process The difference is that RKLLM-Server-Gradio chooses to use the gradio library to implement the server setup and complete communication with the client, providing a simple web-based service. This requires specific handling of the Gradio interface in RKLLM-Server-Gradio as follows:
1)The Gradio function library provides complete communication for input and output data, so there is no need to define complex input-output implementations for the server via Flask.
2)Gradio is a deployment framework based on different control elements. During usage, it is necessary to call various Gradio components to complete the interface design and specify the trigger conditions, function call logic, and the data flow logic between different components for each element. Users can refer to the main code in rkllm_server/gradio_server.py to understand the specific implementation of RKLLM-Server-Gradio, and by modifying the initialization definitions for the RKLLM model within it, they can implement different custom models. Additionally, users can refer to the deployment example of the RKLLM-Server-Gradio to deploy their own custom server.
3.4.2.3 Client: RKLLM-Server-Gradio Usage Instructions
After successfully deploying the RKLLM-Server-Gradio on a Linux development board, users can access it via two methods: “Interface Access” and “API Access”.
1) Interface Access: Upon successfully starting the RKLLM-Server-Gradio with the one-click deployment script, users can directly access the RKLLM model for quick interaction by opening any web browser on a computer within the current local area network and navigating to “board_IP:8080” (e.g., “172.16.10.178:8080” as shown in Figure 3-2). Gradio automatically integrates Markdown, HTML, and other syntaxes, adapting to the format of the RKLLM model’s output results, such as code snippets and Markdown text. Additionally, during the setup of RKLLM-Server, an access queue is initiated. When multiple users interact with the RKLLM-Server simultaneously, the inputs are processed and returned in the order they were submitted. It’s important to note that when a user’s interaction with the RKLLM- Server is in the inference state (i.e., the dialogue box is highlighted), the server will not accept the user’s next input until the current inference is completed.
2) API Access: In the rkllm_server_demo directory, chat_api_gradio.py is provided. After installing gradio_client on the PC (using the command: pip install gradio_client), users can interact with the RKLLM-Server solely through the API interface without relying on the graphical interface, as shown in
following Figure. Before using chat_api_gradio.py, it’s important to modify the IP address in the code to match the current IP address of the development board, as shown in the following code.
from gradio_client import Client
client = Client("http://172.16.10.xx:8080/")
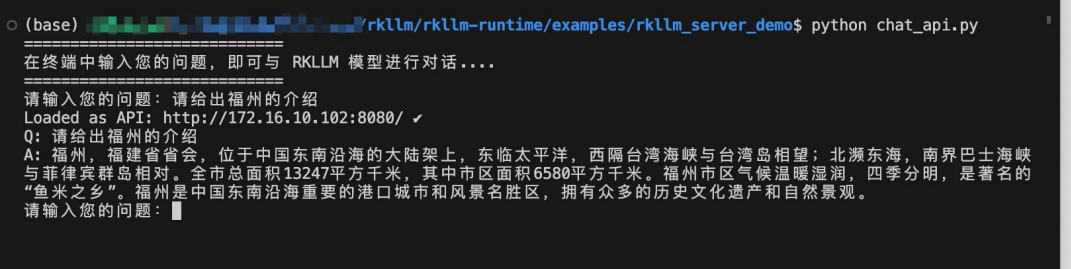
Copyable transcription of the original log (not an ArmSoM measurement; blurred account not reconstructed):
(base) [原图已模糊 / blurred in original]/rkllm/rkllm-runtime/examples/rkllm_server_demo$ python chat_api.py
===========================
在终端中输入您的问题,即可与 RKLLM 模型进行对话....
===========================
请输入您的问题: 请给出福州的介绍
Loaded as API: http://172.16.10.102:8080/ ✓
Q: 请给出福州的介绍
A: 福州,福建省省会,位于中国东南沿海的大陆架上,东临太平洋,西隔台湾海峡与台湾岛相望;北濒东海,南界巴士海峡与菲律宾群岛相对。全市总面积13247平方千米,其中市区面积6580平方千米。福州市气候温暖湿润,四季分明,是著名的“鱼米之乡”。福州是中国东南沿海重要的港口城市和风景名胜区,拥有众多的历史文化遗产和自然景观。
请输入您的问题:
Figure 3-7 Access the RKLLM-Server-Gradio via API calls in terminal Users can choose between the two client invocation methods based on their specific needs. For instance, when providing interactive services within a local area network, it’s recommended to use the interface access method. On the other hand, if customizing access behaviors to RKLLM-Server-Gradio is required, it’s advisable to use API Access for further development. Lastly, it’s important to note that in the implementation of RKLLM-Server-Gradio, there isn’t a definition of data structures for sending and receiving data similar to OpenAI-API. Therefore, this deployment implementation is not compatible with the OpenAI-API interface. When conducting further development, users should refer to the specific function implementation in chat_api_gradio.py. If compatibility with the OpenAI-API interface is required, please refer to the implementation of RKLLM- Server-Flask.
4 Reference
RKLLM: https://github.com/airockchip/rknn-llm RKNN: https://github.com/airockchip/rknn-toolkit2
Original-source link index
developer.arm.com: 10-2-2020-11