
This article retains the technical body of RK-YH-YF-501, Factory Test Tool Instructions V3.0. The source records compatibility with Android 4.4 and later and Android Q support, but its calculator entry refers to V4.0; that discrepancy is retained. For ArmSoM this is a Rockchip Android SDK platform reference: verify the board, SoC, BSP, tool and kernel versions. LED, key and Framework behavior requires product adaptation; no ArmSoM hardware test was performed. All three figures come from the Chinese PDF; no separate English figures were supplied. See the official ArmSoM documentation.
1 Overview
The tool checks production devices and long-running aging stability. A USB drive or SDCard triggers testing of a PCBA or complete device running full firmware. Functional tests cover WIFI, BT, LAN, SD, USB, HDMI, left/right audio, keys, LED and CVBS. Aging tests cover Cpu, Vpu, Gpu and Memory.
2 Functional tests
2.1 Interface preview
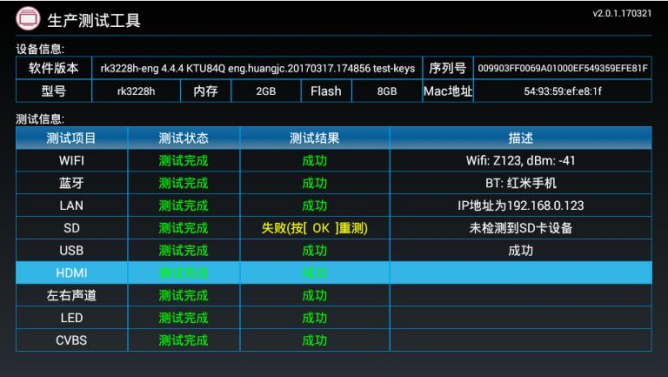
Functional-test interface, Chinese source p. 6.
2.2 Configuration
Create Factory_Test.ini. Set an item’s activated to 0 to disable it or 1 to enable it. Every item supports the test_key retest shortcut: test_key = 1 means pressing remote-control key 1 retests failed items. Parameters and source comments below are preserved, including repeated comment slashes.
[WIFI]
activated = 1 //是否启用该测试项,1:开启, 0:禁用
wifi_ap = zhangwen //测试使用的 Wifi Ap 名称
password = //Wifi Ap 密码
connect = 1 //是否连接 wifi 测试,1:连接 AP, 0:不连接
db_start = -30 //信号强度范围
db_end = -70 //信号强度范围

[BT]
activated = 1 //是否启用该测试项,1:开启, 0:禁用
bt_name = //配置指定蓝牙名称,默认为空

[LAN]
activated = 1 ////是否启用该测试项,1:开启, 0:禁用
[SD]
activated = 1 ////是否启用该测试项,1:开启, 0:禁用
[USB]
activated = 1 ////是否启用该测试项,1:开启, 0:禁用
[HDMI]
activated = 1 ////是否启用该测试项,1:开启, 0:禁用
[CHNL]
activated = 1 ////是否启用该测试项,1:开启, 0:禁用
[LED]
activated = 1 ////是否启用该测试项,1:开启, 0:禁用
[REST]
activated = 1 ////是否启用该测试项,1:开启, 0:禁用
[CVBS]
activated = 1 ////是否启用该测试项,1:开启, 0:禁用
WIFI parameters: wifi_ap is the AP name, password is its password, and connect = 1 connects to the AP while 0 does not. db_start and db_end define the signal-strength range. BT bt_name specifies a Bluetooth device name and defaults to empty. CHNL is left/right audio; REST is the source’s section name for RESET testing.
2.3 Encrypt the configuration
Run EncryptTool in the EncryptTool directory, click Encrypt and select Factory_Test.ini. The tool creates Factory_Test_Signed.bin in the same directory; rename it to Factory_Test.bin.
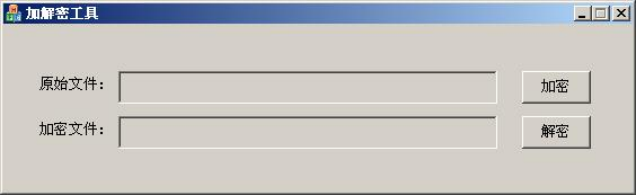
EncryptTool, Chinese source p. 8.
2.4 Start functional testing
Copy Factory_Test.bin to the root of the SDCard or USB drive. Inserting it into the device automatically starts functional testing.
2.5 Test behavior
| Item | Decision and notes |
|---|---|
| Wifi | Automatically searches for the configured AP, connects if configured, determines and displays the result; failure reasons appear in remarks. |
| Bluetooth | Automatically searches Bluetooth devices. If a name is configured that device must be found; otherwise any discovered Bluetooth device passes. The interface displays the result. |
| Lan | Automatically obtains an IP address to determine and display the result. |
| SDCard | Automatically verifies file reads/writes and displays the result. |
| USB | Automatically verifies file reads/writes; remarks list individual results when multiple USB ports exist. |
| HDMI | Manually inspect the automatically played video. Normal playback without stray lines or other defects passes. Default source: /sdcard/Aging_Test_Video.mp4. |
| CVBS | Manually verify that automatic switching to CVBS turns the HDMI screen off and displays on the CVBS screen. |
| CHNL | Listen manually: male voice on the left and female voice on the right passes. |
| LED | Manually observe regular LED blinking. This is product-specific: add a kernel LED control node or set the new node path in persist.sys.leds_path. |
| RESET | Hold RESET on the rear of the board. A pass dismisses the dialog and displays success. Product-specific key mapping is required. |
The displayed Mac address defaults to the Ethernet address.
3 Aging tests
3.1 Interface preview
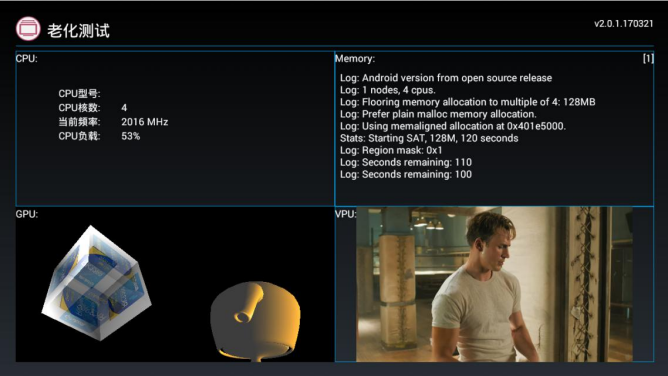
Aging-test interface, Chinese source p. 11.
3.2 Configuration
Create Aging_Test.ini. The interlock controls whether functional tests must pass first. For volume production, embed videos in firmware under system/usr/ or /sdcard/ to avoid copying them onto many USB drives or SDCards.
The body says V4.0 and later can open the aging screen by entering 000.= in the Android calculator. This differs from the V3.0 cover; check the actual tool. Videos must already exist or VPU aging cannot start. The two defaults are /sdcard/Aging_Test_Video.mp4 and /sdcard/Aging_Test_Video_Float.mp4; sources under system/usr/ take precedence.
[FactoryTest]
required = 0 ////是否必须要通过功能测试后,才能进行老化测试。
///// 1:必须通过功能测试, 0:不必通过功能测试
required = 1 requires a functional-test pass; 0 does not.
3.3 Encrypt the configuration
Follow the functional-test encryption procedure; the final file is Aging_Test.bin.
3.4 Start aging
Place Aging_Test.bin in the SDCard/USB-drive root and insert it to start automatically. Red and green LEDs flash together while starting. Six seconds after an abnormal program exit both remain lit; on test errors both turn off. These LED states require product-specific configuration.
3.5 Exit aging
To avoid accidental remote-control exits, press HOME to return to the desktop. This is not generic and requires matching SDK Framework changes.
4 Serial-number provisioning
4.1 Configuration
Create SN_Test.ini. adb_enable = 1 enables ADB; 0 disables it.
[ADB]
adb_enable = 1 //开启或关闭 ADB 1:开启,0:关闭
4.2 Encrypt the configuration
Use the functional-test encryption procedure to produce SN_Test.bin.
4.3 Enable provisioning
Place SN_Test.bin in the SDCard/USB-drive root. Inserting it automatically enables ADB for an external serial-number writing tool. Another tool writes the number; this operation only enables ADB and can be customized.
If all three configuration files share one USB drive, only functional testing starts by default.