
ArmSoM platform reference: this article presents the full technical content of the manufacturer RK3576 Android 14 SDK V1.0.0 guide, not a hardware-validated ArmSoM flashing procedure. Check the SoC, schematic, DTS, SDK release and storage layout before adaptation. No hardware testing was performed; source screenshots, performance advice and examples are not ArmSoM measurements. Back up before flashing or partition changes. Original code identifiers and historical examples are preserved; important source differences and risks are listed at the end.
Code blocks are line-by-line source transcriptions retaining PDF wrapping, typographic quotes and dashes. Long commands/patches may be wrapped and must not be pasted blindly. For example, the appendix joins two update-alternatives commands into --config javasudo; check sudo update-alternatives --config java and sudo update-alternatives --config javac separately. Linux_Upgrade_Tool_v2.26 in help output is an old example; the RK3576 requirements specify at least 2.30.
Downloading and building the RK3576 Android 14 SDK
Downloading the source code
Download address
repo init --repo-url https://gerrit.rock-chips.com:8443/repo-release/tools/repo
-u https://gerrit.rock-chips.com:8443/Android_U/manifests -b rk3576 -m
Android14.xml
If you request Express permission, then the download address is as follows:
repo init --repo-url https://gerrit.rock-chips.com:8443/repo-release/tools/repo
-u https://gerrit.rock-chips.com:8443/Android_U/manifests -b rk3576 -m
Android14_Express.xml
Download server mirroring
repo init --repo-url https://gerrit.rock-chips.com:8443/repo-release/tools/repo
-u https://gerrit.rock-chips.com:8443/Android_U/manifests -b rk3576 -m
Android14.xml --mirror
If you request Express permission, then the download address is as follows:
repo init --repo-url https://gerrit.rock-chips.com:8443/repo-release/tools/repo
-u https://gerrit.rock-chips.com:8443/Android_U/manifests -b rk3576 -m
Android14_Express.xml --mirror
Note: repo is a script invoking git developed by Google using Python script, and mainly used to download, manage Android project software lib. The download address is as follows:
git clone https://gerrit.rock-chips.com:8443/repo-release/tools/repo
Generally, Rockchip FAE contact will provide the initial compressed package of the corresponding version SDK in order to help customers acquire SDK source code quickly. Take Rockchip_Android14.0_SDK_RELEASE.tar.gz.* as an example, you can sync the source code through the following command after getting the initial package:
mkdir RK3576_Android14.0_SDK_RELEASE
cat RK3576_Android14.0_SDK_RELEASE.tar.gz* | tar -zx -C
RK3576_Android14.0_SDK_RELEASE
cd RK3576_Android14.0_SDK_RELEASE
.repo/repo/repo sync -l
.repo/repo/repo sync -c
Set up your own repo code server
Environment
You can install openssh-server for remote login, git for project management, and keychain for public key and private key management tools.
sudo apt-get install openssh-server git keychain
Set up gitolite
Server-side operation
Take server address: 10.10.10.206 as an example for description.
- create git account:
sudo adduser --system --shell /bin/bash --group git
sudo passwd git
-
Log in to the server as a ‘git’ account;
-
Make sure that ‘~/.ssh/authorized_keys’ is empty or non-existent;
-
Copy the server administrator’s public key to ‘~/ yourname.pub’;
-
Download gitolite source code;
git clone https://github.com/sitaramc/gitolite.git
- Create bin directory in git user directory;
mkdir -p ~/bin
- Please execute following commands to install gitolite, and the installation method is different for different versions. Please refer to the documentation in source code:
gitolite/install -to ~/bin
- Set the administrator.
~/bin/gitolite setup -pk YourName.pub
Client-side operation
- Clone gitolite management warehouse of the server;
git clone ssh://git@10.10.10.206/gitolite-admin.git
- Add user’s public key to the gitolite directory;
cp username.pub keydir/username.pub
- Add an administrator user.
vi conf/gitolite.conf
@admin = admin1 admin2 admin3
repo gitolite-admin
RW+     =   @admin
Set up repo mirror
Server-side operation
-
Log in to the server as a ‘git’ account;
-
Download the repo tool in the root directory;
git clone https://gerrit.rock-chips.com:8443/repo-release/tools/repo
- Create a new RK_Android14_mirror directory;
mkdir RK_Android14_mirror
- Enter the RK_Android14_mirror directory;
cd RK_Android14_mirror
- Download RK Android14 SDK mirror;
repo init --repo-url https://gerrit.rock-chips.com:8443/repo-release/tools/repo
-u https://gerrit.rock-chips.com:8443/Android_U/manifests -b rk3576 -m
Android14.xml --mirror
- Create warehouse group permissions.
.repo/repo/repo list -n > android_u.conf
sed -i 's/^/@android_t = RK_Android14_mirror\/&/g' android_u.conf
Client-side operation
-
Copy android_u.conf on the server-side to ·gitolite-admin/conf/· on the client-side;
-
Add group permissions.
vi conf/android_u.conf
@usergroup = user1 user2 user3
repo @android_u
R   = @usergroup
RW+ = @admin
vi conf/gitolite.conf
include "android_u.conf"
- Create your own new manifests warehouse.
vi conf/android_u.conf
@android_u = Android_T/manifests_xxx
Client-side operation
- Download manifests_xxx warehouse on the client-side; Download manifests_xxx.git warehouse on other client-side
git clone ssh://git@10.10.10.206/Android_u/manifests_xxx.git
- Download original manifests warehouse on the client-side;
git clone ssh://git@10.10.10.206/Android_U/manifests.git
- Submit manifest.xml file to manifest_xxx warehouse created newly; Copy the files below original manifests to the manifests_xxx
cd manifests_xxx
cp -rf manifests/*.xml manifests_xxx/
check copy files
git status

 Android14.xml
 Android14_Express.xml
 default.xml
 include/rk3576_repository.xml
 include/rk_checkout_from_aosp.xml
 include/rk_modules_repository.xml
 remote.xml
 remove_u.xml
 remove_unused.xml
Local commits
git add -A
git commit -m "init xxx"
Push to the remote branch
git push origin master:master
- Create your own code download link. Download the repo tool in the root directory
git clone https://gerrit.rock-chips.com:8443/repo-release/tools/repo
After following the above steps, your own code download link is as follows
mkdir Android14
cd Android14
~/repo/repo init -u ssh://git@10.10.10.206/Android_U/manifests_xxx.git -m
Android14.xml
Thereinto: //10.10.10.206 which is your server address You can complete your own repo server set-up with above steps, and you can share your code server links with colleagues to work together.
Code management
After setting up the code server with above steps, most of the code warehouses use the default branches of RK. If some warehouses need to modify their own codes, you can refer to the following steps for operation.
Switch your own code branches
- Enter the code warehouse that needs to be modified, and we take the kernel directory as an example to illustrate;
cd kernel-6.1
- Switch a local branch;
git checkout remotes/m/master -b xxx_branch
- Push xxx_branch to remote server;
git push rk29 xxx_branch:xxx_branch
Thereinto, rk29 is remote, which can be completed automatically by tab key directly
- Enter .repo/manifests directory and modify the branch which is appointed by manifest; Enter .repo/manifests directory, and you can find the manifest location corresponding to the kernel warehouse by grep kernel
cd .repo/manifests
--- a/include/rk_modules_repository.xml
+++ b/include/rk_modules_repository.xml
@@ -10,7 +10,7 @@
   <project path="hardware/rockchip/libgraphicpolicy"
name="rk/hardware/rk29/libgraphicpolicy" remote="rk"
revision="refs/tags/android-1s.0-mid-rkr1" />
   <project path="hardware/rockchip/libhwjpeg" name="rk/hardware/rk29/libhwjpeg"
remote="rk" revision="refs/tags/android-14.0-mid-rkr1"/>
   <project path="u-boot" name="rk/u-boot" remote="rk"
revision="refs/tags/android-14.0-mid-rkr1"/>
-  <project path="kernel" name="rk/kernel" remote="rk29"
revision="refs/tags/android-14.0-mid-rkr1"/>
+  <project path="kernel" name="rk/kernel" remote="rk29" revision="xxx_branch"/>

   <project path="bootable/recovery/rkupdate"
name="platform/bootable/recovery/rk_update" remote="rk"
revision="refs/tags/android-14.0-mid-rkr1"/>
   <project path="bootable/recovery/rkutility"
name="platform/bootable/recovery/rk_utility" remote="rk"
revision="refs/tags/android-14.0-mid-rkr1"/>
- Submit the modified manifest to the remote branch.
git add include/rk_modules_repository.xml
git commit -m "change kernel branch on xxx_branch"
git push origin default:master
After submitting manifests warehouse, other colleagues can synchronize the kernel codes of your own branches.
Code modification submittal
After switching branches according to the steps above, you can commit your modification on your branches and push them directly to the xxx_branch.
Synchronize RK codes
- It’s required to synchronize RK codes on the server-side;
cd RK_Android14_mirror
.repo/repo/repo sync -c
- The manifests that RK modifies are combined by client-side; Download the original manifests warehouse of RK;
git clone //10.10.10.206/wlq/test/manifests.git
The manifests (RK original) and the manifests_xxx (yourselves) are compared with the contrast tools to combine the different parts that RK modifies to your own warehouses (mainly modify the tag, adding and removing the warehouse, etc) After comparing and confirming, the modification will be pushed to the manifests_xxx. You can also confirm which warehouses are modified in this step, and in the next step you will combine the modified warehouses.
- The directories switched branches by yourselves need to push the merge that RK modifies to your own branches manually. Take kernel as an example: Check the pointed remote branches at present
wlq@wlq:~/home1/test2/kernel-6.1$ git branch -av
* android-11.0-mid-rkr7   0bde59fad73a ARM: configs: rockchip_defconfig enable
ION_CMA_HEAP
  xxx_branch              0bde59fad73a ARM: configs: rockchip_defconfig enable
ION_CMA_HEAP
  remotes/m/master        -> rk29/xxx_branch
  remotes/rk29/xxx_branch 0bde59fad73a ARM: configs: rockchip_defconfig enable
ION_CMA_HEAP
You can find that the branch pointed at present is: remotes/m/master -> rk29/xxx_branch Create a local branch (switch from your own remote branch)
git checkout remotes/m/xxx_branch -b local_xxx_branch
Check latest TAG published currently by RK
wlq@wlq:~/home1/test2/kernel$ git tag | grep rkr
android-10.0-mid-rkr1
android-10.0-mid-rkr10
android-10.0-mid-rkr11
android-10.0-mid-rkr13
android-10.0-mid-rkr2
android-10.0-mid-rkr3
android-10.0-mid-rkr4
android-10.0-mid-rkr5
android-10.0-mid-rkr6
android-10.0-mid-rkr7
android-10.0-mid-rkr8
android-10.0-mid-rkr9
android-11.0-ebook-rkr1
android-11.0-ebook-rkr2
android-11.0-ebook-rkr3
android-11.0-ebook-rkr4
android-11.0-ebook-rkr5
android-11.0-ebook-rkr6
android-11.0-mid-rkr1
android-11.0-mid-rkr2
android-11.0-mid-rkr3
android-11.0-mid-rkr4
android-11.0-mid-rkr4.1
android-11.0-mid-rkr5
android-11.0-mid-rkr6
android-11.0-mid-rkr7
android-11.0-mid-rkr7-prev
android-11.0-mid-rkr8
android-14.0-mid-rkr1
You can find the latest tag of Android14 currently is android-14.0-mid-rkr1 combine android-14.0-mid-rkr1 to the local branch
git merge android-14.0-mid-rkr1
Check if there is a conflict. If there is a conflict, resolve the conflict firstly. You can execute the next step when there is no conflict. push the codes which have been combined to the remote branch
git push rk29 local_xxx_branch:xxx_branch
The other directories swiched can be combined and submitted in this way
kernel Code path description
Android14 supports version 6.1 of the kernel, kernel source code in the project kernel-6.1 directory,
Code compiling
Lunch item Description
| lunch item | chipest adapted | other description |
|---|---|---|
| rk3576_u-user | RK3576 | Suitable for Android 14 products, compatible with RK3576 development board hardware, compiled as user version, used in production, Android system supports 64-bit and 32-bit |
| rk3576_u-userdebug | RK3576 | Suitable for Android 14 products, hardware adapted for RK3576 development board, compiled as userdebug version, used for development and debugging, Android system supports 64-bit and 32-bit |
One key compiling command
./build.sh -UKAup
( WHERE: -U = build uboot
       -C = build kernel with Clang
       -K = build kernel
       -A = build android
       -p = will build packaging in IMAGE
       -o = build OTA package
       -u = build update.img
       -v = build android with 'user' or 'userdebug'
       -d = huild kernel dts name
       -V = build version
       -J = build jobs
   ------------you can use according to the requirement, no need to record
uboot/kernel compiling commands------------------
 )

============================================================
Please remember to set the environment variable before using the one key
compiling command, and select the platform to be compiled, for example:
source build/envsetup.sh
lunch rk3588_t-userdebug
============================================================
Compiling command summary
| Soc | type | The reference model | Android | one key compiling | kernel compiling | uboot compiling |
|---|---|---|---|---|---|---|
| RK3576 | EVB | rk3576-evb1-v10 | build/envsetup.sh;lunch rk3576_u-userdebug | ./build.sh -AUCKu | ./build.sh -K | ./build.sh -U |
GKI
To enable GKI (Generic Kernel Image) functionality on the RK3576 platform, follow these steps:
wlq@sys2206:~/b0_A14_bringup/device/rockchip/rk3576$ git diff
diff --git a/rk3576_u/BoardConfig.mk b/rk3576_u/BoardConfig.mk
index eb52fb6..f59df62 100755
--- a/rk3576_u/BoardConfig.mk
+++ b/rk3576_u/BoardConfig.mk
@@ -14,7 +14,7 @@
 # limitations under the License.
 #
 BUILD_WITH_GO_OPT := false
-BOARD_BUILD_GKI := false
+BOARD_BUILD_GKI := true

 BOARD_GRAVITY_SENSOR_SUPPORT := true
After BOARD_BUILD_GKI := false, the AB function will close automatically. Please refer to the document about GKI details: RKDocs/android/《Rockchip_Developer_Guide_Android14_GKI_CN》
Other compiling instruction
Android14.0 cannot directly flash kernel.img and resource.img
The following compilation is only applicable for non-GKI. For GKI, please refer to the document RKDocs/android/《Rockchip_Developer_Guide_Android14_GKI_CN》. The kernel.img and resource.img of Android 14.0 are included in the boot.img. To compile the kernel, use the build.sh -AK command. After compilation, burn the boot.img under rockdev. This process involves recompiling Android, so compilation time will be relatively long. It is recommended to use the following method to compile the kernel separately. Compile Kernel Separately to Generate boot.img Principle of compilation: Replace the compiled kernel.img and resource.img in the kernel directory with the old boot.img. Taking the RK3576 prototype as an example, replace the corresponding boot.img and DTS during compilation. Here, BOOT_IMG=../rockdev/Image-rk3576_u/boot.img specifies the path of the old boot.img. The command is as follows: Export clang to the environment
cd kernel-6.1
export PATH=../prebuilts/clang/host/linux-x86/clang-r487747c/bin:$PATH
alias msk='make CROSS_COMPILE=aarch64-linux-gnu- LLVM=1 LLVM_IAS=1'
rk3576:
msk ARCH=arm64 rockchip_defconfig android-14.config rk3576.config && msk
ARCH=arm64 BOOT_IMG=../rockdev/Image-rk3576_u/boot.img rk3576-evb1-v10.img -j32
You can flash boot.img under the catalogue of kernel-6.1 directly to boot position of machine after compiling, and please load the partition table(parameter.txt) when flashing, for fear of flashing to the wrong place.
Image flashing
Image flashing tool
Android14 requires to update the USB driver DriverAssitant to V5.1.1 version. You can refer to the tool instruction chapter to do the upgrade. Windows flashing tool: The firmware burning tool for the RK3576 platform on Windows requires the use of version
3.28 or above.
RKTools/windows/AndroidTool/AndroidTool_Release_v3.28
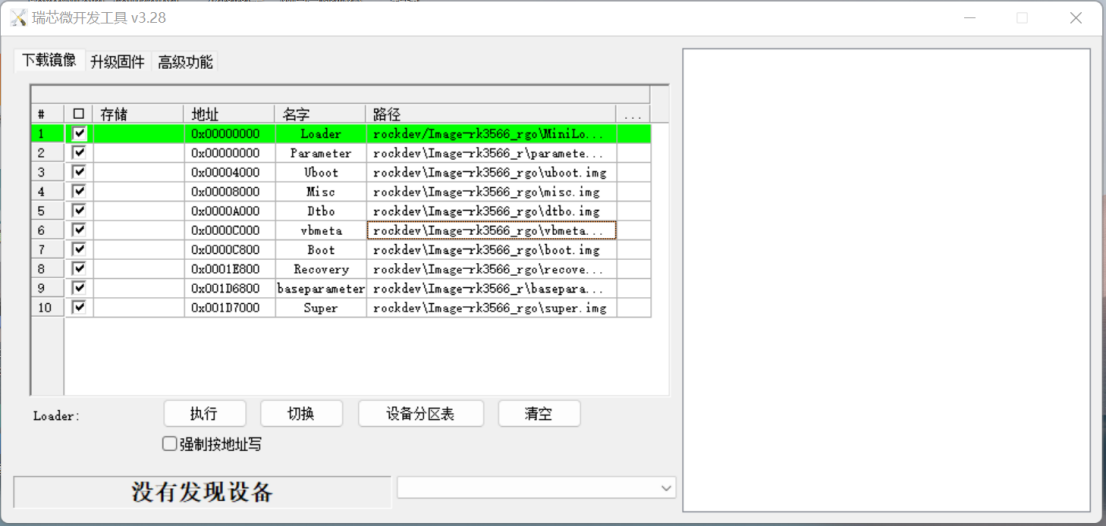
Linux flashing tool: firmware flashing on the RK3576 platform requires Linux Upgrade Tool version 2.30 or later. Tool location: RKTools/linux/Linux_Upgrade_Tool/Linux_Upgrade_Tool_v2.30.
There are more details in the tool instruction chapter.
Image instruction
After complete compiling, it will generate the following files:
rockdev/Image-rk3576_u/
├── boot-debug.img
├── boot.img
├── config.cfg
├── dtbo.img
├── MiniLoaderAll.bin
├── misc.img
├── parameter.txt
├── pcba_small_misc.img
├── pcba_whole_misc.img
├── recovery.img
├── resource.img
├── super.img
├── uboot.img
├── update.img
└── vbmeta.img
Just flash the following files:
rockdev/Image-rk3576_u/
├── boot.img
├── dtbo.img
├── MiniLoaderAll.bin
├── misc.img
├── parameter.txt
├── recovery.img
├── super.img
├── uboot.img
└── vbmeta.img
or you can directly flash update.img
Image instruction
| Image | Instruction |
|---|---|
| boot.img | including ramdis、kernel、dtb |
| boot-debug.img | the difference between boot.img and boot-debug.img is that user image can flash this boot.img to do root operation |
| dtbo.img | Device Tree Overlays refer to dtbo chapter instruction later |
| config.cfg | the configuration file of the flash tool, you can directly load the options required to be flashed for the flash tool |
| MiniLoaderAll.bin | including first level loader |
| misc.img | including recovery-wipe boot symbol information, after flashing it will enter recovery |
| parameter.txt | including partition information |
| pcba_small_misc.img | including pcba boot symbol information, after flashing it will enter the simple pcba mode |
| pcba_whole_misc.img | including pcba boot symbol information, after flashing it will enter the complete pcba mode |
| recovery.img | including recovery-ramdis、kernel、dtb |
| super.img | including the contents of odm、vendor、system partitions |
| trust.img | including BL31、BL32 which are not generated for RK3566/RK3568, no need to flash |
| uboot.img | including uboot image |
| vbmeta.img | including avb verification information, used for AVB verification |
| update.img | including the above img files to be flashed, can be used for the tool to directly flash the whole image package |
Generic Kernel Image(GKI)
All the Android 14 products certificating GMS and EDLA are forced to use GKI for kernel, please refer to the document for GKI configuration and compiling: RKDocs/android/Rockchip_Developer_Guide_Android14_GKI_CN.pdf
Use fastboot to flash dynamic partition
The new device with R supports dynamic partition, and already removessystem/vendor/odm/product/system_ext partitions. Please flash super.img. Use fastbootd can flash system/vendor/odm alone. The version of adb and fastboot should be the latest. SDK provides the compiled tool package:
RKTools/linux/Linux_adb_fastboot (Linux_x86 version)
RKTools/windows/adb_fastboot (Windows_x86 version)
Use the command to flash dynamic partition:
adb reboot fastboot
fastboot flash vendor vendor.img
fastboot flash system system.img
fastboot flash odm odm.img
Note: After entering fastbootd mode, relative information of the device will be displayed on the screen, as shown below:
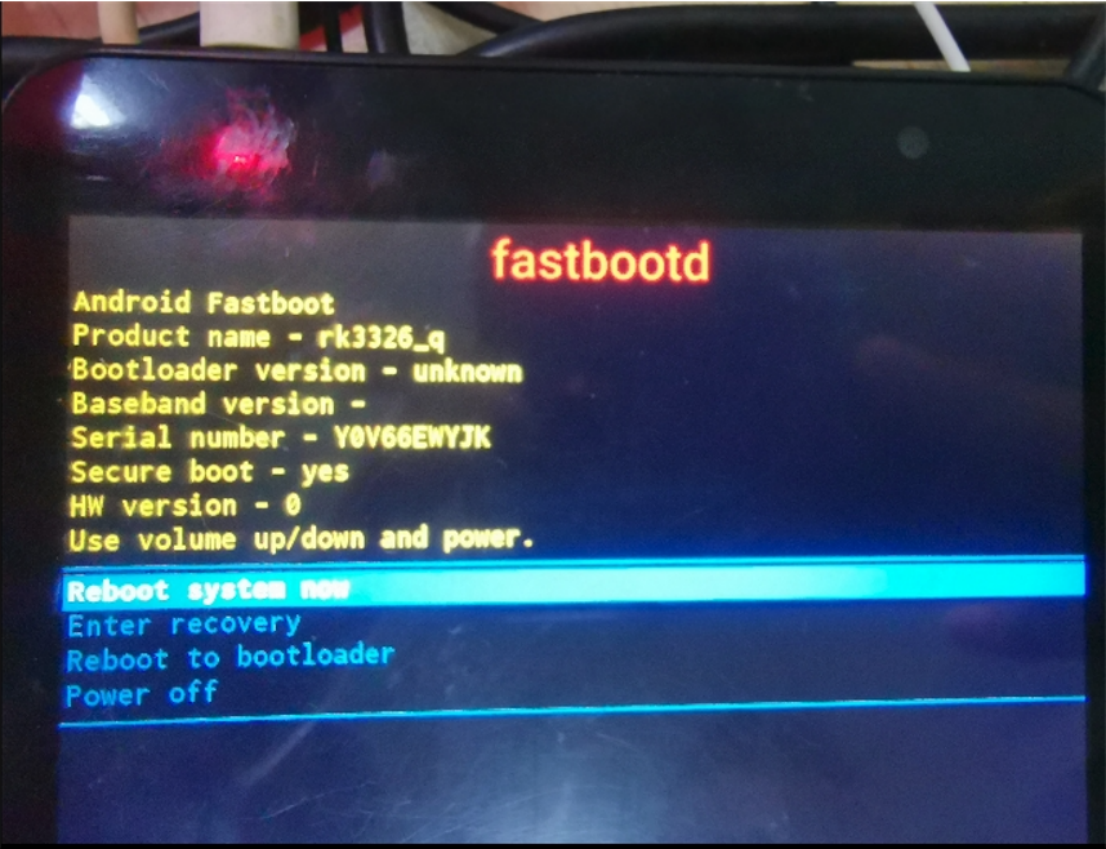
Note: please enter bootloader when using fastboot in the non-dynamic partition:
adb reboot bootloader
The way to flash GSI:
After the device is unlocked, enter fastbootd, only need to flash system.img of GSI and misc.img of the image, and after flashing it will enter recovery to do factory reset. Attach the complete flashing process as below:
- Reboot to bootloader, lock->unlock the device:
adb reboot bootloader
fastboot oem at-unlock-vboot ## for the customers already flashing avb public
key, please refer to the corresponding document to unlock.
- Reset to factory setting, reboot to fastbootd:
fastboot flash misc misc.img
fastboot reboot fastboot  ## now it will enter fastbootd
- Start to flash GSI
fastboot delete-logical-partition product  ## (optional) for the device with
small partition space, you can execute this command to delete product partition
first and then flash GSI
fastboot flash system system.img
fastboot reboot  ## after flashing successfully, reboot the device
Use DSU(Dynamic System Updates) to flash GSI, and current Rockchip platform already supports DSU by default. As this function requires large memory, it is not recommended to use on the device with 1G DDR or less. For the instruction and usage of DSU, please refer to Android official website: https://source.android.com/devices/tech/ota/dynamic-system-updates Note 1: when testing VTS, need to flash the compiled boot-debug.img to boot partition. Note 2: when testing CTS-ON-GSI, no need to flash boot-debug.img. Note 3: please use GSI image ended with -signed released by Google for testing.
DTBO function
Android 10.0 and above versions support Device Tree Overlays function, which requires to flash dtbo.img during development, and is compatible with multiple products. The modification method:
- Find (or specify) the template file:
get_build_var PRODUCT_DTBO_TEMPLATE
For example:
PRODUCT_DTBO_TEMPLATE := $(LOCAL_PATH)/dt-
overlay.in(device/rockchip/rk576/rk3576_u/dt-overlay.in)
- Add or modify the required node: For example:
/dts-v1/;
/plugin/;
&chosen {
    bootargs_ext = "androidboot.boot_devices=${_boot_device}";
};

&firmware_android {
    vbmeta {
        status = "disabled";
    };
    fstab {
        status = "disabled";
    };
};

&reboot_mode {
    mode-bootloader = <0x5242C309>;
    mode-charge = <0x5242C30B>;
    mode-fastboot = <0x5242C303>;
    mode-loader = <0x5242C301>;
    mode-normal = <0x5242C300>;
    mode-recovery = <0x5242C303>;
};
Note: There must be alias in the dts when using dtbo, otherwise it cannot overlay successfully
Modify fstab file
- Fine (or specify) the template file:
get_build_var PRODUCT_FSTAB_TEMPLATE
For example:
PRODUCT_FSTAB_TEMPLATE := device/rockchip/common/scripts/fstab_tools/fstab.in
- Modify: add partition mounting, modify swap_zram parameter, modify data partition format and so on
Modify parameter.txt
Android 14 adds the tool that can generate parameter.txt, and support to compile parameter.txt according to the configuration parameters. If there is no configuration template file, it will find and add the modified parameter.txt file.
- Find (or specify) the template file:
get_build_var PRODUCT_PARAMETER_TEMPLATE
For example:
PRODUCT_PARAMETER_TEMPLATE :=
device/rockchip/common/scripts/parameter_tools/parameter.in
- Partition size configuration(example as below):
BOARD_SUPER_PARTITION_SIZE := 2688548864
BOARD_DTBOIMG_PARTITION_SIZE := xxxx
BOARD_BOOTIMAGE_PARTITION_SIZE := xxxxx
BOARD_CACHEIMAGE_PARTITION_SIZE := xxxx
- Not to use parameter generation tool: Just add a parameter.txt file to your device directory: For example:
device/rockchip/rk3576/rk3576_u/parameter.txt
- Only use the tool to generate parameter.txt(example as below):
parameter_tools --input
device/rockchip/common/scripts/parameter_tools/parameter.in --firmware-version
14.0 --machine-model rk3576 --manufacturer rockchip --machine rk3576_u --
partition-list
uboot_a:4096K,trust_a:4M,misc:4M,dtbo_a:4M,vbmeta_a:4M,boot_a:33554432,backup:30
0M,security:4M,cache:300M,metadata:4096,frp:512K,super:2G --output
parameter_new.txt
Note: If need to do the big version upgrade through OTA, please directly use the previous version’s parameter.txt
- Add a new partition Take baseparameter adding for example: Give a definition in the BoardConfig.mk of the product:BOARD_WITH_SPECIAL_PARTITIONS like: BOARD_WITH_SPECIAL_PARTITIONS := baseparameter:1M,logo:16M
device/rockchip/rk3576/rk3576_u/BoardConfig.mk
+++ b/BoardConfig.mk
@@ -494,4 +494,11 @@ ifeq ($(strip $(BOARD_TWRP_ENABLE)), true)
+BOARD_WITH_SPECIAL_PARTITIONS := baseparameter:1M
Add BOARD_WITH_SPECIAL_PARTITIONS to RebuildParameter.mk
device/rockchip/common/build/rockchip/RebuildParameter.mk
+ifneq ($(strip $(BOARD_WITH_SPECIAL_PARTITIONS)), )
+partition_list := $(partition_list),$(BOARD_WITH_SPECIAL_PARTITIONS)
+endif
Android common configuration
Create product lunch
Here are the steps to create a new product named “rk3576_new_u” based on the RK3576 platform:
-
Navigate to the device/rockchip/rk3576 directory.
-
Create a new directory named rk3576_new_u under the device/rockchip/rk3576 directory.
-
Refer to the existing rk3576_u product directory under device/rockchip/rk3576. You can start by copying the rk3576_u directory and renaming it to rk3576_new_u. You can use the following command to copy the directory:
cp -r rk3576_u rk3576_new_u
-
Once you have copied the directory, navigate into the rk3576_new_u directory.
-
Replace all occurrences of the string rk3576_u with rk3576_new_u in the files inside the rk3576_new_u directory. You can use tools like sed or manually edit the files to make the changes. For example, you can use sed command like this:
sed -i 's/rk3576_u/rk3576_new_u/g' *
This command will replace all occurrences of rk3576_u with rk3576_new_u in all files inside the rk3576_new_u directory.
- Once you have made the changes, your new product directory rk3576_new_u is ready for further customization and development.
Kernel dts instruction
Create new product dts
You can select the corresponding dts according to the configuration in the following table as reference to create new product dts.
| Soc | PMIC | Type | Model | DTS |
|---|---|---|---|---|
| RK3576 | RK806 | EVB | RK3576 EVB1 | rk3576-evb1-v10 |
| RK3576 | RK806 | EVB | RK3576 EVB1 + RK628 | rk3576-evb1-v10-rk628-hdmi2csi |
Patch release
Redmine system will release some important patches from time to time, the link is as follows:
https://redmine.rock-chips.com/projects/rockchip_patch/issues
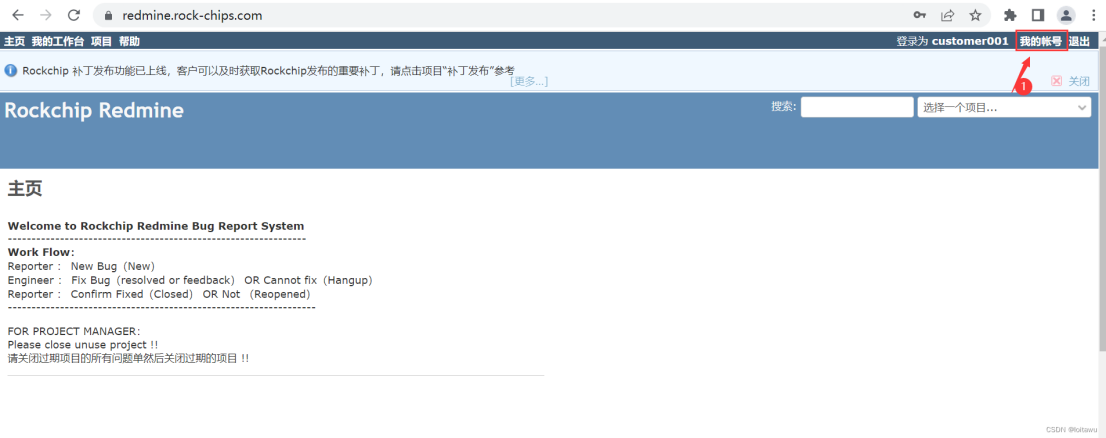
You can subscribe to receive real-time email notification of patch release in the following ways: Step 1: Log in to redmine system Log in to redmine system with redmine account registered with Rockchip.
Step 2: access my account
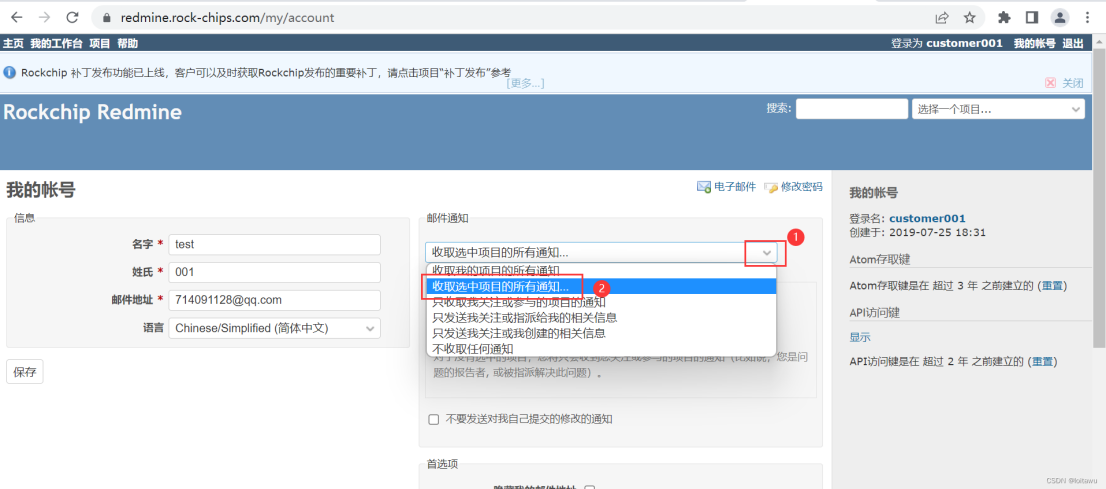
Step 3: Select an email notification type In the following figure, select the mail notification drop-down to receive all notifications for the selected items
Step 4: Select the project Check the patch release item as shown below and click Save
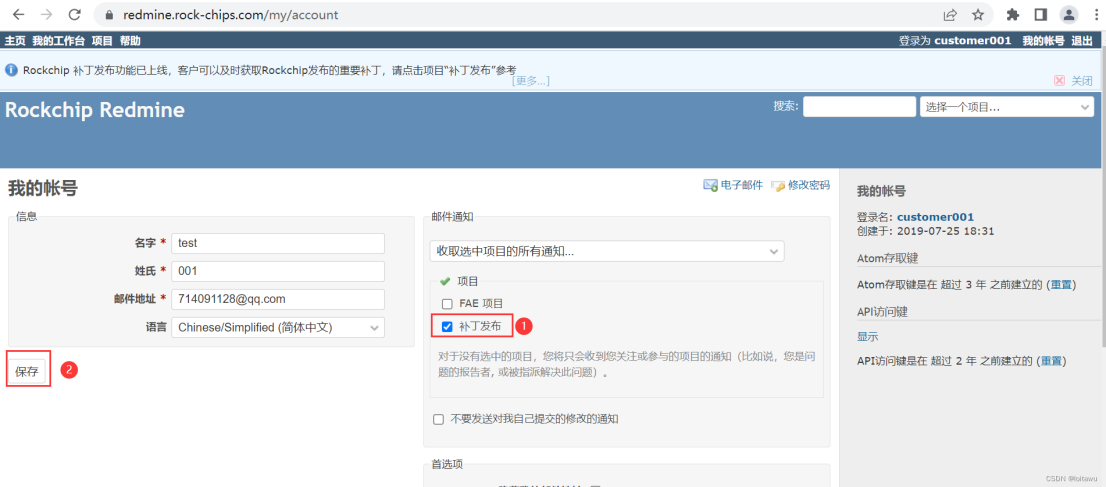
Done: After a successful subscription, Rockchip can receive email notifications when patches are released through the email address registered on redmine.
Document instruction
Peripheral support list
DDR/EMMC/NAND FLASH/WIFI/3G/CAMERA support lists keep updating in redmine, through the following link:
https://redmine.rockchip.com.cn/projects/fae/documents
Camera IQ Tool Document
external/camera_engine_rkaiq/rkisp2x_tuner/doc/
├── Rockchip_Color_Optimization_Guide_ISP2x_CN_v2.0.0.pdf
├── Rockchip_IQ_Tools_Guide_ISP2x_CN_v2.0.0.pdf
└── Rockchip_Tuning_Guide_ISP21_CN_v2.0.0.pdf
rknn-toolkit2 developing SDK and document
hardware/rockchip/rknn-toolkit2/doc/
RKDocs Instruction
RKDocs/
├── android
│ ├── Android11 异显开发说明.zip
│ ├── audio
│ │ └── Rockchip_Developer_Guide_Android_Multi_Audio_CN.pdf
│ ├── bt
│ │ └── Rockchip_Introduction_Android9.0_BT_Configuration_CN.pdf
│ ├── patches
│ │ └── root
│ │ ├── android11_root.pdf
│ │ └── RootChecker.apk
│ ├── Rockchip_Android14_GKI_Developer_Guide_CN.pdf
│ ├── Rockchip_Android14_SDK_Developer_Guide_CN.pdf
│ ├── Rockchip_Android14_SDK_Developer_Guide_EN.pdf
│ ├── Rockchip_Android_Remote_key_Provisioning_Guide.pdf
│ ├── Rockchip_Developer_Guide_Android11_Optimization_CN.pdf
│ ├── Rockchip_Developer_Guide_Android_AB_System_Upgrading_CN.pdf
│ ├── Rockchip_Developer_Guide_Android_Recovery_CN.pdf
│ ├── Rockchip_Developer_Guide_Android_SELinux(Sepolicy)CN.pdf
│ ├── Rockchip_Developer_Guide_PCBA_Test_Tool_V1.3_CN&EN.pdf
│ ├── Rockchip_Firmware_Upgrade_Failed_Analyze_Method_CN.pdf
│ ├── Rockchip_Introduction_Android_Application_Preinstallation_CN&EN.pdf
│ ├── Rockchip_Introduction_Android_Boot_Video_CN.pdf
│ ├── Rockchip_Introduction_Android_BOX_Display_Framework_Configuration_CN.pdf
│ ├── Rockchip_Introduction_Android_Factory_Reset_Protection_CN&EN.pdf
│ ├── Rockchip_Introduction_Android_Log_System.pdf
│ ├── Rockchip_Introduction_Android_Performance_Mode_CN&EN.pdf
│ ├──
Rockchip_Introduction_Android_Power_On_Off_Animation_and_Tone_Customization_CN&EN.pdf
│ ├── Rockchip_Introduction_Android_Samba_CN.pdf
│ ├── Rockchip_Introduction_Android_Widevine_Project_Start_Preparation_CN.pdf
│ ├── Rockchip_Introduction_Box_Media_Application_CN&EN.pdf
│ ├── Rockchip-Parameter-File-Format-Version1.4-CN.pdf
│ ├── Rockchip_User_Guide_Android_GMS_Configuration_CN.pdf
│ ├── Rockchip_User_Guide_Android_GMS_Configuration_EN.pdf
│ ├── Rockchip_User_Guide_Box_FactoryTestTool_V3.0_CN.pdf
│ ├── Rockchip_User_Guide_Dr.G_CN&EN.pdf
│ ├── Rockchip_User_Guide_Magisk_Installation_EN.pdf
│ ├── video
│ │ └── Rockchip_Android_Multimedia_FAQ_CN.pdf
│ └── wifi
│ ├── Rockchip_Introduction_REALTEK_WIFI_Driver_Porting_CN&EN.pdf
│ └── Rockchip_Introduction_WIFI_Configuration_CN&EN.pdf
└── common
├── Audio
│ ├── Rockchip_Developer_Guide_Android_EQ_DRC_CN.pdf
│ ├── Rockchip_Developer_Guide_Android_Multi_Audio_CN.pdf
│ ├──
Rockchip_Developer_Guide_Audio_Call_3A_Algorithm_Integration_and_Parameter_Debugging_CN.pdf
│ ├── Rockchip_Developer_Guide_Audio_CN.pdf
│ └── Rockchip_Developer_Guide_RK817_RK809_Codec_CN.pdf
├── camera
│ ├── common
│ │ └── Camera_External_FAQ_v1.0 .pdf
│ ├── HAL1
│ │ ├── README_CN.txt
│ │ ├── README_EN.txt
│ │ ├── RK312x_Camera_User_Manual_v1.4(3288&3368).pdf
│ │ ├── RK_ISP10_Camera_User_Manual_v2.3.pdf
│ │ ├── RKISPV1_Camera_Module_AVL_v1.7.pdf
│ │ ├── Rockchip_Camera_AVL_v2.0_Package_20180515.7z
│ │ ├── Rockchip_Introduction_RKISPV1_Camera_Driver_Debugging_Method_CN.pdf
│ │ ├── Rockchip_Introduction_RKISPV1_Camera_FAQ_CN.pdf
│ │ ├── Rockchip SOFIA 3G-R_PMB8018(x3_C3230RK)Camera_Module_AVL_v1.6_20160226.pdf
│ │ └── Rockchip_Trouble_Shooting_Android_CameraHAL1_CN_EN.pdf
│ ├── HAL3
│ │ ├── camera_engine_rkisp_user_manual_v2.2.pdf
│ │ ├── camera_hal3_user_manual_v2.3.pdf
│ │ ├── README_CN.txt
│ │ ├── RKCIF_Driver_User_Manual_v1.0.pdf
│ │ ├── RKISP1_IQ_Parameters_User_Guide_v1.2.pdf
│ │ ├── RKISP_Driver_User_Manual_v1.3.pdf
│ │ ├── Rockchip_Color_Optimization_Guide_ISP
│ │ │ ├── ISP21
│ │ │ │ └── CN
│ │ │ │ └── Rockchip_Color_Optimization_Guide_ISP21_CN_v2.0.1.pdf
│ │ │ ├── ISP30
│ │ │ │ └── CN
│ │ │ │ └── Rockchip_Color_Optimization_Guide_ISP30_CN_v3.0.0.pdf
│ │ │ └── ISP32-lite
│ │ │ └── CN
│ │ │ └── Rockchip_Color_Optimization_Guide_ISP32_Lite_CN_v3.1.0.pdf
│ │ ├── Rockchip_Development_Guide_3A_ISP
│ │ │ └── ISP30
│ │ │ └── CN
│ │ │ └── Rockchip_Development_Guide_3A_ISP30_v1.1.0.pdf
│ │ ├── Rockchip_Development_Guide_ISP
│ │ │ ├── ISP21
│ │ │ │ └── CN
│ │ │ │ └── Rockchip_Development_Guide_ISP21_CN_v2.1.0.pdf
│ │ │ ├── ISP30
│ │ │ │ └── CN
│ │ │ │ └── Rockchip_Development_Guide_ISP30_CN_v1.2.3.pdf
│ │ │ └── ISP32-lite
│ │ │ └── CN
│ │ │ └── Rockchip_Development_Guide_ISP32_Lite_CN_v1.0.0.pdf
│ │ ├── Rockchip_Driver_Guide_VI
│ │ │ ├── CN
│ │ │ │ └── Rockchip_Driver_Guide_VI_CN_v1.1.4.pdf
│ │ │ └── EN
│ │ │ └── Rockchip_Driver_Guide_VI_EN_v1.0.7.pdf
│ │ ├── Rockchip_IQ_Tools_Guide_ISP
│ │ │ ├── ISP21
│ │ │ │ └── Rockchip_IQ_Tools_Guide_ISP2x_CN_v2.0.3.pdf
│ │ │ ├── ISP30
│ │ │ │ └── Rockchip_IQ_Tools_Guide_ISP21_ISP30_CN_v2.0.4.pdf
│ │ │ └── ISP32-lite
│ │ │ └── CN
│ │ │ └── Rockchip_IQ_Tools_Guide_v2.0.7_CN.pdf
│ │ ├── Rockchip_Trouble_Shooting_CameraHAL3_CN_EN.pdf
│ │ ├── Rockchip_Tuning_Guide_ISP
│ │ │ ├── ISP21
│ │ │ │ └── CN
│ │ │ │ └── Rockchip_Tuning_Guide_ISP21_CN_v2.1.0.pdf
│ │ │ ├── ISP30
│ │ │ │ └── CN
│ │ │ │ └── Rockchip_Tuning_Guide_ISP30_CN_v1.1.0.pdf
│ │ │ └── ISP32-lite
│ │ │ └── CN
│ │ │ └── Rockchip_Tuning_Guide_ISP32-lite_CN_v1.0.0.pdf
│ │ └── USB_UVC_Integrated_Cameras.pdf
│ ├── README.txt
│ └── vehicle
│ └── Rockchip_Android_Fast_Reverse_Image_System_Developer_Guide_CN_V1.0.3.pdf
├── Can
│ ├── Rockchip_Developer_Guide_Can_CN.pdf
│ └── Rockchip_Developer_Guide_CAN_FD_CN.pdf
├── CLK
│ ├── Rockchip_Developer_Guide_Clock_CN.pdf
│ ├── Rockchip_Developer_Guide_Gpio_Output_Clocks_CN.pdf
│ ├── Rockchip_Develop_Guide_Pll_Ssmod_Clock_CN.pdf
│ └── Rockchip_RK3399_Developer_Guide_Clock_CN.pdf
├── CRU
│ ├── Rockchip_Developer_Guide_Linux3.10_Clock_CN.pdf
│ ├── Rockchip_Developer_Guide_Linux4.4_4.19_Clock_CN.pdf
│ ├── Rockchip_Develop_Guide_Pll_Ssmod_Clock_CN.pdf
│ ├── Rockchip_RK3399_Developer_Guide_Clock_CN.pdf
│ └── Rockchip_RK3399_Developer_Guide_Linux4.4_Clock_CN.pdf
├── CRYPTO
│ ├── Rockchip_Developer_Guide_Crypto_HWRNG_CN.pdf
│ └── Rockchip_Developer_Guide_Crypto_HWRNG_EN.pdf
├── DDR
│ ├── DDR_bandwidth_statistics_tool
│ │ ├── rk-msch-probe-for-user-32bit
│ │ ├── rk-msch-probe-for-user-64bit
│ │ └── Rockchip_Introduction_DDR_Bandwidth_Tool_CN.pdf
│ ├── Rockchip-Developer-Guide-DDR-CN.pdf
│ ├── Rockchip-Developer-Guide-DDR-EN.pdf
│ ├── Rockchip-Developer-Guide-DDR-Problem-Solution-CN.pdf
│ ├── Rockchip-Developer-Guide-DDR-Problem-Solution-EN.pdf
│ ├── Rockchip-Developer-Guide-DDR-Verification-Process-CN.pdf
│ ├── Rockchip_Developer_Guide_DDR_Verification_Process_EN.pdf
│ ├── Rockchip_Developer_Guide_HAL_DDR_ECC_CN.pdf
│ └── Rockchip-User-Guide-DDR-DQ-Eye-Tool-CN.pdf
├── debug
│ ├── RK3399-LOG-EXPLANATION.pdf
│ ├── Rockchip_Developer_Guide_DS5_CN.pdf
│ ├── Rockchip_Quick_Start_Linux_Perf.pdf
│ ├── Rockchip_Quick_Start_Linux_Streamline.pdf
│ ├── Rockchip_Quick_Start_Linux_Systrace.pdf
│ ├── Rockchip_RK3399_JTAG_Configuration_CN.pdf
│ └── Rockchip_User_Guide_J-Link_CN.pdf
├── display
│ ├── Rockchip_BT656_TX_AND_BT1120_TX_Developer_Guide_CN.pdf
│ ├── Rockchip_Developer_Guide_Baseparameter_Format_Define_And_Use_CN.pdf
│ ├── Rockchip_Developer_Guide_DRM_Display_Driver_CN.pdf
│ ├── Rockchip_Developer_Guide_DRM_Panel_Porting_CN&EN.pdf
│ ├── Rockchip_Developer_Guide_DRM_Panel_Porting_CN.pdf
│ ├── Rockchip_Developer_Guide_Dual_Display_Rotation_Direction_Debugging_CN.pdf
│ ├── Rockchip_Developer_Guide_HDMI_Based_on_DRM_Framework_CN&EN.pdf
│ ├── Rockchip_Developer_Guide_HDMI-CEC_CN.pdf
│ ├── Rockchip_Developer_Guide_HDMI_CN.pdf
│ ├── Rockchip_Develop_Guide_DRM_Direct_Show_CN.pdf
│ ├── Rockchip_Display_Issues_FAQ_V1.1.pdf
│ ├── Rockchip_DRM_RK628_Porting_Guide_CN.pdf
│ ├── Rockchip FAQ DRM Hardware Composer V1.00-20181213.pdf
│ ├── Rockchip_Introduction_DisplayAdjust_APK_CN.pdf
│ ├── Rockchip_Introduction_DRM_Integration_Helper_CN.pdf
│ ├── Rockchip_RK3588_Developer_Guide_DisplayPort_CN.pdf
│ ├── Rockchip_RK3588_Developer_Guide_MIPI_DSI2_CN.pdf
│ ├── Rockchip_RK3588_Developer_Guide_Vsync_Adjust_CN.pdf
│ ├── Rockchip_RK3588_User_Guide_DP_CN.pdf
│ ├── Rockchip_RK3588_User_Guide_eDP_CN.pdf
│ └── Rockchip_Trouble_Shooting_Graphics
├── DVFS
│ ├── Rockchip_Developer_Guide_CPUFreq_CN.pdf
│ ├── Rockchip_Developer_Guide_CPUFreq_EN.pdf
│ ├── Rockchip_Developer_Guide_Devfreq_CN.pdf
│ ├── Rockchip_Developer_Guide_Devfreq_EN.pdf
│ ├── Rockchip_Developer_Guide_Linux4.4_CPUFreq_CN.pdf
│ └── Rockchip_Developer_Guide_Linux4.4_Devfreq_CN.pdf
├── Ebook
│ ├── Rockchip_RK3566_Introduction_EBOOK_Display_Mode_CN.pdf
│ └── Rockchip_RK3566_Introduction_EBOOK_Sleep_Mode_CN.pdf
├── GMAC
│ ├── Rockchip_Developer_Guide_Ethernet_CN.pdf
│ ├── Rockchip_Developer_Guide_Linux_GMAC_CN.pdf
│ ├── Rockchip_Developer_Guide_Linux_GMAC_Mode_Configuration_CN.pdf
│ ├── Rockchip_Developer_Guide_Linux_GMAC_RGMII_Delayline_CN.pdf
│ └── Rockchip_Developer_Guide_Linux_GMAC_RGMII_Delayline_EN.pdf
├── hdmi-in
│ ├── apk
│ │ ├── HdmiInDemo_based_on_CameraHal1_2020.06.11_v1.2.tar.gz
│ │ └── rkCamera2_based_on_CameraHal3_V1.3.tar.gz
│ ├── Rockchip_Developer_Guide_HDMI_IN_Based_On_CameraHal1_CN.pdf
│ ├── Rockchip_Developer_Guide_HDMI_IN_Based_On_CameraHal3_CN.pdf
│ └── Rockchip_Developer_Guide_HDMI_RX_CN.pdf
├── I2C
│ ├── Rockchip_Developer_Guide_I2C_CN.pdf
│ └── Rockchip_Developer_Guide_I2C_EN.pdf
├── IO-Domain
│ ├── Rockchip_Developer_Guide_Linux_IO_DOMAIN_CN.pdf
│ ├── Rockchip_PX30_Introduction_IO_Power_Domains_Configuration.pdf
│ ├── Rockchip_RK3288_Introduction_IO_Power_Domains_Configuration.pdf
│ ├── Rockchip_RK3326_Introduction_IO_Power_Domains_Configuration.pdf
│ ├── Rockchip_RK3399_Introduction_IO_Power_Domains_Configuration.pdf
│ ├── Rockchip_RK3399Pro_Introduction_IO_Power_Domains_Configuration.pdf
│ └── Rockchip_RK356X_Introduction_IO_Power_Domains_Configuration.pdf
├── IOMMU
│ ├── Rockchip_Developer_Guide_Linux_IOMMU_CN.pdf
│ └── Rockchip_Developer_Guide_Linux_IOMMU_EN.pdf
├── Leds
│ └── Rockchip_Introduction_Leds_GPIO_Configuration_for_Linux4.4_CN.pdf
├── MCU
│ ├── Rockchip_RK3399_Developer_Guide_MCU_CN.pdf
│ └── Rockchip_RK3399_Developer_Guide_MCU_EN.pdf
├── Memory
│ └── Rockchip_Developer_Guide_Linux_CMA_CN.pdf
├── MMC
│ ├── Rockchip_Developer_Guide_SD_Boot_CN.pdf
│ └── Rockchip_Developer_Guide_SDMMC_SDIO_eMMC_CN.pdf
├── mobile-net
│ ├── Rockchip_Introduction_3G_Data_Card_USB_File_Conversion_CN.pdf
│ ├── Rockchip_Introduction_3G_Dongle_Configuration_CN&EN.pdf
│ └── Rockchip_Introduction_4G_Module_Configuration_CN&EN.pdf
├── MPP
│ ├── Rockchip_Developer_Guide_MPP_CN.pdf
│ └── Rockchip_Developer_Guide_MPP_EN.pdf
├── NVM
│ ├── Rockchip_Application_Notes_Storage_CN.pdf
│ ├── Rockchip_Developer_FAQ_Storage_CN.pdf
│ ├── Rockchip_Developer_Guide_OTP_CN.pdf
│ ├── Rockchip_Developer_Guide_OTP_EN.pdf
│ ├── Rockchip_Developer_Guide_SATA_CN.pdf
│ ├── Rockchip_Introduction_Partition_CN.pdf
│ ├── Rockchip_Introduction_Partition_EN.pdf
│ └── Rockchip_RK356X_Developer_Guide_SATA_CN.pdf
├── PCie
│ ├── Rockchip-Developer-Guide-linux4.4-PCIe.pdf
│ ├── Rockchip_Developer_Guide_PCIe_CN.pdf
│ ├── Rockchip_PCIe_Virtualization_Developer_Guide_CN.pdf
│ └── Rockchip_RK3399_Developer_Guide_PCIe_CN.pdf
├── perf
│ ├── perf使用说明.pdf
│ ├── Rockchip_Developer_FAQ_FileSystem_CN.pdf
│ ├── Rockchip_Optimize_Tutorial_Linux_IO_CN.pdf
│ ├── Rockchip_Quick_Start_Linux_Performance_Analyse_CN.pdf
│ └── systrace使用说明.pdf
├── PIN-Ctrl
│ ├── Rockchip_Developer_Guide_Linux_Pinctrl_CN.pdf
│ └── Rockchip_Developer_Guide_Linux_Pinctrl_EN.pdf
├── PMIC
│ ├── Rockchip_Developer_Guide_FreeRTOS_PMIC_CHARGER_POWERKEY_CN.pdf
│ ├── Rockchip_Developer_Guide_Power_Discrete_DCDC_EN.pdf
│ ├── Rockchip_Developer_Guide_RK817_RK809_Fuel_Gauge_CN&EN.pdf
│ ├── Rockchip_RK805_Developer_Guide_CN.pdf
│ ├── Rockchip_RK806_Developer_Guide_CN.pdf
│ ├── Rockchip_RK808_Developer_Guide_CN.pdf
│ ├── Rockchip_RK809_Developer_Guide_CN.pdf
│ ├── Rockchip_RK816_Developer_Guide_CN.pdf
│ ├── Rockchip_RK817_Developer_Guide_CN.pdf
│ ├── Rockchip_RK818_Developer_Guide_CN.pdf
│ ├── Rockchip_RK818_RK816_Developer_Guide_Fuel_Gauge_CN.pdf
│ └── Rockchip_RK818_RK816_Introduction_Fuel_Gauge_Log_CN.pdf
├── power
│ ├── Rockchip_Developer_Guide_Power_Analysis_EN.pdf
│ └── Rockchip_Developer_Guide_Sleep_and_Resume_CN.pdf
├── PWM
│ ├── Rockchip_Developer_Guide_Linux_PWM_CN.pdf
│ ├── Rockchip_Developer_Guide_Linux_PWM_EN.pdf
│ └── Rockchip_Developer_Guide_PWM_IR_CN.pdf
├── RGA
│ ├── Rockchip_Developer_Guide_RGA_CN.pdf
│ ├── Rockchip_Developer_Guide_RGA_EN.pdf
│ ├── Rockchip_FAQ_RGA_CN.pdf
│ └── Rockchip_FAQ_RGA_EN.pdf
├── RK628
│ ├── Rockchip_RK628D_Application_Notes_CN.pdf
│ └── Rockchip_RK628D_For_All_Porting_Guide_CN.pdf
├── RKTools manuals
│ ├── RKIQTool_User_Manual_v1.5-CH.pdf
│ ├── RKIQTool_User_Manual_v1.5-EN.pdf
│ ├── RK_Platform_apache_tomcat_ota_Server_Setup_Introduction.rar
│ ├── Rockchip_Box_Factory_Test_Tool_V2.0.rar
│ ├── Rockchip_Developer_Guide_Linux_Nand_Flash_Open_Source_Solution_CN.pdf
│ ├── Rockchip_Introduction_Image_Upgrading_Failure_Analysis_CN.pdf
│ ├── Rockchip_Introduction_MP_Tool_Upgrading_and_Related_Issues_Debugging_CN.pdf
│ ├── Rockchip_Introduction_REPO_Mirror_Server_Build_and_Management_CN.pdf
│ ├── Rockchip_Introduction_Stresstest_for_VR_CN.pdf
│ ├── Rockchip_Introduction_WNpctool_Write_Tool_CN.pdf
│ ├── Rockchip_User_Guide_Box_Factory_Test_Tool_CN.pdf
│ ├── Rockchip_User_Guide_Keybox_Burning_EN.pdf
│ ├── Rockchip_User_Guide_KeyWrite_CN.pdf
│ ├── Rockchip_User_Guide_MP_Flashing_v1.2_CN.pdf
│ ├── Rockchip_User_Guide_Production_For_Firmware_Download_CN.pdf
│ ├── Rockchip_User_Guide_RKDevInfoWriteTool_CN.pdf
│ ├── Rockchip_User_Guide_RKDevInfoWriteTool_EN.pdf
│ ├── Rockchip_User_Guide_RK_Platform_MP_Upgrading_CN.pdf
│ ├── Rockchip_User_Manual_Android_Development_Tool_CN.pdf
│ ├── Rockchip_User_Manual_RKIQTool_CN.pdf
│ ├── Rockchip_User_Manual_RKIQTool_EN.pdf
│ ├── Rockchip_User_Manual_RKUpgrade_Dll_CN.pdf
│ └── SecureBootTool_UserManual.pdf
├── SARADC
│ ├── Rockchip_Developer_Guide_Linux_SARADC_CN.pdf
│ └── Rockchip_Developer_Guide_Linux_SARADC_EN.pdf
├── security
│ ├── patch
│ │ └── u-boot
│ │ └── 0001-avb-add-embedded-key.patch
│ ├── RK3399_Efuse_Operation_Instructions_V1.00_EN.pdf
│ ├── RK356X_SecurityBoot_And_AVB_instructions_CN.pdf
│ ├── RK356X_SecurityBoot_And_AVB_instructions_EN.pdf
│ ├── RK3588_SecurityBoot_And_AVB_instructions_CN.pdf
│ ├── RK3588_SecurityBoot_And_AVB_instructions_EN.pdf
│ ├── Rockchip_Developer_Guide_Crypto_HWRNG_CN.pdf
│ ├── Rockchip_Developer_Guide_Secure_Boot_Application_Note_EN.pdf
│ ├── Rockchip_Developer_Guide_Secure_Boot_for_UBoot_Next_Dev_CN.pdf
│ ├── Rockchip_Developer_Guide_Secure_Boot_for_UBoot_Next_Dev_EN.pdf
│ ├── Rockchip_Developer_Guide_TEE_SDK_CN.pdf
│ ├── Rockchip_RK3399_User_Guide_SecurityBoot_And_AVB_CN.pdf
│ └── Rockchip Vendor Storage Application Note.pdf
├── Sensors
│ └── Rockchip_Developer_Guide_Sensors_CN.pdf
├── SPI
│ ├── Rockchip_Developer_Guide_Linux_SPI_CN.pdf
│ └── Rockchip_Developer_Guide_Linux_SPI_EN.pdf
├── Thermal
│ ├── Rockchip_Developer_Guide_Thermal_CN.pdf
│ └── Rockchip_Developer_Guide_Thermal_EN.pdf
├── TRUST
│ ├── Rockchip_Developer_Guide_Trust_CN.pdf
│ ├── Rockchip_Developer_Guide_Trust_EN.pdf
│ └── Rockchip_RK3588_Developer_Guide_System_Suspend_CN.pdf
├── Tutorial
│ ├── RK3399-CPUINFO.pdf
│ ├── RK3399-LOG-EXPLANATION.pdf
│ ├── Rockchip_Developer_FAQ_FileSystem_CN.pdf
│ ├── Rockchip_Introduction_Browser_FAQ_CN.pdf
│ └── Rockchip_Trouble_Shooting_Firmware_Upgrade_Issue_CN.pdf
├── UART
│ ├── Rockchip-Developer-Guide-RT-Thread-UART.pdf
│ ├── Rockchip_Developer_Guide_UART_CN.pdf
│ ├── Rockchip_Developer_Guide_UART_EN.pdf
│ └── Rockchip_Developer_Guide_UART_FAQ_CN.pdf
├── u-boot
│ ├── Rockchip-Developer-Guide-Linux-AB-System.pdf
│ ├── Rockchip-Developer-Guide-Uboot-mmc-device-driver-analysis.pdf
│ └── Rockchip_Developer_Guide_UBoot_Nextdev_CN.pdf
├── usb
│ ├── Rockchip_Developer_Guide_Linux_USB_Initialization_Log_Analysis_CN_V1.1.1.pdf
│ ├── Rockchip_Developer_Guide_Linux_USB_Performance_Analysis_CN_V1.1.1.pdf
│ ├── Rockchip_Developer_Guide_Linux_USB_PHY_CN.pdf
│ ├── Rockchip_Developer_Guide_USB_CN.pdf
│ ├── Rockchip_Developer_Guide_USB_EN.pdf
│ ├── Rockchip_Developer_Guide_USB_FFS_Test_Demo_CN.pdf
│ ├── Rockchip_Developer_Guide_USB_FFS_Test_Demo_CN_V1.2.1.pdf
│ ├── Rockchip_Developer_Guide_USB_Gadget_UAC_CN.pdf
│ ├── Rockchip_Developer_Guide_USB_Gadget_UAC_CN_V1.1.1.pdf
│ ├── Rockchip_Developer_Guide_USB_SQ_Test_CN.pdf
│ ├── Rockchip_Introduction_USB_SQ_Tool_CN.pdf
│ ├── Rockchip_RK3399_Developer_Guide_USB_CN.pdf
│ ├── Rockchip_RK356x_Developer_Guide_USB_CN.pdf
│ ├── Rockchip_RK356X_User_Guide_USB_CN.pdf
│ ├── Rockchip_RK3588_Developer_Guide_USB_CN.pdf
│ └── Rockchip_User_Guide_USB_PHY_Tuning_CN.pdf
└── watchdog
├── Rockchip_Developer_Guide_Linux_WDT_CN.pdf
└── Rockchip_Developer_Guide_Linux_WDT_EN.pdf
Tool usage
StressTest
Use the Stresstest tool to do the stress test for the various functions on the target devices to make sure the whole system running stably. SDK can start StressTest application and perform stress test of various functions by entering “83991906=” code in the calculator. The test items of Stresstest tool mainly include:
Module related
Camera stress test: including Camera on/off, Camera taking photo and Camera switch. Bluetooth stress test: including Bluetooth on/off. Wi-Fi stress test: including Wi-Fi on/off, (plan to add ping test and iperf test).
Non module related
Fly mode on/off test
Suspend and resume stress test Video playing stress test Reboot stress test Recovery stress test ARM frequency scaling test GPU frequency scaling test DDR frequency scaling test
PCBA test tool
PCBA test tool is used to help quickly identify good and bad product features during production to improve the production efficiency. Current test items include panel (LCD), wireless (Wi-Fi), Bluetooth, DDR/EMMC memory, SD card, USB HOST, key, speaker earphone (Codec). These test items include automatic test item and manual test item. Wireless network, DDR/EMMC, Ethernet are automatic test items, while key, SD card, USB Host, Codec are manual test items. For the detailed PCBA function configuration and usage, please refer to:
RKDocs\android\Rockchip_Developer_Guide_PCBA_Test_Tool_CN&EN.pdf_V1.1_20171222.p
df。
DeviceTest
DeviceTest is used for the whole device test in factory, which mainly test whether the peripheral components work normally after assembling. SDK will enter DeviceTest by entering “000.=” code in the calculator, as shown below:
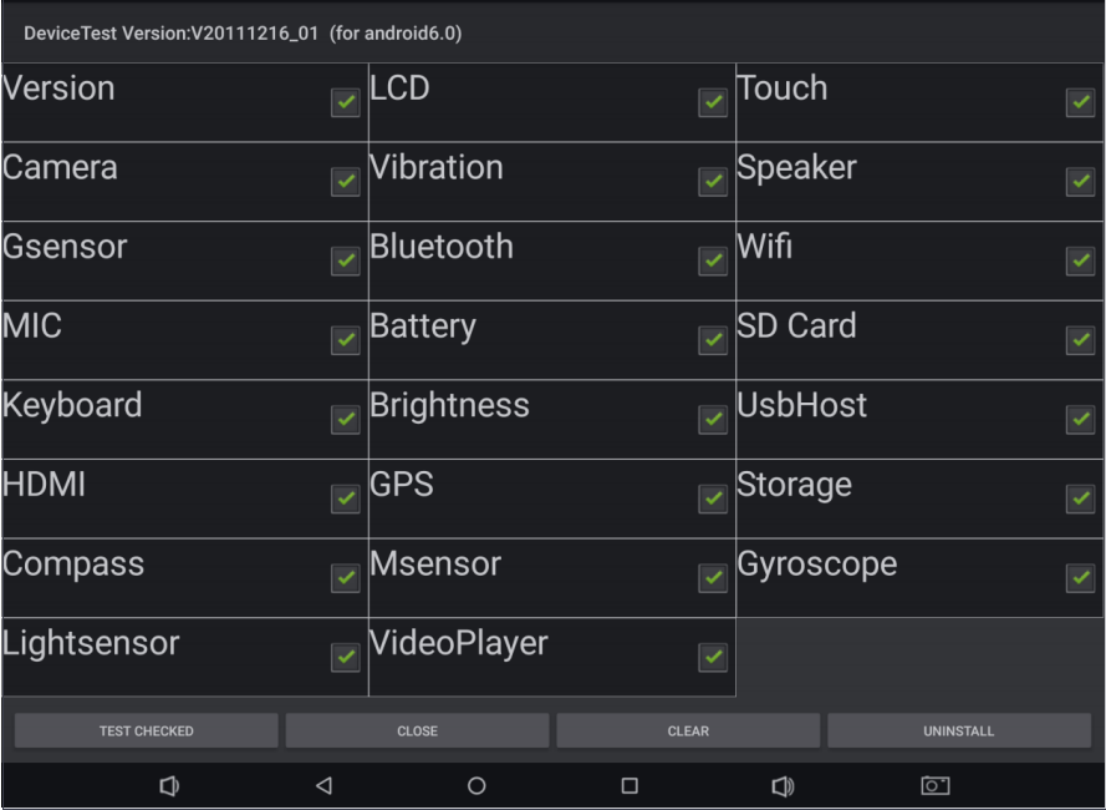
In factory, you can test the corresponding peripheral according to this interface. Click “TEST CHECKED” to test the items one by one. If succeed, click pass, if fail, click failed, the final result will display on the screen, as shown below. Red means failed item, others are pass, and the factory can repair accordingly based on the test result. Besides, if customers need to customize the tool, please contact FAE to apply for the corresponding source code.
USB driver
Rockchip USB driver install package includes ADB and image flashing driver
RKTools\windows\DriverAssitant_v5.1.1.zip
Development flashing tool
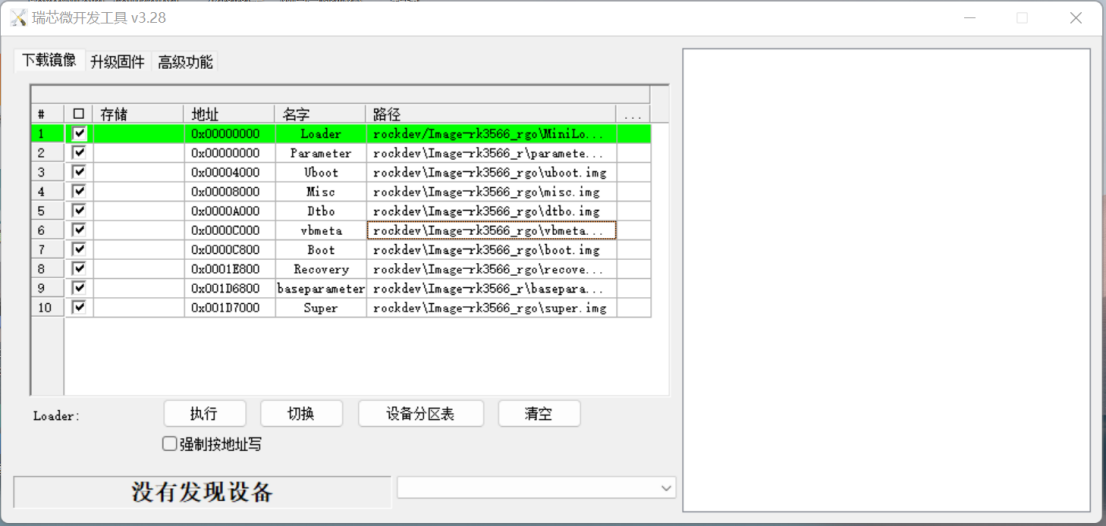
Windows version
RKTools/windows/AndroidTool/AndroidTool_Release_v3.28.zip The tool version will update time by time, please synchronize and update in time.
Linux version
RKTools/linux/Linux_Upgrade_Tool/Linux_Upgrade_Tool_v2.30.zip
Linux_Upgrade_Tool_v2.26$ sudo ./upgrade_tool -h
Program Data in /home/wlq/.config/upgrade_tool

---------------------Tool Usage ---------------------
Help:             H
Quit:             Q
Version:          V
Clear Screen:     CS
------------------Upgrade Command ------------------
ChooseDevice:           CD
ListDevice:                 LD
SwitchDevice:           SD
UpgradeFirmware:        UF <Firmware> [-noreset]
UpgradeLoader:          UL <Loader> [-noreset]
DownloadImage:          DI <-p|-b|-k|-s|-r|-m|-u|-t|-re image>
DownloadBoot:           DB <Loader>
EraseFlash:             EF <Loader|firmware> [DirectLBA]
PartitionList:          PL
WriteSN:                SN <serial number>
ReadSN:             RSN
----------------Professional Command -----------------
TestDevice:             TD
ResetDevice:            RD [subcode]
ResetPipe:              RP [pipe]
ReadCapability:         RCB
ReadFlashID:            RID
ReadFlashInfo:          RFI
ReadChipInfo:           RCI
ReadSector:             RS  <BeginSec> <SectorLen> [-decode] [File]
WriteSector:            WS  <BeginSec> <File>
ReadLBA:                RL  <BeginSec> <SectorLen> [File]
WriteLBA:               WL  <BeginSec> <File>
EraseLBA:               EL  <BeginSec> <EraseCount>
EraseBlock:             EB <CS> <BeginBlock> <BlokcLen> [--Force]
-------------------------------------------------------
Tool to implement SD upgrading and boot
It is used to implement SD card upgrading, SD card boot, SD card PCBA test.
RKTools\windows\SDDiskTool_v1.74.zip
Write SN tool
RKTools\windows\RKDevInfoWriteTool-1.3.0.7z Install after unzip RKDevInfoWriteTool-1.3.0.7z Use admin ID to open the software
For the tool instruction, please refer to:
RKDocs\common\RKTools manuals\Rockchip_User_Guide_RKDevInfoWriteTool_CN.pdf
DDR welding test tool
It is used to test DDR hardware conncection, troubleshooting hardware issues such as virtual welding.
RKTools\windows\Rockchip_Platform_DDR_Test_Tool_V1.38_Release_Annoucement_CN.7z
RKTools\windows\Rockchip_Platform_DDR_Test_Tool_V1.38_Release_Annoucement_EN.7z
efuse flashing tool
It is used to flash efuse, suitable for RK3288W/RK3368/RK3399 platforms.
RKTools\windows\efuse_v1.37.rar
efuse/otp sign tool
It is used to sign efuse/otp of image.
RKTools\windows\SecureBootTool_v1.94.zip
Factory production image flashing tool
It is uesed for batch image flashing in factory.
RKTools\windows\FactoryTool-1.72.9.7z
userdata partition data prebuilt tool
It is the tool used to make userdata partition pre-built data package.
RKTools\windows\OemTool_v1.3.rar
Camera IQ Tool
It is used for debugging ISP image effects.
external/camera_engine_rkaiq/rkisp2x_tuner
System debugging
ADB tool
Overview
ADB (Android Debug Bridge) is a tool in Android SDK which can be used to operate and manage Android simulator or the real Android device. The functions mainly include: Run the device shell (command line) Manage the port mapping of the simulator or the device Upload/download files between the computer and the device Install the local apk to simulator or Android device ADB is a “client – server” program. Usually the client is PC and the server is the actual Android device or simulator. The ADB can be divided into two categories according to the way PC connects to the Android device: Network ADB: PC connects to STB device through cable/wireless network. USB ADB: PC connects to STB device through USB cable.
USB adb usage
USB adb usage has the following limitations: Only support USB OTG port Not support multiple clients at the same time (such as cmd window, eclipse etc.) Support host connects to only one device but not multiple devices The connection steps are as below:
1、The device already running Android system, setting -> developer option -> connect to the computer, enable usb debugging switch.
2、PC connects to the device USB otg port only through USB cable, and then the computer connects with Android device through below command:
adb shell
3、Execute the command ”adb devices” to see if the connection is successful or not. If the device serial number shows up, the connection is successful.
ADB commonly used command elaboration
(1)Check the device situation Check the Android device or simulator connected to computer:
adb devices
The return result is the serial number or IP and port number, status of the Android device connected to PC. (2)Install APK Install the specific apk file to the device:
adb install <apk file path>
For example:
adb install “F:\WishTV\WishTV.apk”
Re-install application:
adb install –r “F:\WishTV\WishTV.apk”
(3)Uninstall APK Complete uninstall:
adb uninstall <package>
For example:
adb uninstall com.wishtv
(4)Use rm to remove apk file:
adb shell rm <filepath>
For example:
adb shell rm “system/app/WishTV.apk”
Note: remove “WishTV.apk” file in the directory of “system/app”. (5)Enter shell of the device and simulator Enthe the shell environment of the device or simulator:
adb shell
(6)Upload the file to the device from PC Use push command can upload any file or folder from PC to the device. Generally local path means the computer and remote path means the single board device connected with ADB. adb push For example:
adb push “F:\WishTV\WishTV.apk” “system/app”
Note: upload local “WishTV.apk” file to the “system/app” directory of the Android system. (7)Download the file from the device to PC Use pull command can download the file or folder from the device to local computer.
adb pull <remote path> <local path>
For example:
adb pull system/app/Contacts.apk F:\
Note: download the file or folder from the “system/app” directory of Android system to local “F:\” directory. (8)Check bug report Run adb bugreport command can check all the error message report generated by system. The command will show all dumpsys, dumpstate and logcat information of the Android system. (9)Check the device system information The specific commands in adb shell to check the device system information.
adb shell getprop
Logcat tool
Android logcat system provides the function to record and check the system debugging information. The logcats are all recorded from various softwares and some system buffer. The buffer can be checked and used through Logcat. Logcat is the function most commonly used by debugging program. The function shows the program running status mainly by printing logcat. Because the amount of logcat is very large, need to do filtering and other operations.
Logcat command usage
Use logcat command to check the contents of the system logcat buffer: The basic format:
[adb] logcat [<option>] [<filter-spec>]
For example:
adb shell
logcat
The commonly used logcat filter method
Several ways to control the logcat output: Control the logcat output priority For example:
adb shell
logcat *:W
Note: show the logcat information with priority of warning or higher. Control the logcat label and output priority For example:
adb shell
logcat ActivityManager:I MyApp:D *:S
Note: support all the logcat information except those with label of “ActivityManager” and priority of “Info” above, label of “MyApp” and priority of “Debug” above. Only output the logcat with the specific label For example:
adb shell
logcat WishTV:* *:S
or
adb shell
logcat –s WishTV
Note: only output the logcat with label of WishTV. Only output the logcat with the specific priority and label For example:
adb shell
logcat WishTV:I *:S
Note: only output the logcat with priority of I and label of WishTV.
Procrank tool
Procrank is a debugging tool with Android, running in the shell environment of the device, used to output the memory snapshot of the process in order to effectively observe the memory usage status of the process. Include the following memory information: VSS:Virtual Set Size The memory size used by virtual (including the memory used by the shared lib) RSS:Resident Set Size The actually used physical memory size (including the memory used by the shared lib) PSS:Proportional Set Size The actually used physical memory size (allocate the memory used by the shared lib in proportion) USS:Unique Set Size The physical memory used exclusively by the process (not including the memory used by the shared lib) Note: USS size represents the memory size only used by the process, and it will be completely recovered after the process is killed. VSS/RSS includes the memory used by the shared lib, so it is not helpful to check the memory status of the single process. PSS is the shared memory status used by the specific single process after the shared memory is allocated in proportion.
Use procrank
Make sure the terminal has the root authority before executing procrank su The command format:
procrank [ -W ] [ -v | -r | -p | -u | -h ]
The commonly used command instructions: -v:order by VSS -r:order by RSS -p:order by PSS -u:order by USS -R:convert to order by increasing[decreasing] method -w:only display the statistical count of working set -W:reset the statistical count of working set -h:help For example: Output the memory snapshot:
procrank
Output the memory snapshot in VSS decreasing order:
procrank –v
Procrank is output in PSS order by default.
Search the specific content information
Use below command format to view the memory status of the specific process:
procrank | grep [cmdline | PID]
cmdline means the target application name, PID means the target application process. Output the memory status used by systemUI process:
procrank | grep “com.android.systemui”
or:
procrank | grep 3396
Trace the process memory status
Analyze if there is memory leakage in the process by tracing the memory usage status. Use the script to continuously output the process memory snapshot, and compare with USS segment to see if there is memory leakage in this process. For example: output the application memory usage of the process named com.android.systemui to see if there is leakage:
1、Write the script test.sh
#!/bin/bash
while true;do
adb shell procrank | grep “com.android.systemui”
sleep 1
done
2、After connect to the device by adb tool, run the script: ./test.sh
Dumpsys tool
Dumpsys tool is a debugging tool in Android system, running in the shell environment of the device, and provides the service status information running in the system. The running service means the service process in the Android binder mechanism. The conditions for dumpsys to output the print:
1、Only print the services already loaded to ServiceManager.
2、If the dump function in the service code is not implemented, there will be no information output.
Use Dumpsys
View Dumpsys help Function: output dympsys help information.
dumpsys -help
View the service list of Dumpsys Function: output all the printable service information of dumpsys, developer can pay attention to the service names required for debugging.
dumpsys -l
Output the specific service information Function: output the specific service dump information. Format: dumpsys [servicename] For example: execute below command can output the service information of SurfaceFlinger:
dumpsys SurfaceFlinger
Output the specific service and application process information Function: output the specific service and application process information. Format: dumpsys [servicename] [application name] For example: execute below command to output the memory information for the service named meminfo and process named com.android.systemui:
dumpsys meminfo com.android.systemui
Note: the service name is case sensitive and must input the full service name.
Last log enable
Add the following two nodes in dts file
ramoops_mem: ramoops_mem {
    reg = <0x0 0x110000 0x0 0xf0000>;
    reg-names = "ramoops_mem";
};

ramoops {
    compatible = "ramoops";
    record-size = <0x0 0x20000>;
    console-size = <0x0 0x80000>;
    ftrace-size = <0x0 0x00000>;
    pmsg-size = <0x0 0x50000>;
    memory-region = <&ramoops_mem>;
};
- Check last log in the device
130|root@rk3399:/sys/fs/pstore # ls
dmesg-ramoops-0   Log saved after last kernel panic
pmsg-ramoops-0    Log of last user space, android log
ftrace-ramoops-0    Print function trace during some period
console-ramoops-0  kernel log when last_log was enabled last time, but only save
the log with higher priority than default log level
Usage:
cat dmesg-ramoops-0
cat console-ramoops-0
logcat -L (pmsg-ramoops-0) pull out by logcat and parse
cat ftrace-ramoops-0
FIQ mode
You can input fiq command through the serial port to check the system status when the device crashes or gets stuck. The specific command is as below:
127|console:/ $ fiq
debug>  help
FIQ Debugger commands:
 pc            PC status
 regs          Register dump
 allregs       Extended Register dump
 bt            Stack trace
 reboot [<c>]  Reboot with command <c>
 reset [<c>]   Hard reset with command <c>
 irqs          Interupt status
 kmsg          Kernel log
 version       Kernel version
 sleep         Allow sleep while in FIQ
 nosleep       Disable sleep while in FIQ
 console       Switch terminal to console
 cpu           Current CPU
 cpu <number>  Switch to CPU<number>
 ps            Process list
 sysrq         sysrq options
 sysrq <param> Execute sysrq with <param>
Common issues
What is current kernel version and u-boot version?
Android 14.0 uses kernel version 6.1 and the next-dev U-Boot branch.
How to acquire the corresponding RK release version for current SDK
Rockchip Android14.0 SDK includes AOSP source code and RK changed code. RK changed libs are involved in xml under the directory .repo/manifests/include , while AOSP default libs are in .repo/manifests/default.xml 。 Version confirm: RK modification part
vim .repo/manifests/include/rk_checkout_from_aosp.xml
<project groups="pdk" name="platform/build" path="build/make" remote="rk"
revision="refs/tags/android-14.0-mid-rkr1">
Means RK version is android-14.0-mid-rkr1 AOSP part
vim .repo/manifests/default.xml
<default revision="refs/tags/android-14.0.0_r11"...>
Means OASP version is android-14.0.0_r11 Just provide the above two version information when needed. You can directly acquire tag information through the following command for single lib:
kernel-6.1$ git tag
android-14.0-mid-rkr1
RK version is incremental with the format of android-14.0-mid-rkrxx, so current latest tag is android-14.0-mid-rkr1
How to confirm if local SDK is already updated to the latest SDK version released by RK
When RK SDK is released, the commit information corresponding to the version will be submited under the .repo/manifests/commit/ directory. Customers can confirm whether SDK is updated completely or not by comparing with the commit information. The specific operations are as follows: First confirm RK version of SDK according to the instruction of “How to acquire the corresponding RK release version for current SDK”. Below take RKR6 version as example to introduce. Use the following command to save local commit information
.repo/repo/repo manifest -r -o release_manifest_rkr1_local.xml
Comparing .repo/manifests/commit/commit_release_rkr1.xml with release_manifest_rkr1_local.xml can confirm whether SDK code is completely updated or not, while .repo/manifests/commit/commit_release_rkr1.xml is the commit information released along with RKR6 version.
Replace uboot and kernel logo picture
uboot and kernel logo are the first and second logo picture displayed during bootup, and they can be changed according to the product requirement. uboot logo source file: kernel-6.1/logo.bmp kernel logo source file: kernel-6.1/logo_kernel.bmp If need to change the picture, just use the bmp with the same name to replace, and re-compile kernel. The compiled file is in boot.img. Note: Logo picture size currently only supports to 8M with 8, 16, 24, 32bit bmp format.
How to modify Android system to support 64-bit only
The Android 14 products certifying GMS and EDLA are required to be configured to support 64-bit system only, not 32-bit one for reducing the memory usage. The detailed modification is as followed:(take rk3562_ugo as an example) Modify corresponding configuration in the BoardConfig.mk of the product directory, as followed:
diff --git a/rk3562_ugo/BoardConfig.mk b/rk3562_ugo/BoardConfig.mk
index c06433e..dc9cc50 100644
--- a/rk3562_ugo/BoardConfig.mk
+++ b/rk3562_ugo/BoardConfig.mk
@@ -18,3 +18,11 @@ PRODUCT_KERNEL_DTS := rk3562-rk817-tablet-v10
 CAMERA_SUPPORT_AUTOFOCUS := true
 BOARD_BUILD_GKI := true
 include device/rockchip/rk3562/BoardConfig.mk
+
+DEVICE_IS_64BIT_ONLY := true
+
+TARGET_2ND_ARCH :=
+TARGET_2ND_ARCH_VARIANT :=
+TARGET_2ND_CPU_ABI :=
+TARGET_2ND_CPU_ABI2 :=
+TARGET_2ND_CPU_VARIANT :=
Power off charging and low battery precharging
Power off charging and low battery precharging can be configured in dts, as shown below:
charge-animation {
                compatible = "rockchip,uboot-charge";
                rockchip,uboot-charge-on = <1>;
                rockchip,android-charge-on = <0>;
                rockchip,uboot-low-power-voltage = <3400>;
                rockchip,screen-on-voltage = <3500>;
                status = "okay";
        };
Note: rockchip,uboot-charge-on: uboot power off charging is mutually exclusive with android power off charging rockchip,android-charge-on: android power off charging is mutually exclusive with uboot power off charging rockchip,uboot-low-power-voltage: configure the voltage for low battery precharging to boot, it can be configured according to the actual requirement rockchip,screen-on-voltage: configure the voltage for low battery precharging to light the panel, it can be configured according to the actual requirement
Uboot charging logo package and replace
Charging logo path, you can directly replace with the file with the same name, and the format should be the same as original file.
u-boot/tools/images/
├── battery_0.bmp
├── battery_1.bmp
├── battery_2.bmp
├── battery_3.bmp
├── battery_4.bmp
├── battery_5.bmp
└── battery_fail.bmp
If uboot charging is enabled, but there is no charging logo displaed, maybe it is because the picture is not packaged into resource.img. You can package per the following command:
cd u-boot
./scripts/pack_resource.sh ../kernel-6.1/resource.img
cp resource.img ../kernel/resource.img
After executing the above command, uboot charging logo will be packaged into resource.img in kernel directory. Now need to re-package resource.img into boot.img. You can execute ./mkiamge.sh in android root directory, and then flash boot.img under rockdev/.
HDMI IN configuration
hdmi in function is disabled in SDK by default. If need to enable, operate as below:
vim device/rockchip/rk3588/BoardConfig.mk
+BOARD_HDMI_IN_SUPPORT := true
RM310 4G configuration
4G function is disabled in SDK by default. If need to enable, operate as below:
vim device/rockchip/common/BoardConfig.mk
#for rk 4g modem
-BOARD_HAS_RK_4G_MODEM ?= false
+BOARD_HAS_RK_4G_MODEM ?= true
WIFI Sleep Policy configuration
WIFI sleep policy is to keep sleep connecting, if you need to disconnect the sleep, please refer to the following:
---
a/rk3566_rgo/overlay/frameworks/base/packages/SettingsProvider/res/values/defaul
ts.xml
+++
b/rk3566_rgo/overlay/frameworks/base/packages/SettingsProvider/res/values/defaul
ts.xml
@@ -24,5 +24,5 @@
        You can configure persist.wifi.sleep.delay.ms to delay closing wifi.
        The default is 15 minutes, 0 means that the wifi is turned off
        immediately after the screen is off. -->
-    <integer name="def_wifi_sleep_policy">2</integer>
+    <integer name="def_wifi_sleep_policy">0</integer>
      </resources>
Recovery rotation configuration
Support Recovery rotation with 0/90/180/270 degree. Disabled by default(that is to rotate 0 degree). The rotation configuration is described as below:
vim device/rockchip/common/BoardConfig.mk
#0:   ROTATION_NONE rotate 0 degree
#90:  ROTATION_RIGHT rotate 90 degrees
#180: ROTATION_DOWN rotate 180 degrees
#270: ROTATION_LEFT rotate 270 degrees
# For Recovery Rotation
TARGET_RECOVERY_DEFAULT_ROTATION ?= ROTATION_NONE
Android Surface rotation
For Android system display rotation, you can modify the following configuration with the parameters 0/90/180/270
# For Surface Flinger Rotation
SF_PRIMARY_DISPLAY_ORIENTATION ?= 0
Replace some remote of AOSP source code
The speed for customer to download RK release code is relatively slow. You can change the remote of AOSP to domestic mirror source, or Google mirror source for foreign customers, to improve the downloading speed. The detailed method is described as below: After executing repo init (or unpacking base package), modify .repo/manifests/remote.xml. Change the remote fetch of AOSP from
< remote name="aosp" fetch="./" review="https://10.10.10.29" />
to for domestic customers: (here we take Tsinghua university mirror source as example. You can change to other domestic mirror source)
< remote name="aosp" fetch="https://aosp.tuna.tsinghua.edu.cn" />;
for foreign customers: (Google mirror source)
< remote name="aosp" fetch="https://android.googlesource.com" />
Data area read and write performance optimization
For devices with batteries, advised to add ‘fsync_mode=nobarrier’ to the data partition mounting parameter of fstab to improve storage read/write rates and performance. This parameter may cause data damage on devices without batteries. Therefore, it is not recommended to add this parameter to devices without batteries. Modified patches as follows:
cd device/rockchip/common

diff --git a/scripts/fstab_tools/fstab.in b/scripts/fstab_tools/fstab.in
index 2ec6c265..c890cc84 100755
--- a/scripts/fstab_tools/fstab.in
+++ b/scripts/fstab_tools/fstab.in
@@ -23,6 +23,6 @@ ${_block_prefix}odm     /odm      ext4 ro,barrier=1
${_flags},first_stage_mount
 # For sdmmc
 /devices/platform/${_sdmmc_device}/mmc_host*        auto  auto    defaults
   voldmanaged=sdcard1:auto
 #  Full disk encryption has less effect on rk3326, so default to enable this.
-/dev/block/by-name/userdata /data f2fs
noatime,nosuid,nodev,discard,reserve_root=32768,resgid=1065
latemount,wait,check,fileencryption=aes-256-xts:aes-256-
cts:v2+inlinecrypt_optimized,keydirectory=/metadata/vold/metadata_encryption,quo
ta,formattable,reservedsize=128M,checkpoint=fs
+/dev/block/by-name/userdata /data f2fs
noatime,nosuid,nodev,discard,reserve_root=32768,resgid=1065,fsync_mode=nobarrier
latemount,wait,check,fileencryption=aes-256-xts:aes-256-
cts:v2+inlinecrypt_optimized,keydirectory=/metadata/vold/metadata_encryption,quo
ta,formattable,reservedsize=128M,checkpoint=fs
 # for ext4
 #/dev/block/by-name/userdata    /data      ext4
discard,noatime,nosuid,nodev,noauto_da_alloc,data=ordered,user_xattr,barrier=1
latemount,wait,formattable,check,fileencryption=software,quota,reservedsize=128M
,checkpoint=block
diff --git a/scripts/fstab_tools/fstab_go.in b/scripts/fstab_tools/fstab_go.in
index 582557f2..05c7653c 100755
--- a/scripts/fstab_tools/fstab_go.in
+++ b/scripts/fstab_tools/fstab_go.in
@@ -17,6 +17,6 @@ ${_block_prefix}odm     /odm      ext4 ro,barrier=1
${_flags},first_stage_mount
 # For sdmmc
 /devices/platform/${_sdmmc_device}/mmc_host*        auto  auto    defaults
   voldmanaged=sdcard1:auto
 #  Full disk encryption has less effect on rk3326, so default to enable this.
-/dev/block/by-name/userdata /data f2fs
noatime,nosuid,nodev,discard,reserve_root=32768,resgid=1065
latemount,wait,check,fileencryption=aes-256-xts:aes-256-
cts:v2+inlinecrypt_optimized,keydirectory=/metadata/vold/metadata_encryption,quo
ta,formattable,reservedsize=128M,checkpoint=fs
+/dev/block/by-name/userdata /data f2fs
noatime,nosuid,nodev,discard,reserve_root=32768,resgid=1065i,fsync_mode=nobarrie
r latemount,wait,check,fileencryption=aes-256-xts:aes-256-
cts:v2+inlinecrypt_optimized,keydirectory=/metadata/vold/metadata_encryption,quo
ta,formattable,reservedsize=128M,checkpoint=fs
 # for ext4
 #/dev/block/by-name/userdata    /data      ext4
discard,noatime,nosuid,nodev,noauto_da_alloc,data=ordered,user_xattr,barrier=1
latemount,wait,formattable,check,fileencryption=software,quota,reservedsize=128M
,checkpoint=block
Change userdata partition file system to EXT4
The default file system of data partition is f2fs. Recommend to change the file system of data partition to ext4 for the product without battery, as it can reduce the risk of data loss after abnormal power down. The modification method is as below: Take rk3566_r as example:
device/rockchip/common$ git diff
diff --git a/scripts/fstab_tools/fstab.in b/scripts/fstab_tools/fstab.in
index 6e78b00..a658332 100755
--- a/scripts/fstab_tools/fstab.in
+++ b/scripts/fstab_tools/fstab.in
@@ -20,6 +20,6 @@ ${_block_prefix}system_ext /system_ext  ext4 ro,barrier=1
${_flags},first_stage_
 # For sdmmc
 /devices/platform/${_sdmmc_device}/mmc_host*        auto  auto    defaults
   voldmanaged=sdcard1:auto
 #  Full disk encryption has less effect on rk3326, so default to enable this.
-/dev/block/by-name/userdata /data f2fs
noatime,nosuid,nodev,discard,reserve_root=32768,resgid=1065
latemount,wait,check,fileencryption=aes-256-xts:aes-256-
cts:v2+inlinecrypt_optimized,quota,formattable,reservedsize=128M,checkpoint=fs
+#/dev/block/by-name/userdata /data f2fs
noatime,nosuid,nodev,discard,reserve_root=32768,resgid=1065
latemount,wait,check,fileencryption=aes-256-xts:aes-256-
cts:v2+inlinecrypt_optimized,quota,formattable,reservedsize=128M,checkpoint=fs
 # for ext4
-#/dev/block/by-name/userdata    /data      ext4
discard,noatime,nosuid,nodev,noauto_da_alloc,data=ordered,user_xattr,barrier=1
latemount,wait,formattable,check,fileencryption=software,quota,reservedsize=128M
,checkpoint=block
+/dev/block/by-name/userdata    /data      ext4
discard,noatime,nosuid,nodev,noauto_da_alloc,data=ordered,user_xattr,barrier=1
latemount,wait,formattable,check,fileencryption=software,quota,reservedsize=128M
,checkpoint=block
device/rockchip/rk356x$ git diff
diff --git a/rk3566_r/recovery.fstab b/rk3566_r/recovery.fstab
index 7532217..cf789ac 100755
--- a/rk3566_r/recovery.fstab
+++ b/rk3566_r/recovery.fstab
@@ -7,7 +7,7 @@
 /dev/block/by-name/odm                   /odm                 ext4
defaults                  defaults
 /dev/block/by-name/cache                 /cache               ext4
defaults                  defaults
 /dev/block/by-name/metadata              /metadata            ext4
defaults                  defaults
-/dev/block/by-name/userdata              /data                f2fs
defaults                  defaults
+/dev/block/by-name/userdata              /data                ext4
defaults                  defaults
 /dev/block/by-name/cust                  /cust                ext4
defaults                  defaults
 /dev/block/by-name/custom                /custom              ext4
defaults                  defaults
 /dev/block/by-name/radical_update        /radical_update      ext4
defaults                  defaults
Modify power on/off animation and tones
Reference document:
RKDocs\android\Rockchip_Introduction_Android_Power_On_Off_Animation_and_Tone_Cus
tomization_CN&EN.pdf
APP performance mode setting
Configure the file: package_performance.xml in device/rockchip/rk3xxx/. Add the package names which need to use performance mode in the node:(use aapt dump badging (file_path.apk) to acquire the package name)
< app package="package name" mode="whether to enable the acceleration, 1 for
enable, 0 for disable"/>
Take antutu as example as below:
< app package="com.antutu.ABenchMark"mode="1"/>
< app package="com.antutu.benchmark.full"mode="1"\/>
< app package="com.antutu.benchmark.full"mode="1"\/>
It will package the file into the image when compiling.
Debugging method of GPU related issues
You can do the initial debugging for the issues referring to the following documents.
RKDocs\android\Rockchip_User_Guide_Dr.G_CN&EN.pdf
OTP and efuse instruction
OTP support chipset RK3326 PX30 RK3566 RK3568 RK3588 RK3568S EFUSE support chipset RK3288 RK3368 RK3399 Refer to the document for image signing and otp/efuse flashing:
RKDocs\common\security\Rockchip-Secure-Boot-Application-Note-V1.9.pdf
How to judge from the code whether OTP/EFUSE of the device is already flashed or not
The status of OTP/EFUSE will be transmitted through kernel cmdline and fuse.programmed in cmdline is used to mark the status of OTP/EFUSE. The details are as follows: “fuse.programmed=1”: the software image package is already signed by secure-boot and efuse/otp of the hardware device is already flashed. “fuse.programmed=0”: the software image package is already signed by secure-boot but efuse/otp of the hardware device is not flashed. there is no fuse.programmed in cmdline: the software image package is not signed by secure-boot (Miniloader doesn’t tramsmit), or Miniloader is too old to support transmission.
Enable/disable selinux
Refer to the following modification, false to disable, true to enable
device/rockchip/common$
--- a/BoardConfig.mk
+++ b/BoardConfig.mk
@@ -67,7 +67,7 @@ endif

 # Enable android verified boot 2.0
 BOARD_AVB_ENABLE ?= false
-BOARD_SELINUX_ENFORCING ?= false
+BOARD_SELINUX_ENFORCING ?= true
Warning “There’s an internal problem with your device.” pops up after boot up
There are two reasons to pop up the warning:
-
Image mismatch, the fingerprints of system/boot/vendor are not consistent.
-
The device is enabled with a configuration that supports IO debugging. This problem can be solved by using the previous compile kernel command in the documentation.
-
For projects with IO debugging, regardless of the above two reasons, please merge the following patches directly to eliminate the warning:
diff --git
a/services/core/java/com/android/server/wm/ActivityTaskManagerService.java
b/services/core/java/com/android/server/wm/ActivityTaskManagerService.java
index 595c340..d4e495a 100644
---
a/services/core/java/com/android/server/wm/ActivityTaskManagerService.java
+++
b/services/core/java/com/android/server/wm/ActivityTaskManagerService.java
@@ -6555,7 +6555,7 @@ public class ActivityTaskManagerService extends
IActivityTaskManager.Stub {
                 } catch (RemoteException e) {
                 }

-                if (!Build.isBuildConsistent()) {
+                if (0 && !Build.isBuildConsistent()) {
                     Slog.e(TAG, "Build fingerprint is not consistent, warning
user");
                     mUiHandler.post(() -> {
                         if (mShowDialogs) {
How to enable the setting options for Ethernet in Settings
There is no default option of Ethernet setting in the system Settings. If Ethernet is needed in the project, it can be turned on as follows:
  --- a/BoardConfig.mk
+++ b/BoardConfig.mk
@@ -146,3 +146,6 @@ endif
 ifeq ($(strip $(BOARD_USES_AB_IMAGE)), true)
 DEVICE_MANIFEST_FILE :=
device/rockchip/$(TARGET_BOARD_PLATFORM)/manifest_ab.xml
 endif

+# for ethernet
+BOARD_HS_ETHERNET := true
About AVB and security boot
For AVB and security boot related instruction and configurations, you can refer to the document
RKDocs/common/security/RK356X_SecurityBoot_And_AVB_instructions_CN.pdf
Cannot use IO commands
IO commands rely on DEVMEM which is disabled by default, so it is not able to use IO by default. If need to use IO commands for debugging, you can modify as follows:
wlq@ubuntu:~/rk3562_Android14.0/$ vim mkcombinedroot/configs/android-14.config
For GO produts, need to modify:
wlq@ubuntu:~/rk3562_Android14.0$ vim mkcombinedroot/configs/android-14-go.config
delete the following line:
# CONFIG_DEVMEM is not set
If you want to compile Android, you also need to modify the following code
cd rk3562_Android14.0/kernel/configs

diff --git a/android-6.1/android-base.config b/android-6.1/android-base.config
index 5de76f0..6dcdf86 100644
--- a/android-6.1/android-base.config
+++ b/android-6.1/android-base.config
@@ -2,7 +2,6 @@
 # CONFIG_ANDROID_LOW_MEMORY_KILLER is not set
 # CONFIG_ANDROID_PARANOID_NETWORK is not set
 # CONFIG_BPFILTER is not set
-# CONFIG_DEVMEM is not set
 # CONFIG_FHANDLE is not set
 # CONFIG_FW_CACHE is not set
 # CONFIG_IP6_NF_NAT is not set
wlq@sys2206:~/rk3562_Android14.0/kernel/configs$ git diff
diff --git a/u/android-6.1/android-base.config b/u/android-6.1/android-
base.config
index 29b9e98..c1b21cf 100644
--- a/u/android-6.1/android-base.config
+++ b/u/android-6.1/android-base.config
@@ -2,7 +2,6 @@
 # CONFIG_ANDROID_LOW_MEMORY_KILLER is not set
 # CONFIG_ANDROID_PARANOID_NETWORK is not set
 # CONFIG_BPFILTER is not set
-# CONFIG_DEVMEM is not set
 # CONFIG_FHANDLE is not set
 # CONFIG_FW_CACHE is not set
 # CONFIG_IP6_NF_NAT is not set
The SN command rules
The SN must begin with a letter and be no more than 14 bytes.
Failer about LZ4 when Kernel compiling
kernel compiling fail log as:
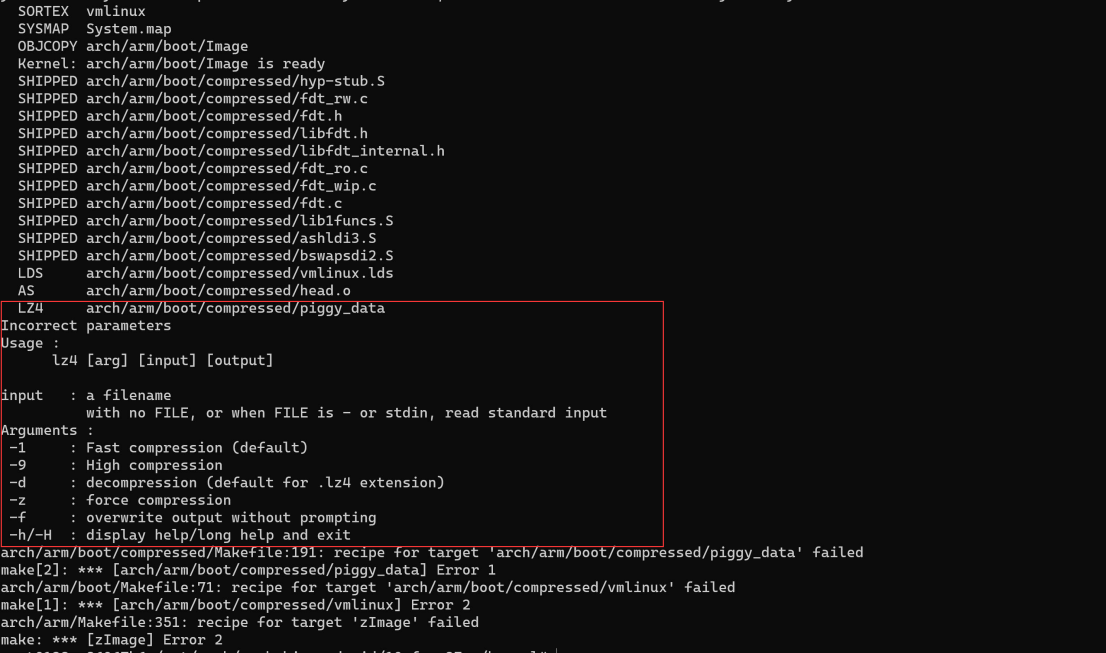
problem: The LZ4 version of the system is too low, and the version 1.8.3 or above is required
wlq@ubuntu:~$ lz4 -v
*** LZ4 command line interface 64-bits v1.8.3, by Yann Collet ***
refusing to read from a console
solution: copy the LZ4 compiled by Android to override the LZ4 of the system
sudo cp out/host/linux-x86/bin/lz4 /usr/bin/lz4
Android Samba function
reference file
RKDocs/android/Rockchip_Introduction_Android_Samba_CN.pdf
NFS boot
Refer to the documents and patches:
RKDocs/android/patches/customized_functions/nfs_boot_patch_v1.1.0.zip
Update RK3528 DDR 4BIT Loader
diff --git a/RKBOOT/RK3528MINIALL.ini b/RKBOOT/RK3528MINIALL.ini
index a7e3779..6a952cf 100644
--- a/RKBOOT/RK3528MINIALL.ini
+++ b/RKBOOT/RK3528MINIALL.ini
@@ -14,7 +14,7 @@ Path1=bin/rk35/rk3528_usbplug_v1.03.bin
 NUM=2
 LOADER1=FlashData
 LOADER2=FlashBoot
-FlashData=bin/rk35/rk3528_ddr_1056MHz_v1.05.bin
+FlashData=bin/rk35/rk3528_ddr_1056MHz_4BIT_PCB_v1.05.bin
Multi-screen display and touch
Referenced document
RKDocs\android\patches\customized_functions/Android11异显开发说明.zip
Different screen different sound
Referenced document
RKDocs/android/patches/customized_functions/Dual_Audio_v1.0.zip
APPENDIX A Compiling and development environment setup
Initializing a Build Environment
This section describes how to set up your local work environment to build the Android source files. You must use Linux or Mac OS; building under Windows is not currently supported. For an overview of the entire code-review and code-update process, see Life of a Patch. Note: All commands in this site are preceded by a dollar sign ($) to differentiate them from output or entries within files. You may use the Click to copy feature at the top right of each command box to copy all lines without the dollar signs or triple-click each line to copy it individually without the dollar sign.
Choosing a Branch
Some requirements for the build environment are determined by the version of the source code you plan to compile. For a full list of available branches, see Build Numbers. You can also choose to download and build the latest source code (called master), in which case you will simply omit the branch specification when you initialize the repository. After you have selected a branch, follow the appropriate instructions below to set up your build environment.
Setting up a Linux build environment
These instructions apply to all branches, including master. The Android build is routinely tested in house on recent versions of Ubuntu LTS (14.04) and Debian testing. Most other distributions should have the required build tools available. For Gingerbread (2.3.x) and newer versions, including the master branch, a 64-bit environment is required. Older versions can be compiled on 32-bit systems. Note: See Requirements for the complete list of hardware and software requirements, then follow the detailed instructions for Ubuntu and Mac OS below.
Installing the JDK
The master branch of Android in the Android Open Source Project (AOSP) comes with prebuilt versions of OpenJDK below prebuilts/jdk/ so no additional installation is required. Older versions of Android require a separate installation of the JDK. On Ubuntu, use OpenJDK. See JDK Requirements for precise versions and the sections below for instructions. For Ubuntu >= 15.04 Run the following:
sudo apt-get update
sudo apt-get install openjdk-8-jdk
For Ubuntu LTS 14.04 There are no available supported OpenJDK 8 packages for Ubuntu 14.04. The Ubuntu 15.04 OpenJDK 8 packages have been used successfully with Ubuntu 14.04. Newer package versions (e.g. those for 15.10, 16.04) were found not to work on 14.04 using the instructions below.
- Download the .deb packages for 64-bit architecture from old-releases.ubuntu.com:
openjdk-8-jre-headless_8u45-b14-1_amd64.deb with SHA256
0f5aba8db39088283b51e00054813063173a4d8809f70033976f83e214ab56c0
openjdk-8-jre_8u45-b14-1_amd64.deb with SHA256
9ef76c4562d39432b69baf6c18f199707c5c56a5b4566847df908b7d74e15849
openjdk-8-jdk_8u45-b14-1_amd64.deb with SHA256
6e47215cf6205aa829e6a0a64985075bd29d1f428a4006a80c9db371c2fc3c4c
- Optionally, confirm the checksums of the downloaded files against the SHA256 string listed with each package above. For example, with the sha256sum tool:
sha256sum {downloaded.deb file}
- Install the packages:
sudo apt-get update
Run dpkg for each of the .deb files you downloaded. It may produce errors due to missing dependencies:
sudo dpkg -i {downloaded.deb file}
To fix missing dependencies:
sudo apt-get -f install
Update the default Java version - optional Optionally, for the Ubuntu versions above update the default Java version by running:
sudo update-alternatives --config javasudo update-alternatives --config javac
Note: If, during a build, you encounter version errors for Java, see Wrong Java version for likely causes and solutions. Installing required packages (Ubuntu 14.04) You will need a 64-bit version of Ubuntu. Ubuntu 14.04 is recommended.
sudo apt-get install git-core gnupg flex bison gperf build-essential zip curl
zlib1g-dev gcc-multilib g++-multilib libc6-dev-i386 lib32ncurses5-dev x11proto-
core-dev libx11-dev lib32z-dev ccache libgl1-mesa-dev libxml2-utils xsltproc
unzip python-pyelftools python3-pyelftools device-tree-compiler libfdt-dev
libfdt1
Note: To use SELinux tools for policy analysis, also install the python-networkx package. Note: If you are using LDAP and want to run ART host tests, also install the libnss-sss:i386 package.
Configuring USB Access
Under GNU/linux systems (and specifically under Ubuntu systems), regular users can’t directly access USB devices by default. The system needs to be configured to allow such access. The recommended approach is to create a file /etc/udev/rules.d/51-android.rules (as the root user) and to copy the following lines in it. must be replaced by the actual username of the user who is authorized to access the phones over USB.
# adb protocol on passion (Rockchip products)
SUBSYSTEM=="usb", ATTR{idVendor}=="2207", ATTR{idProduct}=="0010", MODE="0600",
OWNER="<username>"
Those new rules take effect the next time a device is plugged in. It might therefore be necessary to unplug the device and plug it back into the computer. This is known to work on both Ubuntu Hardy Heron (8.04.x LTS) and Lucid Lynx (10.04.x LTS). Other versions of Ubuntu or other variants of GNU/linux might require different configurations. References : http://source.android.com/source/initializing.html
APPENDIX B SSH public key operation instruction
APPENDIX B-1 SSH public key generation
Use the following command to generate:
ssh-keygen -t rsa -C "user@host"
Please replace user@host with your email address.
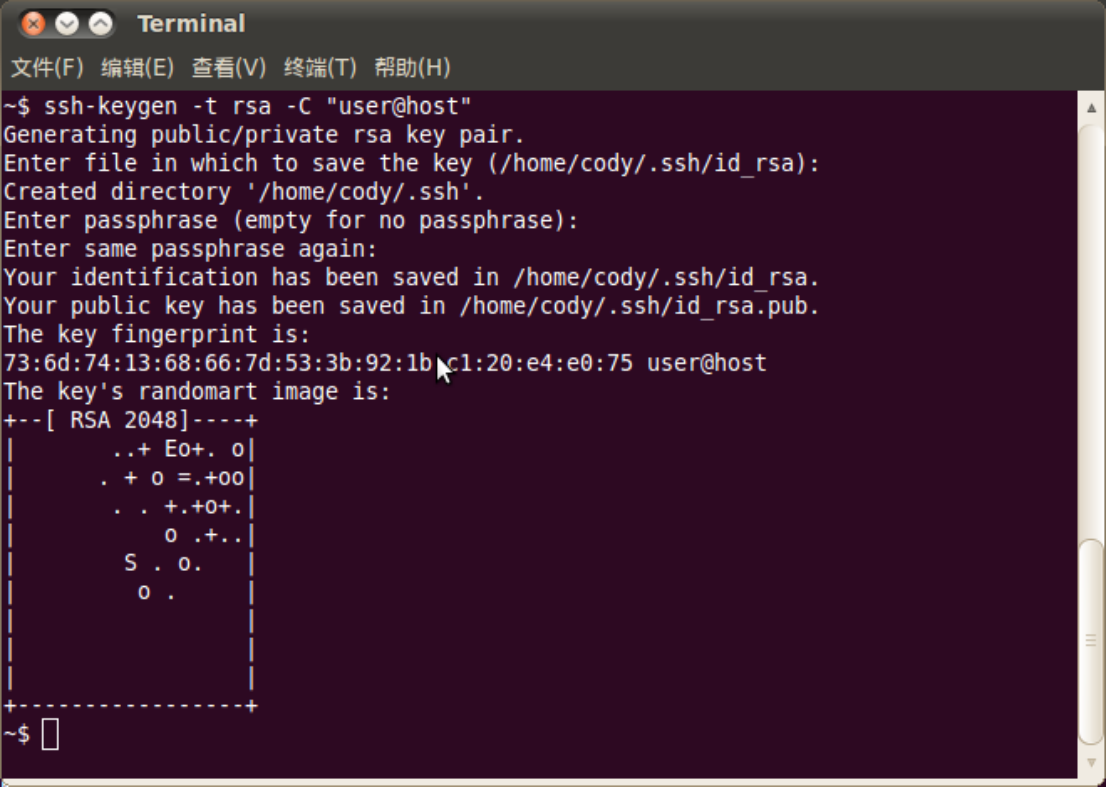
It will generate the key file in your directory after the command is executed successfully.

Please keep carefully the generated private key file id_rsa and password, and send id_rsa.pub to SDK release server admin through email.
APPENDIX B-2 Use key-chain to manage the key
Recommend you use the simple tool keychain to manage the key. The detailed usage is as follows:
- Install keychain software package:
$sudo aptitude install keychain
- Configure to use the key:
$vim ~/.bashrc
Add the following command:
eval `keychain --eval ~/.ssh/id_rsa`
Among which, id_rsa is the file name of the private key. Log in the console again after configuring as above, and it will prompt to input the password. Only need to input the password used for generating the key if there is one. Besides, please avoid using sudo or root user unless you know clearly how to deal with,
otherwise it will cause the authority and key management problems.
APPENDIX B-3 Multiple devices use the same ssh public key
In order to use on different devices, you can copy ssh private key file id_rsa to the target device “~/.ssh/id_rsa”. Below hint will show up if using the wrong private key. Please replace with the correct private key.
After adding the correct private key, you can use git to clone code, shown as below picture:
Below error may occur when adding ssh private key:
Agent admitted failture to sign using the key
Input the following command at console can fix it.
ssh-add ~/.ssh/id_rsa
APPENDIX B-4 Switch different ssh public keys on one device
You can refer to ssh_config document to configure ssh.
~$ man ssh_config
Use the following commands to configure ssh for current user.
~$ cp /etc/ssh/ssh_config ~/.ssh/config
~$ vi .ssh/config
As below picture, identify another directory ssh file ”~/.ssh1/id_rsa” as certificate private key. In this way, you can switch different keys.
APPENDIX B-5 Key authority management
The server can real-time monitor for the specific key the download times, IP and other information. If any abnormal case is found, it will prohibit the download authority of the corresponding key. Please keep carefully the private key file. DO NOT re-authorize it to the third party.
APPENDIX B-6 Git authority application instruction
Generate the public key as described above and apply through the SDK publisher’s authorization channel for code-download permission. Submit only the public key, never the private key or passphrase.
Source differences and checks before use
Both sources are V1.0.0, in the Android 14 RKR4 release context. Chinese document 789 has 53 pages; English document 790 has 57. The technical body, FAQ and appendices A/B are retained. Chinese uses Chinese-source figures; English, Russian and German use English-source figures, with original UI labels unchanged.
- Chinese synchronization/merge examples use
android-14.0-mid-rkr4; English still usesandroid-14.0-mid-rkr1, with different tag-history output. The Chinese RKR4 command is supplied below. Later FAQs mix RKR1/RKR6 descriptions and filenames; these examples do not justify mixing SDK releases. - Chinese lunch descriptions specify default DTS
rk3576-evb1-v10.dts, omitted in English. Chinese build help ends withlunch rk3576_u-userdebug; English retains unrelatedlunch rk3588_t-userdebug. The Chinese combined example is./build.sh -UKAup; the table separately uses./build.sh -AUCKu. Check case-sensitive options against the release script. - Chinese explicitly says GKI is disabled by default; its patch changes
BOARD_BUILD_GKI := falsetotrueand enabling GKI automatically enables A/B. English has the same patch but then describes false disabling A/B. False is not the enable setting. Chinese super.img includes odm, vendor, system, product and system_ext; English lists only the first three. Check the actual product partition configuration. - For removing 32-bit support, Chinese patches
rk3576_u/BoardConfig.mk; English retainsrk3562_ugo/BoardConfig.mkandrk3562-rk817-tablet-v10. The original example is retained and the Chinese RK3576 patch is supplied below. Do not apply RK3562 paths blindly to RK3576. - English adds RK3568S to the historical OTP support list. Neither list establishes RK3576 support. The trust.img RK3566/RK3568 exception likewise is not an RK3576 claim. ramdis is source spelling; the boot-debug.img row ambiguously calls the image “this boot.img”: verify the actual debug image.
logcat ActivityManager:I MyApp:D *:Sadmits only those tags at the specified or higher priorities and silences others; it does not exclude those tags.WishTV:Iincludes I and higher priorities, not I alone. ADB single-client/single-host descriptions are the source usage model, not a universal protocol limit.- Source
mkiamge.sh, Android_T/Android_U,@android_t/@android_uand old branch labels may be stale examples. Check the actual SDK; identifiers have not been silently rewritten. Suppressing a compatibility warning does not resolve incompatible images. - Appendix A’s Ubuntu 14.04, OpenJDK 8 and master instructions are historical upstream material, not current Android 14 environment recommendations. Follow the SDK body and actual release requirements. F2FS
fsync_mode=nobarrierrisks data loss on power failure even with a battery; EXT4 is not an absolute power-loss guarantee either. - Flashing, repartitioning and factory reset can erase data. Back up and confirm the board, images and partition table. OTP/eFuse writes can be irreversible. SSH private-key copying, authorized_keys and permission examples are for authorized environments only: do not erase existing authorization files or disclose private keys/passwords. Submit only the public key for download authorization.
Chinese-baseline supplement: RKR4 merge and RK3576 64-bit configuration
git merge android-14.0-mid-rkr4
diff --git a/rk3576_u/BoardConfig.mk b/rk3576_u/BoardConfig.mk
index c06433e..dc9cc50 100644
--- a/rk3576_u/BoardConfig.mk
+++ b/rk3576_u/BoardConfig.mk
@@ -18,3 +18,11 @@ PRODUCT_KERNEL_DTS := rk3576-evb1-v10
 CAMERA_SUPPORT_AUTOFOCUS := true
 BOARD_BUILD_GKI := true
 include device/rockchip/rk3576/rk3576_u/BoardConfig.mk
+
+DEVICE_IS_64BIT_ONLY := true
+
+TARGET_2ND_ARCH :=
+TARGET_2ND_ARCH_VARIANT :=
+TARGET_2ND_CPU_ABI :=
+TARGET_2ND_CPU_ABI2 :=
+TARGET_2ND_CPU_VARIANT :=