
ArmSoM platform reference, source V1.0.0. This covers the customized Rockchip Buildroot SDK, not a guarantee of the same extensions in upstream Buildroot/Weston or every ArmSoM board. Match the actual SoC, board, SDK/BSP, kernel, display and input hardware; the source does not list a kernel version. The examples are not ArmSoM measurements; no commands or hardware tests were executed.
Both sources are V1.0.0; all 16 chapters are retained. ZH uses three Chinese figures; EN/RU/DE use three English figures. SDK dates versus Buildroot years in the support table appear inconsistent and are preserved. The §4.1 uClibc-only statement is historical source wording; check the actual SDK. The §6 export example lacks an assignment equals sign; it is retained as a source issue, not a ready-to-run command. §8 mixes foo-barboo and foo-bar_boo; §14.7 contains output:eDP-1::rotate180 with a double colon. Preserve and verify against the actual parser.
Buildroot automates cross-compilation of a complete embedded Linux system. Rockchip integrates chip BSP settings, hardware-acceleration configurations and customized third-party packages for secondary development. The following is the source support matrix, not an ArmSoM support commitment.
| Buildroot version | SDK release date (source) | Source-verified chips |
|---|---|---|
| 2021.11 | 2018-06-20 | RK3588, RK356X, RK3399, RK3326/PX30/RK3358, RK3308, RK3399, RK3288, RK312X, RK3036 |
| 2018.02 | 2022-01-15 | RK356X, RK3399, RK3326/PX30/RK3358, RK3308, RK3399, RK3288, RK312X, RK3036, RK3399PRO, RK1808, RK1806, RV1126/RV1109, RK3328 |
1. Buildroot Third-Party Package Download Mechanism
The SDK integrates the Buildroot third-party package download mechanism to ensure effective downloads for customers. A more flexible mechanism has now been adopted, which adds an archives directory based on original dl , pre-storing third-party packages. If unable to connect to Google, it will switch to using the domestic kgithub mirror, and prioritize downloading from the source specified in the mk script. If that fails, it will attempt the mirror source configured in the mk script and defconfig, and finally resort to the official backup source. In the official tree, most source codes are obtained using wget; only a small portion is through their respective git, mercurial, or svn repositories.
2. Setting Environment Variables
In the SDK directory:
source buildroot/envsetup.sh <config_name>
config_name can be listed with source buildroot/envsetup.sh to select the specific platform for compilation.
3. Compilation Modules and Systems
Choose an appropriate compilation platform, and then you can compile each package, which mainly consists of three parts: config, build, and install. The detailed steps are as follows. Enter the buildroot directory: Run make <package> to build and install a package and its dependencies. For packages that depend on Buildroot, there are many special make targets that can be called independently. Like this:
make <package>-<target>
| Command/target | Description |
|---|---|
| source | Get the source code (download tarball, clone source repositories, etc.) |
| depends | Build and install all dependencies required for building the software package |
| extract | Place the source code in the package build directory (extract tarball, copy source code, etc.) |
| patch | Apply patches, if any |
| configure | Run the configure command, if any |
| build | Run the compilation command |
| install-staging | Target package: Perform the necessary installation of the package in the staging directory |
| install | Target package: Run the previous two installation commands Host package: Run the package installation in the host directory |
Additionally, there are other useful targets
| command/target | Description |
|---|---|
| show-depends | Show the dependencies required to build the software package |
| clean | Run the package clean command, can also uninstall the software from the target and staging directories; note that this is not implemented for all packages |
| dirclean | Delete the entire package build directory |
| rebuild | Re-run the compilation command |
| reconfigure | Re-run the configuration command |
For example, to build, configure, install, and rebuild modifications for the rockchip-test package:
### Compile package
buildroot$ make rockchip-test-configure
buildroot$ make rockchip-test-build
buildroot$ make rockchip-test-install

### Rebuild package
buildroot$ make rockchip-test-reconfigure
buildroot$ make rockchip-test-rebuild
buildroot$ make rockchip-test-reinstall

### Clean package
buildroot$ make rockchip-test-dirclean
If you need to modify the configuration, you can run make menuconfig , for example:
buildroot$ make menuconfig
In the configuration tool, you can find relevant help describing the purpose of each menu entry. Once the tool completes the configuration, it will generate a .config file containing the configuration description. This file will be used by the Makefile to perform the required tasks. Then, execute the make command. To build the Buildroot system, simply run make .
buildroot$ make
Save to rootfs configuration file buildroot$ make update-defconfig The output of Buildroot compilation is in the output directory, which contains several subdirectories:
- images: The storage directory for all images (file systems, such as ext2/4, squashfs, cpio, and other format images).
- build: All components are compiled (this includes the tools required to run on the host Buildroot and the packages compiled for the target). The build/ directory contains a subdirectory for each component.
- staging: The hierarchy is similar to the hierarchy of root file system. This directory contains the installation package of the cross-compilation toolchain and all user space packages selected for the target. However, this directory is not intended to become the target’s root file system: it contains many development files, unstripped binaries, and libraries, which are also very large for embedded systems. These development files are used to provide the compilation libraries and other libraries required by the target dependencies.
- target: It almost contains the complete root file system for the
- target: everything needed is present (Buildroot cannot create them because Buildroot does not run as root and does not want to run as root). In addition, it does not have the correct permissions (for example, the setuid for the busybox binary). Therefore, this directory should not be used for your target. Instead, you should use one of the images built in the images/ directory. If you need to mount an external image in the root file system with NFS, you must generate the image in the images/ directory as the root user. Compared to staging/, target/ only contains the files and libraries required to run the selected target applications: development files (header files) do not exist, and binaries are stripped.
- host: Contains the installation of tools compiled for the host, which are necessary for the proper execution of Buildroot, including the cross-compilation toolchain.
4. Cross-Compilation Toolchain
Buildroot provides different solutions for building cross-compilation toolchains: The internal toolchain backend, referred to as the Buildroot toolchain in the configuration interface.
The external toolchain backend, referred to as the external toolchain in the configuration interface.
$ make menuconfig
  -> Toolchain
  │       -> Toolchain type (<choice> [=y])
The SDK defaults to using the internal toolchain.
4.1 Internal Toolchain Backend
The internal toolchain backend is a built-in backend that constructs a cross-compilation toolchain before building, which is used for user space applications and libraries in the target embedded system. This backend is the historical backend of Buildroot and is limited to the use of the uClibc C library (i.e., glibc and eglibc C libraries are not supported by this backend. For solutions using glibc or eglibc, see the external toolchain backend and cross-ystem toolchain backend). Advantages: Good compatibility with Buildroot Fast, only builds what is necessary Disadvantages: Requires rebuilding the toolchain during a clean process, which takes time. Consider using the external toolchain backend if you want to reduce your build time. Limited to the uClibc C library.
4.2 External Toolchain Backend
The external toolchain backend allows the use of existing prebuilt cross-compilation toolchains. Buildroot can recognize several common cross-compilation toolchains (ARM’s Linaro, ARM’s Sourcery CodeBench, x86, x86-64, PowerPC, MIPS, and SuperH, ADI’s Blackfin toolchain, Xilinx for Microblaze toolchain, etc.) and can download them automatically, or it can point to a custom toolchain that can be downloaded or installed locally. Advantages: Allows the use of well-known, well-tested cross-compilation toolchains. Avoids the build time of the cross-compilation toolchain, which is usually very important in the overall build time of the embedded Linux system. Not limited to uClibc: glibc and eglibc toolchains are supported. Disadvantages: If your prebuilt external toolchain has defects, it may be difficult to get a solution from the toolchain vendor unless you build the external toolchain with a cross toolchain. The SDK directory comes with built-in cross-compilation. When Buildroot’s external toolchain uses prebuilt cross-compilation in the SDK prebuilts directory, it is as follows:
| Directory | Description |
|---|---|
| prebuilts/gcc/linux-x86/aarch64/gcc-arm-10.3-2021.07-x86_64-aarch64-none-linux-gnu | gcc arm 10.3.1 64-bit toolchain |
| prebuilts/gcc/linux-x86/arm/gcc-arm-10.3-2021.07-x86_64-arm-none-linux-gnueabihf | gcc arm 10.3.1 32-bit toolchain |
The toolchain can be downloaded from the following Baidu Cloud disk as follows: Toolchain Download If the SDK needs to build a single module or third-party application, a cross-compilation environment needs to be configured. For example, the cross-compilation tools for RK3562 are located in the buildroot/output/rockchip_rk3562/host/usr directory. The bin/ directory of the tools and the aarch64-buildroot-linux-gnu/bin/ directory need to be set as environment variables. Run the script to automatically configure the environment variables in the top-level directory:
source buildroot/envsetup.sh rockchip_rk3562
Enter the command to view:
cd buildroot/output/rockchip_rk3562/host/usr/bin
./aarch64-linux-gcc --version
At this point, the following information will be printed:
aarch64-linux-gcc.br_real (Buildroot) 12.3.0
If the external toolchain requires the toolchain built in the SDK, the relevant configurations of configs/rockchip/toolchain/* can be integrated.
5. Using ccache Buildroot
By default, SDK compilation of Buildroot has ccache enabled, which is a compiler cache. The cache is located at $HOME/.buildroot-ccache . If you want to delete the cache, simply remove this directory. You can also obtain statistical information about the cache (its size, hit count, misses, etc.) by running make ccache-stats .
6. Package Download Location
The various tarballs downloaded by Buildroot are located in BR2_DL_DIR, which is the dl directory by default. Presetting the dl package can improve compilation efficiency and solve some issues with third-party package download failures. The SDK download location can be specified by setting the BUILDROOT_DL_DIR environment variable.
$ export BUILDROOT_DL_DIR <shared download location>
Add the line to ~/.bashrc to set the environment variable.
The download location can also be set in the .config file by BR2_DL_DIR option. This value will be overridden by the BUILDROOT_DL_DIR environment variable.
7. How to Add New Software Packages in Buildroot
How to integrate new software packages (user space libraries or applications) into Buildroot. Please refer to the related packages in buildroot/package/rockchip/* for adding new packages.
7.1 Create a Directory for Your Software in the Package Directory
For example, package/rockchip
7.2 Config.in File
Next, create a Config.in file, which will contain the option descriptions related to our rockchip software that are used and displayed in the configuration tool. It should basically include:
menuconfig BR2_PACKAGE_ROCKCHIP
        bool "Rockchip Platform"

if BR2_PACKAGE_ROCKCHIP

config BR2_PACKAGE_ROCKCHIP_HAS_ISP1
        bool
        help
         Has Rockchip ISP1
7.3 .mk Files
This is the most difficult part. Create a file named rockchip.mk. It describes how to download, configure, build, install, etc. Depending on the type of package, the .mk files must be written in different ways, using different infrastructure: Makefile for general software packages (not using automated tools or CMake): These are based on an infrastructure similar to that used for packages based on automated tools, but require more work from developers. They specify what configurations, compilations, installations, and cleaning of the package should be done. This infrastructure must be used
for all packages that do not use automated tools as their build system. In the future, other specialized infrastructure systems may be written for other builds. Makefile for software based on automated tools (autoconf, automake, etc.): We provide specialized infrastructure for these packages because automated tools are a very common build system. This infrastructure must be used for new software packages that rely on them using the build system automated tools. Makefile for software based on CMake: We provide a dedicated infrastructure for these packages because CMake is an increasingly common build system with standardized behavior. This infrastructure must be used for new software packages that rely on CMake.
8. Relationships Between Package Name, Configuration Items’ Name and Makefile Variable
In Buildroot, there are some relationships: the package name, which is the package directory name (and the name of the *.mk file); the configuration items’ name is declared in the Config.in file; the Makefile variable prefix. The following rules must be used to maintain consistency between these elements: The package directory and the *mk name are the package name itself (e.g., package/foo- bar_boo/foo-bar_boo.mk); The target name is the package name itself (e.g., foo-barboo); The configuration items is the package name in capital ‘-‘ characters replaced with ‘’ and prefixed with BR2PACKAGE (e.g., BR2_PACKAGE_FOO_BAR_BOO); The .mk variable suffix starts with the capital package name as the prefix, ‘-‘ characters replaced with ‘‘(e.g., FOO_BAR_BOO_VERSION).
9. How to Add a Software Package from GitHub
Software packages managed on GitHub generally do not have a download link for the released package. However, it is possible to directly download the software package from the GitHub repository.
FOO_VERSION = v1.0 # tag or (abbreviated) commit ID
FOO_SITE = http://github.com/<user>/<package>/tarball/$(FOO_VERSION)
Note
• FOO_VERSION can be either a tag or a commit ID.
• The tarball name generated by GitHub matches the default value of Buildroot (e.g., foo-1234567.tar.gz), so it does not need to be specified in the .mk file.
• When using a commit ID as the version, generally, the first 7 characters of the SHA1 are sufficient.
10. Custom Module Development
Refer to the configuration switches in <SDK>/buildroot/configs/rockchip* for custom development of each module.
buildroot$ tree -L 2 configs/rockchip/
configs/rockchip/
├── base  # General base packages
│   ├── base.config
│   ├── common.config
│   ├── kernel.config
│   ├── recovery.config
│   └── tiny.config
├── benchmark.config # Benchmark scoring test tools
├── chips # Chip-related configurations
│   ├── rk3036_arm.config
│   ├── rk3036.config
│   ├── rk312x_arm.config
│   ├── rk312x.config
│   ├── rk3288_arm.config
│   ├── rk3288.config
│   ├── rk3308_aarch64.config
│   ├── rk3308_arm.config
│   ├── rk3308.config
│   ├── rk3326_aarch64.config
│   ├── rk3326_arm.config
│   ├── rk3326.config
│   ├── rk3399_aarch64.config
│   ├── rk3399_arm.config
│   ├── rk3399.config
│   ├── rk3399pro_aarch64.config
│   ├── rk3399pro_arm.config
│   ├── rk3399pro.config
│   ├── rk3399pro_npu_aarch64.config
│   ├── rk3399pro_npu_arm.config
│   ├── rk3399pro_npu.config
│   ├── rk3528_aarch64.config
│   ├── rk3528.config
│   ├── rk3562_aarch64.config
│   ├── rk3562_arm.config
│   ├── rk3562.config
│   ├── rk3566_rk3568_aarch64.config
│   ├── rk3566_rk3568_arm.config
│   ├── rk3566_rk3568.config
│   ├── rk3588_aarch64.config
│   ├── rk3588_arm.config
│   └── rk3588.config
├── chromium.config # Chromium browser
├── debug.config # Debug tool configuration
├── electric.config # Electric power configuration
├── font # Font configuration
│   ├── chinese.config
│   └── font.config
├── fs # File system format configuration
│   ├── e2fs.config
│   ├── exfat.config
│   ├── ntfs.config
│   ├── ubifs.config
│   └── vfat.config
├── gdb.config # GDB debugging
├── gpu # GPU configuration
│   └── gpu.config
├── libcamera.config # libcamera configuration
├── locale
│   ├── chinese.config
│   └── locale.config
├── multimedia # Multimedia configuration
│   ├── audio.config
│   ├── camera.config
│   ├── gst
│   ├── mpp.config
│   └── rockit.config
├── npu2.config # NPU configuration
├── powermanager.config # Power management configuration
├── rknn_demo.conf
├── tee_aarch64_v2.config
├── test.config
├── toolchain # Toolchain configuration
│   ├── arm_10_aarch64.config
│   ├── arm_10_armhf.config
│   └── arm_8_armhf.config
├── weston.config # Weston configuration
├── wifibt # RKWIFIBT network configuration
│   ├── bt.config
│   ├── network.config
│   └── wireless.config
└── x11.config # X11 configuration
...
11. Desktop Applications
Buildroot uses Weston DRM based on the Wayland protocol as the display backend by default. As shown in the following figure:
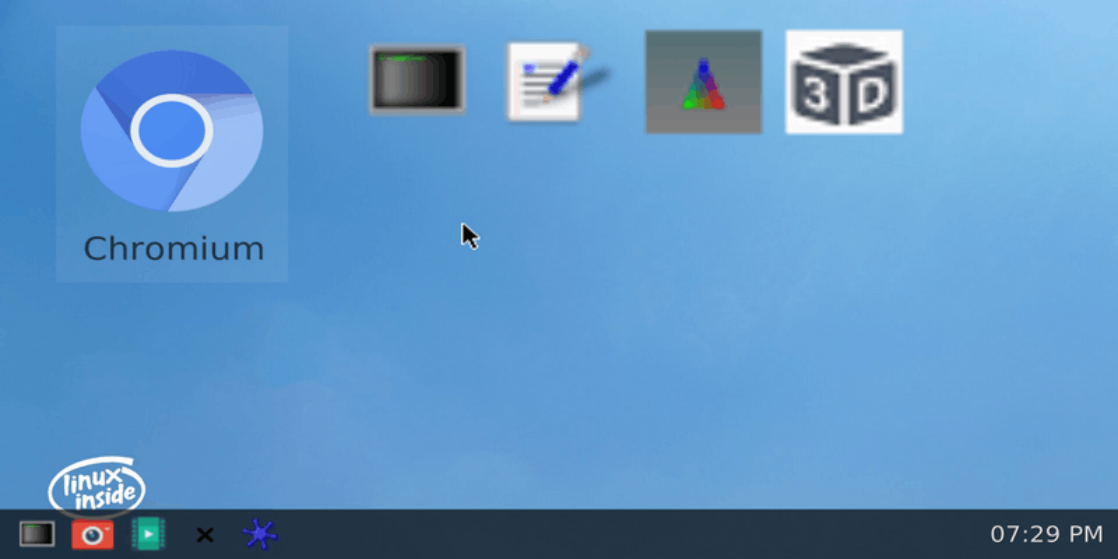
These Weston applications provide some basic configuration options for status bars, backgrounds, such as Chromium browser, Terminal, Launchers configuration, camera preview, multi-channel video, GPU, mouse, and other demos. For more demos, they can be added through the configuration in /etc/xdg/weston/weston.ini.d/*. For more information on Weston parameter configuration and usage, refer to Weston Development. Note: Third-party UI frameworks may involve the risk of infringement without commercial authorization. If using Buildroot QT/Enlightenment/Minigui/LVGL, or other UI frameworks on the Rockchip platform, third-party authorization and technical support are required, as Rockchip officially does not provide related technical support and maintenance.
11.1 Weston Applications
Applications related to Weston clients used on Wayland:
/usr/bin/#
├── weston-calibrator
├── weston-clickdot
├── weston-cliptest
├── weston-confine
├── weston-content_protection
├── weston-debug
├── weston-dnd
├── weston-editor
├── weston-eventdemo
├── weston-flower
├── weston-fullscreen
├── weston-image
├── weston-multi-resource
├── weston-presentation-shm
├── weston-resizor
├── weston-scaler
├── weston-screenshooter
├── weston-simple-damage
├── weston-simple-dmabuf-egl
├── weston-simple-dmabuf-v4l
├── weston-simple-egl
├── weston-simple-shm
├── weston-simple-touch
├── weston-smoke
├── weston-stacking
├── weston-subsurfaces
├── weston-tablet
├── weston-terminal
├── weston-touch-calibrator
├── weston-transformed
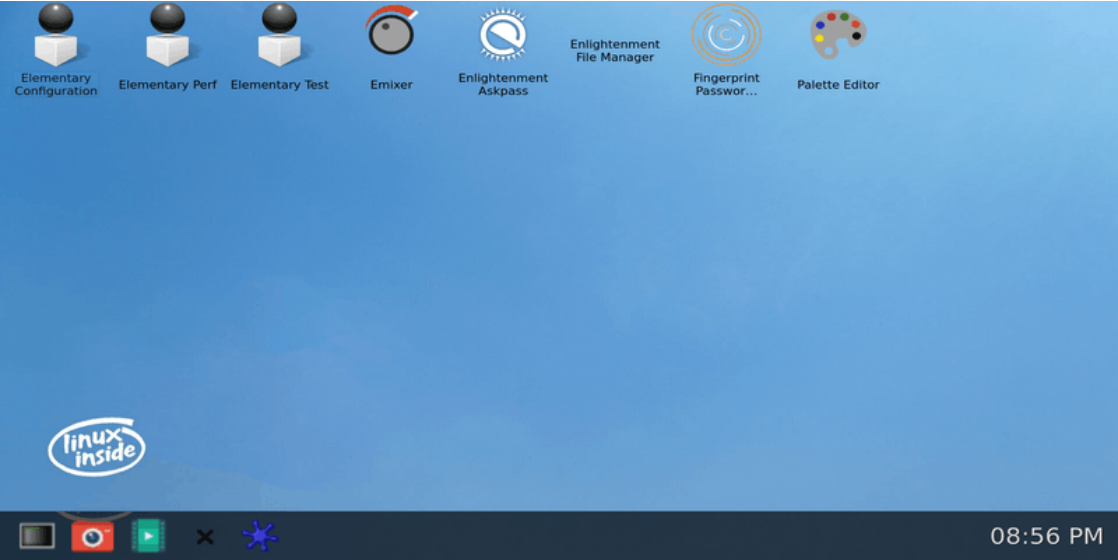
11.2 Enlightenment Desktop Application
Simply enable the relevant configurations as follows:
BR2_PACKAGE_EFL=y
BR2_PACKAGE_LUAJIT=y
BR2_PACKAGE_EFL_GSTREAMER1=y
BR2_PACKAGE_ENLIGHTENMENT=y
BR2_PACKAGE_EFL_WAYLAND=y
The actual running interface is shown in the following image:
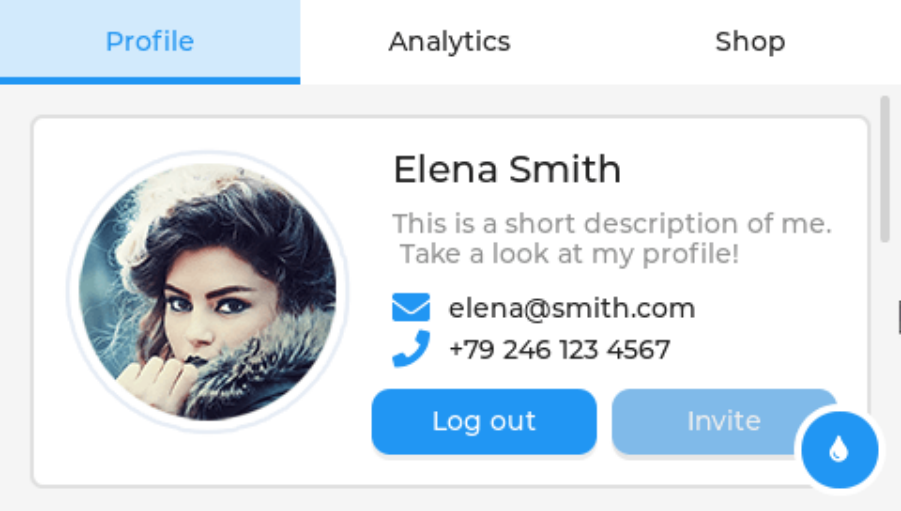
11.3 LVGL Desktop Application
The relevant configurations can be enabled as follows:
BR2_PACKAGE_LVGL=y
BR2_PACKAGE_LVGL_COLOR_DEPTH=32
BR2_PACKAGE_LV_DRIVERS=y
BR2_PACKAGE_LV_DRIVERS_USE_DRM=y
BR2_PACKAGE_LVGL_DEMO=y
BR2_PACKAGE_RK_DEMO=y
BR2_PACKAGE_LVGL_DEMO_USE_DRM=y
BR2_PACKAGE_FREETYPE=y
12. User and Password
User: root Password: rockchip
13. Weston Development
Weston is the official reference implementation of the Wayland open-source display protocol, and the display service of the Rockchip Buildroot SDK defaults to using the Weston drm backend.
13.1 Configuration Ways
There are several ways to configure Weston in Buildroot SDK: a. Boot Parameters These are the parameters carried by the command when starting Weston, such as weston –tty=2 . It is located in /etc/init.d/S49weston , and the corresponding location in the SDK code is: buildroot/package/weston/S49weston . b. weston.ini Configuration File
The .ini files Located in /etc/xdg/weston/weston.ini and /etc/xdg/weston/weston.ini.d/ . The corresponding location in the SDK code is, for example: buildroot/board/rockchip/common/base/etc/xdg/weston/weston.ini . Reference:https://fossies.org/linux/weston/man/weston.ini.man c. Special Environment Variables These types of environment variables are generally set in /etc/profile.d/weston.sh , and the corresponding location in the SDK code is: buildroot/package/weston/weston.sh . d. Dynamic Configuration File For the drm backend display function, Weston in Buildroot SDK provides some dynamic configuration support. The default path is /tmp/.weston_drm.conf , which can be specified by the environment variable WESTON_DRM_CONFIG . e. Udev Rules Some configurations of input devices in Weston need to be done through udev rules.
14. Specific Configuration
14.1 Screen Identification
Weston distinguishes screen devices using the output (head) name. Specific information can be obtained through the Weston boot log:
# weston&
[02:11:29.746] DRM: head 'DSI-1' found ...
14.2 Mouse Style and Size
Weston supports setting the mouse style and size in the shell section of the weston.ini configuration file, as follows:
# /etc/xdg/weston/weston.ini

[shell]
cursor-theme=whiteglass # Buildroot SDK supports comix/obsidian/xcursor/xcursor-transparent mouse theme packages
cursor-size=24
14.3 Status Bar Configuration
Weston supports setting the status bar background color, position and scaling in the shell section of weston.ini configuration file, and setting quick start programs in the launcher section, such as:
# /etc/xdg/weston/weston.ini

[shell]
panel-color=0x90ff0000
# Color format is ARGB8888

panel-position=bottom
# top|bottom|left|right|none, none means disabled

panel-scale=4
# 4x scaling

[launcher]
icon=/usr/share/icons/gnome/24x24/apps/utilities-terminal.png
# Icon path

path=/usr/bin/gnome-terminal
# Shortcut launch command
14.4 Background Configuration
Weston supports setting background patterns and colors in the shell section of the weston.ini configuration file, as well as setting quick start programs in the desktop-launcher section, such as:
# /etc/xdg/weston/weston.ini

[shell]
background-image=/usr/share/backgrounds/gnome/Aqua.jpg
# Absolute path of the background pattern (wallpaper)

background-type=tile
# scale|scale-crop|tile

background-color=0xff002244
# Color format is ARGB8888, takes effect when no background pattern is set

[desktop-launcher]
icon=/usr/share/icons/hicolor/256x256/apps/chromium.png
# Icon path

path=/usr/bin/chromium www.baidu.com
# Shortcut launch command
displayname=chromium
# Display name
14.5 Standby and Lock Screen Configuration
The idle standby duration for Weston can be configured in the startup parameters or in the core section of the weston.ini file, as follows:
# /etc/init.d/S49weston
start_weston()
{
  /usr/bin/weston --idle-time=0&  # 0 means no standby, unit is seconds
}
Or:
# /etc/xdg/weston/weston.ini

[core]
idle-time=10
The lock screen for Weston can be configured in the shell section of the weston.ini file, as follows:
# /etc/xdg/weston/weston.ini

[shell]
locking=false
# Disable lock screen

lockscreen-icon=/usr/share/icons/gnome/256x256/actions/lock.png
# Unlock button image

lockscreen=/usr/share/backgrounds/gnome/Garden.jpg
# Lock screen background
14.6 Display Color Format Configuration
The default display format for Weston in Buildroot SDK is ARGB8888. For some low-performance platforms, it can be configured as RGB565 in the core section of weston.ini, as follows:
# /etc/xdg/weston/weston.ini

[core]
gbm-format=rgb565
# xrgb8888|argb8888|rgb565|xrgb2101010
The display format for each screen can also be individually configured in the output section of weston.ini, as follows:
# /etc/xdg/weston/weston.ini

[output]
name=LVDS-1

gbm-format=rgb565
# xrgb8888|argb8888|rgb565|xrgb2101010
14.7 Screen Orientation Configuration
The screen display orientation of Weston can be configured in the output section of weston.ini, as follows:
# /etc/xdg/weston/weston.ini

[output]
name=LVDS-1

transform=rotate-90
# normal|rotate-90|rotate-180|rotate-270|flipped|flipped-90|flipped-180|flipped-270
If dynamic screen orientation configuration is required, it can be configured through a dynamic configuration file, as follows:
echo "output:all:rotate90" > /tmp/.weston_drm.conf # Rotate all screens by 90 degrees
echo "output:eDP-1::rotate180" > /tmp/.weston_drm.conf # Rotate eDP-1 by 180 degrees
14.8 Resolution and Scaling Configuration
The screen resolution and scaling for Weston can be configured in the output section of the weston.ini file, as follows:
# /etc/xdg/weston/weston.ini

[output]
name=LVDS-1

mode=1280x800
# Must be a valid resolution supported by the screen

scale=2
# Must be an integer multiple, support applications to achieve scaling
If you need to scale to a specific resolution (with the physical resolution remaining unchanged), you can configure the size of all screens through the WESTON_DRM_VIRTUAL_SIZE environment variable, as follows:
# /etc/profile.d/weston.sh
export WESTON_DRM_VIRTUAL_SIZE=1024x768
If you need to dynamically configure the resolution and scaling, you can use a dynamic configuration file, as follows:
echo "output:HDMI-A-1:mode=800x600" > /tmp/.weston_drm.conf # Change the resolution of HDMI-A-1 to 800x600
echo "output:eDP-1:rect=<10,20,410,620>" > /tmp/.weston_drm.conf # Display eDP-1 at position (10,20), scaled to a size of 400x600
echo "output:HDMI-A-1:size=1920x1080" > /tmp/.weston_drm.conf # Scale HDMI-A-1 to 1080p, with the physical resolution unchanged
When scaling, if the hardware VOP display module does not support scaling, it is necessary to rely on RGA for processing.
14.9 Freeze Screen
During the startup of Weston, there is a brief transition from the boot logo to the UI display where the screen goes black. If you need to prevent the screen from going black, you can briefly freeze the content of the Weston screen with the following methods: Use the custom –warm-up parameter to start displaying after the UI starts.
# /etc/init.d/S49weston
start_weston()
{
  /usr/bin/weston --warm-up&
}
Or
# /etc/init.d/S49weston
start_weston()
{
  export WESTON_FREEZE_DISPLAY=/tmp/.weston_freeze # Set special configuration file path
  touch /tmp/.weston_freeze # Freeze display
  /usr/bin/weston&
  sleep 1 && rm /tmp/.weston_freeze& # Unfreeze after 1 second
}
Or
# /etc/init.d/S49weston
start_weston()
{
  echo "output:all:freeze" > /tmp/.weston_drm.conf # Freeze display
  /usr/bin/weston&
  ...
  sleep 1 && echo "output:all:unfreeze" > /tmp/.weston_drm.conf& # Unfreeze after 1 second
}
14.10 Screen Status Configuration
The DRM framework supports forcing screen status configuration:
echo on > /sys/class/drm/card0-HDMI-A-1/status # Force HDMI-A-1 to be in the connected state
# on|off|detect, detect for hot-plug
For more specific dynamic screen status configuration, you can use dynamic configuration files, such as:
echo "output:DSI-1:off" > /tmp/.weston_drm.conf # Turn off DSI (without unplugging)
echo "output:HDMI-A-1:freeze" > /tmp/.weston_drm.conf # Freeze HDMI-A-1
echo "output:eDP-1:on" > /tmp/.weston_drm.conf # Turn on eDP
echo "compositor:state:off" > /tmp/.weston_drm.conf # Suspend display
echo "compositor:state:sleep" > /tmp/.weston_drm.conf # Suspend display, wake up with touch screen
echo "compositor:state:freeze" > /tmp/.weston_drm.conf # Freeze display
echo "compositor:state:on" > /tmp/.weston_drm.conf # Wake up display
14.11 Multi-screen Management
The Weston in Buildroot SDK supports multi-screen mirroring display, multi-screen extend display, screen position configuration, and hot-plug functions. For mirrored display, if the hardware VOP display module does not support scaling, it would try to use RGA for processing. Related configurations are set through environment variables, such as:
# /etc/profile.d/weston.sh
export WESTON_DRM_PRIMARY=HDMI-A-1 # Specify HDMI-A-1 as primary monitor
export WESTON_DRM_SINGLE_HEAD=1 # Force using single monitor
export WESTON_DRM_MIRROR=1 # In mirror mode (multi-screen with the same display), without setting this environment variable will be with different display
export WESTON_DRM_KEEP_RATIO=1 # In mirror mode, scaling maintains the aspect ratio, without setting this variable will be full screen by force
export WESTON_DRM_HEAD_MODE=primary # Only enable primary monitor
export WESTON_DRM_HEAD_MODE=internal # Only enable internal monitors
export WESTON_DRM_HEAD_MODE=external # Only enable external monitors
export WESTON_DRM_HEAD_MODE=external-dual # Enable all monitors, and prefer the external ones
export WESTON_DRM_HEAD_FALLBACK=1 # Fallback to any available monitor when none matched
export WESTON_DRM_MASTER=1 # Allow disabling unused monitors

export WESTON_OUTPUT_FLOW=horizontal # Laying outputs horizontally by default
export WESTON_OUTPUT_FLOW=vertical # Laying outputs vertically by default
export WESTON_OUTPUT_FLOW=same-as # Laying outputs at (0,0) by default
It also supports disabling specific screens individually in the output section of weston.ini:
# /etc/xdg/weston/weston.ini

[output]
name=LVDS-1

mode=off
# off|current|preferred|<WIDTHxHEIGHT@RATE>
Dynamic configuration files can also be used, such as:
echo "output:HDMI-A-1:pos=100,200" > /tmp/.weston_drm.conf # Set HDMI display position
echo "output:HDMI-A-1:prefer" > /tmp/.weston_drm.conf # Set applications to default display on HDMI
echo "output:HDMI-A-1:primary" > /tmp/.weston_drm.conf # Set HDMI as the primary display
14.12 Configuration of Input Devices
The Weston service requires at least one input device by default. If there is no input device, the special settings in the core section of weston.ini is needed:
# /etc/xdg/weston/weston.ini

[core]
require-input=false
If there are multiple screens in Weston, you can bind input devices to screens through udev rules’s WL_OUTPUT env, such as:
# /lib/udev/rules.d/99-goodix-ts.rules
ATTRS{name}=="goodix-ts", ENV{WL_OUTPUT}="HDMI-A-1"
Or configure WL_SEAT:
# /lib/udev/rules.d/99-goodix-ts.rules
ATTRS{name}=="goodix-ts", ENV{WL_SEAT}="seat1"
# /etc/xdg/weston/weston.ini

[output]
name=LVDS-1

seat=seat1
Or through dynamic configuration files, such as:
echo "output:HDMI-A-1:input=*" > /tmp/.weston_drm.conf # Match all devices
echo "output:HDMI-A-1:input=" > /tmp/.weston_drm.conf # Disable input
echo "output:HDMI-A-1:input=event6" > /tmp/.weston_drm.conf
echo "output:HDMI-A-1:input=goodix*" > /tmp/.weston_drm.conf
echo "output:HDMI-A-1:input=goodix-ts" > /tmp/.weston_drm.conf
The vendor id, product id, and device name of the input device can be obtained by the evtest tool, such as:
# evtest /dev/input/event8 | head -3
Input driver version is 1.0.1
Input device ID: bus 0x18 vendor 0xdead product 0xbeef version 0x28bb
Input device name: "goodix-ts"
14.13 Touchscreen Calibration
If Weston requires touchscreen calibration, it can be done through the WESTON_TOUCH_CALIBRATION environment variable, as follows:
# /etc/profile.d/weston.sh
export WESTON_TOUCH_CALIBRATION="1.013788 0.0 -0.061495 0.0 1.332709 -0.276154"
Alternatively, it can be configured through udev rules, as shown below:
# /lib/udev/rules.d/99-goodix-ts.rules
ATTRS{name}=="goodix-ts", ENV{LIBINPUT_CALIBRATION_MATRIX}="1.013788 0.0 -0.061495 0.0 1.332709 -0.276154"
The calibration parameters can be obtained using the Weston calibration tool: weston-calibrator. After running the tool, it generates a number of random points. Once clicked in sequence, the calibration parameters are output, as follows: Final calibration values: 1.013788 0.0 -0.061495 0.0
1.332709 -0.276154 Alternatively, another calibration tool provided by Weston can be used: weston-touch-calibrator. It requires configuration as follows:
# /etc/xdg/weston/weston.ini

[libinput]
touchscreen_calibrator=true
calibration_helper=/bin/weston-calibration-helper.sh
14.14 Configuration on the Platform without GPU
The Weston in the SDK uses GPU for render acceleration by default. For platforms without GPUs or GPU is not powerful enough, Rockchip RGA 2D acceleration can also be used instead. The detailed configuration requires to enable BR2_PACKAGE_LINUX_RGA and BR2_PACKAGE_WESTON_DEFAULT_PIXMAN in the Buildroot SDK.
14.15 ARM AFBC Modifier Configuration
When the chip supports AFBC, Weston in the SDK supports the use of GPU-based AFBC compression format for display. Specific configuration:
# /etc/profile.d/weston.sh
# export WESTON_DISABLE_ATOMIC=1
export WESTON_ALLOW_GBM_MODIFIERS=1
14.16 Reduce UI Resolution
When UI performance or DDR bandwidth is insufficient, you can reduce the UI resolution. Specific configuration:
echo "output:HDMI-A-1:down-scale=0.5" >> /tmp/.weston_drm.conf # UI scaling by 0.5x
For more details, you can refer to the Weston development documentation <SDK>/docs/cn/Linux/Graphics/Rockchip_Developer_Guide_Buildroot_Weston_CN.pdf .
15. Screenshot Function
buildroot:/# killall weston
buildroot:/# weston --debug&
buildroot:/# weston-screenshooter
This captures the current screen.
16. Support for Chinese Display
Configuration for Weston as follows:
$ cat /etc/xdg/weston/weston.ini
[terminal]
font=Source Han Sans CN Medium
font-size=14
term=xterm-256color
Import the chinese.config from buildroot’s configs/rockchip/locale/ or enable the following configurations:
BR2_TOOLCHAIN_GLIBC_GCONV_LIBS_COPY=y
BR2_PACKAGE_BUSYBOX_UNICODE=y
# BR2_ENABLE_LOCALE_PURGE is not set
BR2_GENERATE_LOCALE="zh_CN.UTF-8"
Setting of environment variables in buildroot:
root@rk3588:/# cat /etc/profile.d/lang.sh
export LANG=zh_CN.utf8
Related commits in buildroot as follows:
buildroot$ git log --oneline
c476944fee configs: locale.config: Disable BR2_ENABLE_LOCALE_PURGE
f9654d67c8 localedef: Sync with 2018 SDK
2cbb75a54c coreutils: Support bypassing Unicode when printing
15340338dc busybox: Support bypassing Unicode when printing
5e9b8ba00c configs: rockchip: Add locale.config
863eed048e busybox: Support enabling unicode

device/rockchip$ git log --oneline
5c42211 post-rootfs.sh: Support setting LANG environment
Source differences and supplements
Chinese §3 explicitly says target/ lacks /dev/ device files; English omits that phrase. Chinese describes build/ as all components except the cross-compilation toolchain, whereas English says all components. Both statements are recorded without assuming which applies to a given SDK. Chinese §7 spells the package path builroot/package/rockchip/*; English has buildroot/package/rockchip/*. English §8 omits the underscore in its replacement-character prose; Chinese and the example use _. Verify the actual SDK.