
Source RK-KF-YF-029 V3.6.0. Pulse Width Modulation (PWM) uses a microprocessor’s digital output to control analog circuits and is widely used in measurement, communications, power control and conversion. This full guide covers Rockchip PWM features, usage and troubleshooting. Platform reference only: verify the ArmSoM board SoC, SDK/BSP, kernel, PWM channel, IOMUX and voltage domain. No ArmSoM hardware validation; not every board supports every listed feature. Chinese uses Chinese source figures; English/Russian/German use English source figures. Commands are source examples and were not executed on hardware.
| SoC | Source kernel minimum |
|---|---|
| RK3036 | Linux 4.4 |
| RK312X/PX3SE | Linux 4.4 |
| RK3288 | Linux 4.4 |
| RK322X/RK312XH | Linux 4.4 |
| RK3308 | Linux 4.4 |
| RK322XH/RK332X | Linux 4.4 |
| RK3326/PX30 | Linux 4.4 |
| RK3368/PX5 | Linux 4.4 |
| RK3399 | Linux 4.4 |
| RK1808 | Linux 4.4 |
| RV1109/RV1126 | Linux 4.19 |
| RK356X | Linux 4.19 |
| RK3588 | Linux 5.10 |
| RV1103/RV1106 | Linux 5.10 |
| RK3528 | Linux 4.19 |
| RK3562 | Linux 5.10 |
| RK3576 | Linux 6.1 |
| RV1103B | Linux 5.10 |
| RK3506 | Linux 6.1 |
| RV1126B | Linux 6.1 |
1. Driver
1.1 Kernel Driver
1.1.1 Driver Files
Linux-5.10 and below:
drivers/pwm/pwm-rockchip.c
Linux-6.1 and above:
drivers/pwm/pwm-rockchip.c
drivers/pwm/pwm-rockchip-test.c
Linux-6.1 begins to support the PWM v4 driver. PWM v1-v3 supported by Linux-5.10 and below share the v1 interface, hereinafter collectively referred to as PWM v1. Linux-6.1 adds a new test driver for testing functions and locating problems. It is also used as an application example of various PWM functions. CONFIG_PWM_ROCKCHIP_TEST needs to be turned on to use it.
1.1.2 DTS Configuration
In DTS, PWM nodes are usually referenced by other drivers, where PWM is configured and used through various interfaces provided by the PWM framework. This section takes a common backlight driver as an example. PWM v1:
backlight: backlight {
    compatible = "pwm-backlight";
    pwms = <&pwm5 0 25000 0>;
    ......
};
PWM v4:
backlight: backlight {
    compatible = "pwm-backlight";
    pwms = <&pwm1_6ch_1 0 25000 0>;
    ......
};
PWM v1 and PWM v4 nodes are named differently. PWM v1 uses pwmX: controller id X / 4, channel id X % 4. PWM v4 uses pwmX_Ych_Z: X is the controller id, Y its total channel count, and Z the channel id. Linux-4.4 and later support 3 PWM parameters instead of the 2 used by Linux-3.10; the count corresponds to #pwm-cells. See Documentation/devicetree/bindings/pwm/pwm.txt. The parameters are described below.
Parameter 1 is index (per-chip index of the PWM to request), fixed at 0. Each Rockchip PWM channel corresponds to one PWM device, and each device has only one chip.
Parameter 2, represents the period of the PWM output waveform, the unit is ns. The 25000 ns in the example converts to a frequency of 40KHz. Parameter 3 represents the optional parameter polarity, which defaults to 0. If you want to flip the polarity, set it to PWM_POLARITY_INVERTED.
2. Feature support
| SoC | PWM version | Channels | Continuous | Oneshot | Capture | Filter | Global control | Output offset | Counter | Frequency meter | IR output | IR input | Wave generator | Biphasic counter |
|---|---|---|---|---|---|---|---|---|---|---|---|---|---|---|
| RK3036 | v2 | 4 | Y | Y | Y | N | N | N | N | N | N | N | N | N |
| RK312X/PX3SE | v2 | 4 | Y | Y | Y | N | N | N | N | N | N | N | N | N |
| RK3288 | v2 | 4 | Y | Y | Y | N | N | N | N | N | N | N | N | N |
| RK322X/RK312XH | v2 | 4 | Y | Y | Y | N | N | N | N | N | N | N | N | N |
| RK3308 | v2 | 4 | Y | Y | Y | Y | N | N | N | N | N | Y | N | N |
| RK322XH/RK332X | v2 | 4 | Y | Y | Y | N | N | N | N | N | N | Y | N | N |
| RK3326/PX30 | v2 | 4 | Y | Y | Y | Y | N | N | N | N | N | Y | N | N |
| RK3368/PX5 | v2 | 4 | Y | Y | Y | N | N | N | N | N | N | N | N | N |
| RK3399 | v2 | 4 | Y | Y | Y | N | N | N | N | N | N | N | N | N |
| RK1808 | v2 | 4 | Y | Y | Y | Y | N | N | N | N | N | Y | N | N |
| RV1109/RV1126 | v2 | 4 | Y | Y | Y | Y | N | N | N | N | N | Y | N | N |
| RK356X | v2 | 4 | Y | Y | Y | Y | N | N | N | N | N | Y | N | N |
| RK3588 | v2 | 4 | Y | Y | Y | Y | N | N | N | N | N | Y | N | N |
| RV1103/RV1106 | v3 | 4 | Y | Y | Y | Y | N | Y | Y | N | Y | Y | N | N |
| RK3528 | v3 | 4 | Y | Y | Y | Y | N | Y | Y | N | Y | Y | N | N |
| RK3562 | v3 | 4 | Y | Y | Y | Y | N | Y | Y | N | Y | Y | N | N |
| RK3576 | v4(PWM0) | 2 | Y | Y | Y | Y | Y | Y | N | N | N | Y | N | N |
| RK3576 | v4(PWM1) | 6 | Y | Y | Y | Y | Y | Y | Y | Y | N | N | Y | Y |
| RK3576 | v4(PWM2) | 8 | Y | Y | Y | Y | Y | Y | N | N | Y | Y | N | Y |
| RV1103B | v4(PWM0) | 4 | Y | Y | Y | Y | Y | Y | Y | Y | N | Y | N | N |
| RV1103B | v4(PWM1) | 4 | Y | Y | Y | Y | Y | Y | N | N | N | N | N | N |
| RV1103B | v4(PWM2) | 4 | Y | Y | Y | Y | Y | Y | N | N | N | N | N | N |
| RK3506 | v4(PWM0) | 4 | Y | Y | Y | Y | Y | Y | N | N | N | Y | Y | N |
| RK3506 | v4(PWM1) | 8 | Y | Y | Y | Y | Y | Y | Y | Y | Y | N | N | Y |
| RV1126B | v4(PWM0) | 8 | Y | Y | Y | Y | Y | Y | N | N | N | N | N | Y |
| RV1126B | v4(PWM1) | 4 | Y | Y | Y | Y | Y | Y | Y | Y | N | Y | N | N |
| RV1126B | v4(PWM2) | 8 | Y | Y | Y | Y | Y | Y | N | N | N | N | Y | Y |
| RV1126B | v4(PWM3) | 8 | Y | Y | Y | Y | Y | Y | N | N | N | N | N | Y |
PWM v2 Each controller has 4 channels. Continuous, oneshot, and capture modes are supported on any channel of each controller. Filter can only be enabled on one channel per controller at a time. IR input is only supported on channel 3 of each controller. PWM v3 The newly added counter and output offset features are supported on any channel of each controller. Other functions are the same as PWM v2. PWM v4 The number of channels may vary among different controllers, with a maximum of 8 channels supported by a single controller. Continuous, oneshot, capture, global control, output offset and filter modes are supported on any channel of each controller. Counter, frequency meter, IR output, and IR input features are supported by some controllers, with only one channel of a single controller able to enable these functions simultaneously. Wave generator is supported by some controllers, and multiple channels of a single controller can enable this function simultaneously. Biphasic counter is supported by some controllers, and multiple channels of a single controller can support this function. For DTS configuration, you can refer to arch/arm/boot/dts/rk3506g-iotest-pwm-test.dtsi. Only the PWM node corresponding to the A-phase channel needs to be enabled, and the B-phase channel requires the corresponding IOMUX configuration.
3. Application Notes
The application method of PWM kernel and user space has been explained in Documentation/devicetree/bindings/pwm/pwm.txt. This section mainly focuses on further expansion of the PWM features of the Rockchip platform.
3.1 Kernel Driver
If you want to use PWM in the Kernel driver, you can refer to the configuration method of the backlight driver in the “DTS Configuration” chapter, add the pwms attribute under the driver node, and then get/put the PWM device through the following interface:
struct pwm_device *pwm_get(struct device *dev, const char *con_id);
void pwm_put(struct pwm_device *pwm);

struct pwm_device *devm_pwm_get(struct device *dev, const char *con_id);
struct pwm_device *devm_fwnode_pwm_get(struct device *dev, struct fwnode_handle *fwnode, const char *con_id);
For detailed implementation and function description, see include/linux/pwm.h and drivers/pwm/core.c. The interfaces provided by the PWM framework (extracted from Linux-5.10, all interfaces related to legacy drivers have been deleted on Linux-6.1):
/**
 * struct pwm_ops - PWM controller operations
 * @request: optional hook for requesting a PWM
 * @free: optional hook for freeing a PWM
 * @capture: capture and report PWM signal
 * @apply: atomically apply a new PWM config
 * @get_state: get the current PWM state. This function is only
 *         called once per PWM device when the PWM chip is
 *         registered.
 * @get_output_type_supported: get the supported output type of this PWM
 * @owner: helps prevent removal of modules exporting active PWMs
 * @config: configure duty cycles and period length for this PWM
 * @set_polarity: configure the polarity of this PWM
 * @enable: enable PWM output toggling
 * @disable: disable PWM output toggling
 */
struct pwm_ops {
    int (*request)(struct pwm_chip *chip, struct pwm_device *pwm);
    void (*free)(struct pwm_chip *chip, struct pwm_device *pwm);
    int (*capture)(struct pwm_chip *chip, struct pwm_device *pwm,
               struct pwm_capture *result, unsigned long timeout);
    int (*apply)(struct pwm_chip *chip, struct pwm_device *pwm,
             const struct pwm_state *state);
    void (*get_state)(struct pwm_chip *chip, struct pwm_device *pwm,
              struct pwm_state *state);
    int (*get_output_type_supported)(struct pwm_chip *chip,
            struct pwm_device *pwm);
    struct module *owner;

    /* Only used by legacy drivers */
    int (*config)(struct pwm_chip *chip, struct pwm_device *pwm,
              int duty_ns, int period_ns);
    int (*set_polarity)(struct pwm_chip *chip, struct pwm_device *pwm,
                enum pwm_polarity polarity);
    int (*enable)(struct pwm_chip *chip, struct pwm_device *pwm);
    void (*disable)(struct pwm_chip *chip, struct pwm_device *pwm);

    ANDROID_KABI_RESERVE(1);
};
Linux-4.4 and above kernels no longer implement interfaces such as config, enable and disable, but implement apply instead. The purpose is to use the int pwm_apply_state(struct pwm_device *pwm, const struct pwm_state *state) function to atomically change multiple parameters of the PWM device through struct pwm_state .
/*
 * struct pwm_state - state of a PWM channel
 * @period: PWM period (in nanoseconds)
 * @duty_cycle: PWM duty cycle (in nanoseconds)
 * @polarity: PWM polarity
 * @enabled: PWM enabled status
 * @usage_power: If set, the PWM driver is only required to maintain the power
 *               output but has more freedom regarding signal form.
 *               If supported, the signal can be optimized, for example to
 *               improve EMI by phase shifting individual channels.
 */
struct pwm_state {
    u64 period;
    u64 duty_cycle;
    enum pwm_polarity polarity;
#ifdef CONFIG_PWM_ROCKCHIP_ONESHOT
    u64 oneshot_count;
    u32 oneshot_repeat;
    u64 duty_offset;
#endif /* CONFIG_PWM_ROCKCHIP_ONESHOT */
    bool enabled;
    bool usage_power;
};
The basic functions of PWM, including continous, oneshot and caputure, can be applied through the interface provided by the PWM framework. The functions such as frequency meter, counter and wave generator supported by Rockchip platform PWM v4 need to include the header file include/linux/pwm-rockchip.h to use. The following is a detailed introduction to each function and its application. You can also refer to the demo driver drivers/pwm/pwm-rockchip-test.c.
3.1.1 Continous
Continuous output mode supports continuous output of PWM waveform with specified duty cycle.
pwm_get_state(pdev, &state);
state.period = period;
state.duty_cycle = duty;
state.polarity = polarity;
state.enabled = enable;
pwm_apply_state(pdev, &state);
3.1.2 Oneshot
Single output mode supports outputting a specified number of PWM waveforms. The CONFIG_PWM_ROCKCHIP_ONESHOT configuration needs to be turned on in the Kernel.
pwm_get_state(pdev, &state);
state.period = period;
state.duty_cycle = duty;
state.duty_offset = duty_offset;
state.polarity = polarity;
state.oneshot_count = rpt_first;
state.oneshot_repeat = rpt_second;
pwm_apply_state(pdev, &state);
oneshot_count represents the number of waveforms output with a specified duty cycle. The upper limit of the number of waveforms has been extended on PWM v4. The actual number of output waveforms is oneshot_repeat * oneshot_count. Oneshot mode will generate an interrupt after the output is completed. Users can add corresponding logic to the drivers/pwm/pwm-rockchip-irq-callbacks.h interrupt processing function as needed:
static void rockchip_pwm_oneshot_callback(struct pwm_device *pwm, struct pwm_state *state)
{
    /*
     * If you want to enable oneshot mode again, config and call
     * pwm_apply_state().
     *
     * struct pwm_state new_state;
     *
     * pwm_get_state(pwm, &new_state);
     * new_state.enabled = true;
     * ......
     * pwm_apply_state(pwm, &new_state);
     *
     */
}
3.1.3 Capture
Input capture mode supports calculating the duration of high and low levels of the input waveform.
pwm_capture(pdev, &cap_res, timeout_ms);
Return the calculated result cap_res after timeout_ms:
/**
 * struct pwm_capture - PWM capture data
 * @period: period of the PWM signal (in nanoseconds)
 * @duty_cycle: duty cycle of the PWM signal (in nanoseconds)
 */
struct pwm_capture {
    unsigned int period;
    unsigned int duty_cycle;
};
3.1.4 Filter
The input filter configuration needs to be used in conjunction with capture/IR input/biphasic counter, which can filter out noise in the input waveform that is lower than the width of the filter window.
rockchip_pwm_set_filter(pdev, filter_window_ns);
filter_window_ns is the width of the filter window.
3.1.5 Global control
Global control mode supports synchronous update of multi-channel configurations. Combined with continous/oneshot mode, it can realize output synchronization, complementary output and other functions.
// join the global control group
rockchip_pwm_global_ctrl(pdev0, PWM_GLOBAL_CTRL_JOIN);
rockchip_pwm_global_ctrl(pdev1, PWM_GLOBAL_CTRL_JOIN);
rockchip_pwm_global_ctrl(pdev2, PWM_GLOBAL_CTRL_JOIN);
// assign one channel to obtain the permission of global control
rockchip_pwm_global_ctrl(pdev0, PWM_GLOBAL_CTRL_GRANT);
// use pwm_apply_state() to update configurations for each channel
......
// update the configs for all channels in group
rockchip_pwm_global_ctrl(pdev0, PWM_GLOBAL_CTRL_UPDATE);
// enable all channels in group
rockchip_pwm_global_ctrl(pdev0, PWM_GLOBAL_CTRL_ENABLE);
// reclaim the permission of global control
rockchip_pwm_global_ctrl(pdev0, PWM_GLOBAL_CTRL_RECLAIM);
// exit the global control group
rockchip_pwm_global_ctrl(pdev0, PWM_GLOBAL_CTRL_EXIT);
rockchip_pwm_global_ctrl(pdev1, PWM_GLOBAL_CTRL_EXIT);
rockchip_pwm_global_ctrl(pdev2, PWM_GLOBAL_CTRL_EXIT);
Description of each command in global control mode:
/**
 * enum rockchip_pwm_global_ctrl_cmd - commands for pwm global ctrl
 * @PWM_GLOBAL_CTRL_JOIN: join the global control group
 * @PWM_GLOBAL_CTRL_EXIT: exit the global control group
 * @PWM_GLOBAL_CTRL_GRANT: obtian the permission of global control
 * @PWM_GLOBAL_CTRL_RECLAIM: reclaim the permission of global control
 * @PWM_GLOBAL_CTRL_UPDATE: update the configs for all channels in group
 * @PWM_GLOBAL_CTRL_ENABLE: enable all channels in group
 * @PWM_GLOBAL_CTRL_DISABLE: disable all channels in group
 */
enum rockchip_pwm_global_ctrl_cmd {
    PWM_GLOBAL_CTRL_JOIN,
    PWM_GLOBAL_CTRL_EXIT,
    PWM_GLOBAL_CTRL_GRANT,
    PWM_GLOBAL_CTRL_RECLAIM,
    PWM_GLOBAL_CTRL_UPDATE,
    PWM_GLOBAL_CTRL_ENABLE,
    PWM_GLOBAL_CTRL_DISABLE,
};
3.1.6 Output offset
Output offset mode supports PWM output waveform offset for a specified time. It is usually used in oneshot mode in combination with global control. It corresponds to the duty offset parameter in struct pwm_state . You can refer to oneshot mode description.
3.1.7 Counter
Input counting mode supports counting the number of input waveforms.
rockchip_pwm_set_counter(pdev, PWM_COUNTER_INPUT_FROM_IO, true);
msleep(timeout_ms);
rockchip_pwm_set_counter(pdev, 0, false);
rockchip_pwm_get_counter_result(pdev, &counter_res, true);
Close counter after timeout_ms and get the count result counter_res.
3.1.8 Frequency meter
Frequency counter mode supports calculating the frequency of the input waveform.
rockchip_pwm_set_freq_meter(pdev, timeout_ms, PWM_COUNTER_INPUT_FROM_IO, &freq_hz);
Returns the calculated result freq_hz after timeout_ms.
3.1.9 IR output
Infrared output mode supports outputting infrared waveforms in NEC format. In the Kernel, you need to enable the CONFIG_RC_CORE and CONFIG_LIRC configurations. The former enables framework support for RC devices, while the latter provides a user-space interface for RC devices.
#include <stdio.h>
#include <unistd.h>
#include <fcntl.h>
#include <string.h>
#include <stdlib.h>
#include <sys/ioctl.h>
#include <sys/mman.h>
int main(int argc, char **argv)
{
    int fp = 0;
    int len = 0;
    int buf[7] = {0};
    char name[32];
    if (argc != 2) {
        printf("Usage: ./rc_tx_test 0/1/2/...\n");
        return -1;
    }
    sprintf(name, "/dev/lirc%s", argv[1]);
    fp = open(name, O_RDWR);
    if (fp < 0)
    {
        printf("Error : Can not open lirc device\n");
        return -1;
    }
    buf[0] = 0x2328;
    buf[1] = 0x1194;
    buf[2] = 0x08ca;
    buf[3] = 0x0230;
    buf[4] = 0x0230;
    buf[5] = 0x069a;
    buf[6] = 0xf00f0ff0;
    len = write(fp, (char *)buf, sizeof(buf));
    if (len < 0)
    {
        printf("Error : Can not write to lirc device\n");
        return -1;
    }
    close(fp);
    printf("Exit ir tx test\n");
    return 0;
}
For detailed information on RC devices and their user-space interfaces, please refer to the documents located in the “Documentation/userspace-api/media/rc/” directory. According to the instructions in the “Documentation/userspace-api/media/rc/lirc-write.rst” document, the buffer written should be a pulse/space sequence. However, the Rockchip platform supports a simpler configuration method that requires only 7 parameters. For more details, please refer to the comments in the driver file “drivers/pwm/pwm-rockchip.c”.
static int rockchip_pwm_ir_transmit_v4(struct pwm_chip *chip, unsigned int *txbuf, unsigned int count)
{
......
    /*
     * Each value in the txbuf[] is in microseconds(us).
     * txbuf[0]: the low duration of NEC leader code.
     * txbuf[1]: the high duration of NEC leader code.
     * txbuf[2]: the high duration of NEC repeat code.
     * txbuf[3]: the low duration of NEC logic '0' and '1'.
     * txbuf[4]: the high duration of NEC logic '0'.
     * txbuf[5]: the high duration of NEC logic '1'.
     * txbuf[6]:
     * For 8-bit address code:
     *   bit[31:24]             bit[23:16]    bit[15:8]              bit[7:0]
     *   command inverted code  command code  address inverted code  address code
     *
     * For 16-bit address code:
     *   bit[31:24]             bit[23:16]    bit[15:8]              bit[7:0]
     *   command inverted code  command code  address code bit[15:8] address code bit[7:0]
     */
    preload = txbuf[0] << IR_TRANS_OUT_LOW_PRELOAD_SHIFT |
          txbuf[1] << IR_TRANS_OUT_HIGH_PRELOAD_SHIFT;
    spreload = txbuf[2] << IR_TRANS_OUT_HIGH_SIMPLE_PRELOAD_SHIFT;
    low_period = txbuf[3] << IR_TRANS_OUT_DATA_LOW_PERIOD_SHIFT;
    high_period = txbuf[4] << IR_TRANS_OUT_HIGH_PERIOD_FOR_ZERO_SHIFT |
              txbuf[5] << IR_TRANS_OUT_HIGH_PERIOD_FOR_ONE_SHIFT;
    tx_value = txbuf[6] << IR_TRANS_OUT_VALUE_SHIFT;
......
}
3.1.10 IR input
For details, please refer to the document “Rockchip_Developer_Guide_PWM_IR_CN”. The corresponding kernel driver is driver/input/remotectl/rockchip_pwm_remotectl.c.
3.1.11 Wave generator
Waveform generator mode supports outputting specified waveforms according to the configuration in the wave table.
// setup the duty table
for (i = 0; i < PWM_TABLE_MAX; i++)
    table[i] = i * PWM_WAVE_STEP;
duty_table.table = table;
duty_table.offset = (channel_id % 3) * PWM_TABLE_MAX;
duty_table.len = PWM_TABLE_MAX;

// setup the repeat time for each parameter in table
wave_config.rpt = PWM_WAVE_RPT;

// setup the clk rate
wave_config.clk_rate = 400000;

// If duty_en is true, the wave will get duty config from table each PWM_WAVE_RPT period, and the same to period_en
wave_config.duty_table = &duty_table;
wave_config.period_table = NULL;
wave_config.enable = enable;
wave_config.duty_en = true;
wave_config.period_en = false;

// setup the width_mode and update_mode
wave_config.width_mode = PWM_WIDTH_MODE;
wave_config.update_mode = PWM_WAVE_INCREASING_THEN_DECREASING;

// setup the start and end index in duty/period table
wave_config.duty_max = (channel_id % 3 + 1) * PWM_TABLE_MAX - 1;
wave_config.duty_min = (channel_id % 3) * PWM_TABLE_MAX;
wave_config.period_max = 0;
wave_config.period_min = 0;
wave_config.offset = 0;

// setup the middle index to change table config in interrupt if needed.
wave_config.middle = PWM_TABLE_MAX / 2;
rockchip_pwm_set_wave(pdev, &wave_config);

// enable the continous mode
pwm_get_state(pdev, &state);
state.period = period;
state.duty_cycle = duty;
state.polarity = polarity;
state.enabled = enable;
pwm_apply_state(pdev, &state);
The configuration and description related to wave mode are as follows:
/**
 * enum rockchip_pwm_wave_table_width_mode - element width of pwm wave table
 * @PWM_WAVE_TABLE_8BITS_WIDTH: each element in table is 8bits
 * @PWM_WAVE_TABLE_16BITS_WIDTH: each element in table is 16bits
 */
enum rockchip_pwm_wave_table_width_mode {
    PWM_WAVE_TABLE_8BITS_WIDTH,
    PWM_WAVE_TABLE_16BITS_WIDTH,
};

/**
 * enum rockchip_pwm_wave_update_mode - update mode of wave generator
 * @PWM_WAVE_INCREASING:
 *     The wave table address will wrap back to minimum address when increase to
 *     maximum and then increase again.
 * @PWM_WAVE_INCREASING_THEN_DECREASING:
 *     The wave table address will change to decreasing when increasing to the maximum
 *     address. it will return to increasing when decrease to the minimum value.
 */
enum rockchip_pwm_wave_update_mode {
    PWM_WAVE_INCREASING,
    PWM_WAVE_INCREASING_THEN_DECREASING,
};

/**
 * struct rockchip_pwm_wave_config - wave generator config object
 * @duty_table: the wave table config of duty
 * @period_table: the wave table config of period
 * @enable: enable or disable wave generator
 * @duty_en: to update duty by duty table or not
 * @period_en: to update period by period table or not
 * @clk_rate: the dclk rate in wave generator mode
 * @rpt: the number of repeated effective periods
 * @width_mode: the width mode of wave table
 * @update_mode: the update mode of wave generator
 * @duty_max: the maximum address of duty table
 * @duty_min: the minimum address of duty table
 * @period_max: the maximum address of period table
 * @period_min: the minimum address of period table
 * @offset: the initial offset address of duty and period
 * @middle: the middle address of duty and period
 * @max_hold: the time to stop at maximum address
 * @min_hold: the time to stop at minimum address
 * @middle_hold: the time to stop at middle address
 */
struct rockchip_pwm_wave_config {
    struct rockchip_pwm_wave_table *duty_table;
    struct rockchip_pwm_wave_table *period_table;
    bool enable;
    bool duty_en;
    bool period_en;
    unsigned long clk_rate;
    u16 rpt;
    u32 width_mode;
    u32 update_mode;
    u32 duty_max;
    u32 duty_min;
    u32 period_max;
    u32 period_min;
    u32 offset;
    u32 middle;
    u32 max_hold;
    u32 min_hold;
    u32 middle_hold;
};
PWM v4 has 768 * 8bit space in wave generator mode for storing duty/period configuration. After turning on duty_en/period_en, new data will be fetched from the duty_min + offset/period_min + offset index in duty_table/period_table every rpt cycle. Configuration value (unit: ns) until duty_max/period_max. Then it will re-enter the next cycle according to update_mode. If it is oneshot mode, it will stop after oneshot_repeat cycles, while continous mode will continue to output until manually stopped. Wave supports width_mode switching (768 * 8bit and 384 * 16bit). Under the same working clock dclk, 16bit mode will support larger duty/period configuration. Interrupts will be generated at the configured middle and max indexes. Users can add corresponding logic to the drivers/pwm/pwm-rockchip-irq-callbacks.h interrupt handling function as needed:
static void rockchip_pwm_wave_middle_callback(struct pwm_device *pwm)
{
    /*
     * If you want to update the configuration of wave table, set
     * struct rockchip_pwm_wave_table and call rockchip_pwm_set_wave().
     *
     * struct rockchip_pwm_wave_config wave_config;
     * struct rockchip_pwm_wave_table duty_table;
     *
     * //fill the duty table
     * ......
     * wave_config.duty_table = &duty_table;
     * wave_config.enable = true;
     * rockchip_pwm_set_wave(pwm, &wave_config);
     *
     */
}

static void rockchip_pwm_wave_max_callback(struct pwm_device *pwm)
{
    /*
     * If you want to update the configuration of wave table, set
     * struct rockchip_pwm_wave_table and call rockchip_pwm_set_wave().
     *
     * struct rockchip_pwm_wave_config wave_config;
     * struct rockchip_pwm_wave_table duty_table;
     *
     * //fill the duty table
     * ......
     * wave_config.duty_table = &duty_table;
     * wave_config.enable = true;
     * rockchip_pwm_set_wave(pwm, &wave_config);
     *
     */
}
3.1.12 Biphasic counter
Bidirectional counter mode supports five counting modes mode0-mode4 (see the description of the PWM chapter in TRM for details). Mode0 can be used as the above counter and freqency meter.
biphasic_config.enable = true;
biphasic_config.is_continuous = false;
biphasic_config.mode = biphasic_mode;
biphasic_config.delay_ms = timeout_ms;
rockchip_pwm_set_biphasic(pdev, &biphasic_config, &biphasic_res);
The parameters of biphasic_config are described as follows:
/**
 * struct rockchip_pwm_biphasic_config - biphasic counter config object
 * @enable: enable: enable or disable biphasic counter
 * @is_continuous: biphascic counter will not stop at the end of timer in continuous mode
 * @mode: the mode of biphasic counter
 * @delay_ms: time to wait, in milliseconds, before getting biphasic counter result
 */
struct rockchip_pwm_biphasic_config {
    bool enable;
    bool is_continuous;
    u8 mode;
    u32 delay_ms;
};
In non-continous mode, the count result biphasic_res is returned after timeout_ms. In continous mode, counting will continue until manual shutdown, and the counting results can be obtained in real time through int rockchip_pwm_get_biphasic_result(struct pwm_device *pwm, unsigned long *biphasic_res) . biphasic counter mode description:
/**
 * enum rockchip_pwm_biphasic_mode - mode of biphasic counter
 * @PWM_BIPHASIC_COUNTER_MODE0: single phase increase mode with A-phase
 * @PWM_BIPHASIC_COUNTER_MODE1: single phase increase/decrease mode with A-phase
 * @PWM_BIPHASIC_COUNTER_MODE2: dual phase with A/B-phase mode
 * @PWM_BIPHASIC_COUNTER_MODE3: dual phase with A/B-phase 2 times frequency mode
 * @PWM_BIPHASIC_COUNTER_MODE4: dual phase with A/B-phase 4 times frequency mode
 */
enum rockchip_pwm_biphasic_mode {
    PWM_BIPHASIC_COUNTER_MODE0,
    PWM_BIPHASIC_COUNTER_MODE1,
    PWM_BIPHASIC_COUNTER_MODE2,
    PWM_BIPHASIC_COUNTER_MODE3,
    PWM_BIPHASIC_COUNTER_MODE4,
    PWM_BIPHASIC_COUNTER_MODE0_FREQ,
};
PWM_BIPHASIC_COUNTER_MODE0 is equivalent to the counter function, and PWM_BIPHASIC_COUNTER_MODE0_FREQ is equivalent to the freqency meter function.
3.2 User space
The PWM framework provides a user layer interface in the /sys/class/pwm/ directory. For details, see drivers/pwm/sysfs.c. After the PWM driver is successfully loaded, the pwmchipX directory will be generated under it, such as pwmchip0, pwmchip1, etc., here The X has nothing to do with the controller or channel ID of the PWM, but is only related to the probe sequence of the PWM device.
root@linaro-alip:/# cat /sys/class/pwm/pwmchip0/
device/    export     npwm       power/     subsystem/ uevent     unexport
Writing Y to the export node will generate a pwmY directory in the current directory. Since each PWM device on the Rockchip platform has only one chip, the Y value can only be 0. Conversely, writing Y to the unexport node will delete the pwmY directory. There are the following operable nodes in the pwmY directory: enable: Writing 1 enables PWM, writing 0 disables PWM; polarity: There are two parameter options: normal or inversed, corresponding to the PWM polarity configuration PWM_POLARITY_NORMAL/PWM_POLARITY_INVERSED; duty_cycle: In normal mode, it represents the duration of high level in one cycle (unit: ns). In reversed mode, it represents the duration of low level in one cycle (unit: ns); period: represents the period of the PWM waveform (unit: ns); oneshot_count: CONFIG_PWM_ROCKCHIP_ONESHOT needs to be turned on, indicating the number of PWM waveforms in oneshot mode; oneshot_repeat: CONFIG_PWM_ROCKCHIP_ONESHOT needs to be turned on and is only supported by PWM v4. It indicates the number of times the oneshot mode is repeated. The final number of output waveforms is oneshot_repeat * oneshot_count; duty_offset: CONFIG_PWM_ROCKCHIP_ONESHOT needs to be turned on, indicating the offset time of the PWM output waveform (unit: ns); capture: Enable capture mode to obtain the duration of the high and low levels of the input waveform (unit: ns).
3.2.1 Continous
cd /sys/class/pwm/pwmchip0/
echo 0 > export
cd pwm0
echo 10000 > period
echo 5000 > duty_cycle
echo normal > polarity
echo 1 > enable
3.2.2 Oneshot
cd /sys/class/pwm/pwmchip0/
echo 0 > export
cd pwm0
echo 10000 > period
echo 5000 > duty_cycle
echo 1000 > duty_offset
echo normal > polarity
echo 100 > oneshot_count
echo 10 > oneshot_repeat
echo 1 > enable
3.2.3 Capture
cd /sys/class/pwm/pwmchip0/
echo 0 > export
cd pwm0
cat capture
4. FAQ
4.1 Connection of PWM Between U-Boot and Kernel
If U-Boot has the function of PWM voltage regulation, the PWM is still working at the kernel stage, the PWM clock gating count needs to be adjusted to be consistent with the current PWM state according to the current hardware status of the PWM. Otherwise, the clock driver may find that the unused PWM clock, turn off it, which causing the PWM failed to work. The above patch has been modified to ensure the PWM driver: drivers/pwm/pwm-rockchip.c , updated to the following submission points:
- kernel-4.4: commit e6f2796ef5b660a70102c02d6c15f65ff8701d76
- kernel-3.10: commit 5a3d9257d5e379391eb02457ccd70f28a8fb188b The frequency of the clock source used by U-Boot and kernel PWM is different, which will also cause switching in the middle, which may cause the PWM duty cycle to change, and similar crashes caused by insufficient PWM voltage regulation will occur. Consistent with the clock source or clock source of the kernel. Make sure that the PWM source clock and source clock frequency of U-Boot PWM is consistent with the kernel. Inconsistencies in the polarity and cycle configured by U-Boot and kernel can also lead to middle-state switching, which can lmake the changes for PWM duty cycle, and dead-machine problems such as a lack of PWM voltage control, so keep the U- Boot consistent with kernel’s polarity and cycle.
4.2 PWM Pin PULL State As PWM Regulator
When the device rebooting, the registers in the GRF may not reset(second global reset), but the PWM controller reset, which make the PWM pin to be a input state. This will change the default voltage of the PWM Regulator after rebooting by reseting the PWM pin pull state . Therefore, the PWM pin must be configured the same as the default state(pull-up or pull-down) in the kernel, which cannot be configured as “none”. This configuration only needs to be modified when the PWM is used as a voltage regulator, as the other functions can be ignored. Confirm the default pull-up and pull-down of this PWM pin through the hardware schematic diagram. For example, the RK3399 excavator board PWM2 is used as a voltage regulation function, and the PWM2 pin is found on the schematic diagram: GPIO1_C3/PWM2_d , where “d” means down for the default pull-down; if “u” means up for the default pull-up.
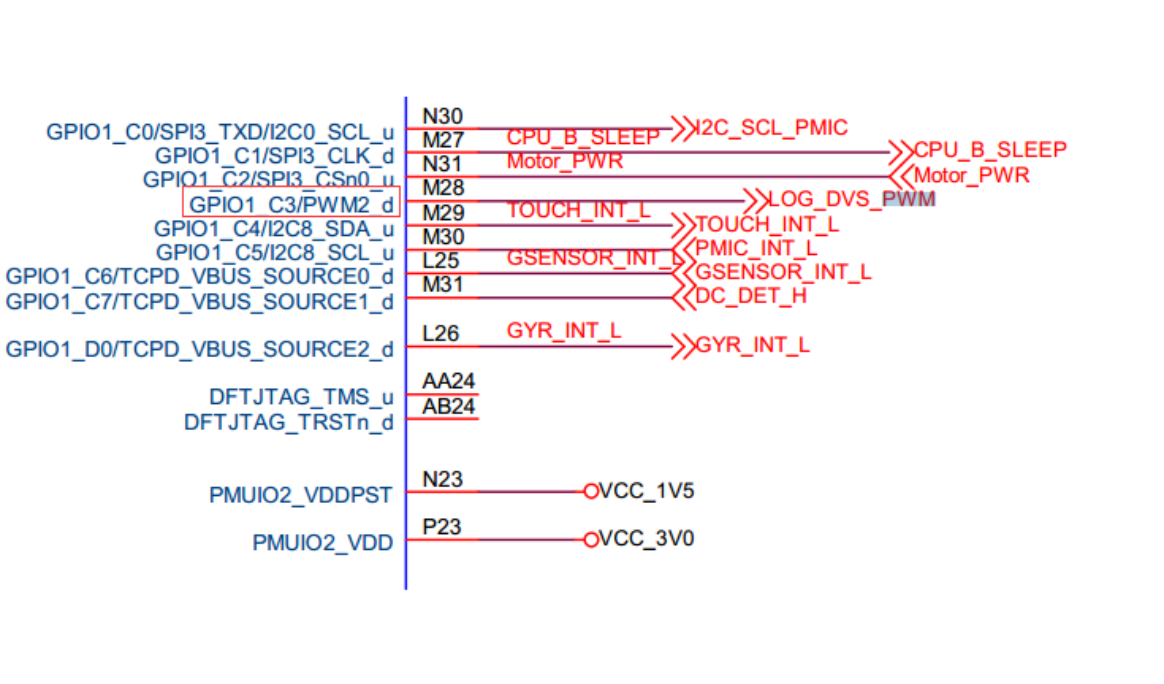
Legible schematic pin and net labels (blank means no net label in the figure):
| Pin/function | Ball | Net |
|---|---|---|
| GPIO1_C0/SPI3_TXD/I2C0_SCL_u | N30 | I2C_SCL_PMIC |
| GPIO1_C1/SPI3_CLK_d | M27 | CPU_B_SLEEP |
| GPIO1_C2/SPI3_CSn0_u | N31 | Motor_PWR |
| GPIO1_C3/PWM2_d | M28 | LOG_DVS_PWM |
| GPIO1_C4/I2C8_SDA_u | M29 | TOUCH_INT_L |
| GPIO1_C5/I2C8_SCL_u | M30 | PMIC_INT_L |
| GPIO1_C6/TCPD_VBUS_SOURCE0_d | L25 | GSENSOR_INT_L |
| GPIO1_C7/TCPD_VBUS_SOURCE1_d | M31 | DC_DET_H |
| GPIO1_D0/TCPD_VBUS_SOURCE2_d | L26 | GYR_INT_L |
| DFT_JTAG_TMS_u | AA24 | |
| DFT_JTAG_TRSTn_d | AB24 | |
| PMUIO2_VDDPST | N23 | VCC_1V5 |
| PMUIO2_VDD | P23 | VCC_3V0 |
Original English PDF figure — p.19
Define the PWM pull down pinctrl in dtsi:
pwm2_pin_pull_down: pwm2-pin-pull-down {
    rockchip,pins =
        <1 19 RK_FUNC_1 &pcfg_pull_down>;
};
Overwrite pinctrl config at dts:
&pwm2 {
    status = "okay";
    pinctrl-names = "active";
    pinctrl-0 = <&pwm2_pin_pull_down>;
};
4.3 Oscilloscope Cannot Detect PWM Waveform
If the oscilloscope cannot get the waveform, confirm the following method: First check whether the value of the PWM Counter Register register is changing. If there is a change, it indicates that the PWM is working. (Note that if you use the io command to read the PWM registers, it need to turn off gating of pclk for RK3328 and the chips later, you can find them in the table of the product documentation , because these chips PWM pclk and the working clock are separated ); if the value of this register has not changed, it means that the PWM is irregular. Generally, these exceptions are divided into the following cases:
- Clock error
- The register configuration problem of the PWM itself, the PWM is not enabled or the value of the duty count is greater than period, etc .;
- RK3368 needs to additionally configure bit12 of the register GRF_SOC_CON15 in GRF to 1. If the read-out value of the PWM Counter Register is changing, it means that the PWM is working, but the signal still cannot be measured. It should be a problem with the pinctrl:
- iomux error.
- io-domain configuration is incorrect;
- Interfered by the hardware;
Editorial note: Y means supported and N unsupported in the feature table. The source uses both PWM_POLARITY_INVERTED and PWM_POLARITY_INVERSED and writes the IR driver path as driver/input/remotectl/rockchip_pwm_remotectl.c. These source identifiers are retained; check the actual BSP headers and directories before use. Chip/kernel support does not establish board pin exposure or completed adaptation.